ITINERARIES
Southern & Central California
Two Week Trip for Families
California is one of the most beautiful and diverse states in America! This itinerary is a great “highlight” reel of the bottom half of the state for families with kids. It’s no where close to everything you could do, but it includes many family-friendly activities and gives a balance of natural beauty, attractions, and cities.
Our family did this trip in 2022 with kids ages 6-9 and it was and still is our favorite vacation! I try to continue to update this itinerary with any new information. If you find anything that’s incorrect, please contact us and let us know!
Deciding when to go
Flights
We recommend flying in and out of LAX. You could do this trip without making it a round trip (fly into San Diego and out San Francisco), but that’s makes flights sometimes more expensive, and renting a car much more expensive, so we chose round trip to save on cost.
Car Rental
Unless you can drive to California, you will need to rent a car for this trip. Budget is usually the cheapest, but shop around. I recommend renting a minivan if you have a family of 4-6 people. I don’t care if you think minivans “aren’t cool”, they are the most spacious and convenient for road trips with kids and have plenty of room for luggage.
Check the prices on car seat rentals at your car rental place. I have rented before and sometimes got great seats and other times did not. Sometimes they are unavailable or too pricey and it may be better to bring your own. You can pack them in a car seat travel pack or a big suitcase and check them as luggage.
Lodging
This trip involves hopping around to different places. Our family prefers hotels over vacation rentals for short stays because they are more flexible, check in and check out are always easy, and they have more services. We like to book within the same hotel family as much as possible to earn points and usually do Marriott Bonvoy. If you want more flexibility to choose different hotel brands, I recommend using booking.com. They have great customer service, free cancelations, good prices, and there website and app have a good user interface.
Hotels to Book:
- 3 Nights in San Diego
– Beach: Bahia Resort Hotel – located on the Mission peninsula, you get water views all around you, a beach, outdoor pool, and hot tub.
– City: Holiday Inn Express Downtown – walk around downtown, close to the zoo, has an outdoor pool, clean and nice but more affordable than other downtown options. Or try Residence Inn downtown for more space.
– Marina: Best Western PLUS Island Palms Hotel and Marina – close to downtown but on the marina! - 3 Nights near Disneyland (either a Disney or hotel or one of the many hotels in walking distance).
– Check the prices on the Disneyland resorts. There isn’t as big of an advantage to stay at an official Disney resort (unlike Walt Disney World), but there are still some nice perks.
– For Marriott people, we like the Courtyard Anaheim Theme Park Entrance because it’s very close to the park and has a fun pool area with waterslides (when it’s warm enough). We also like Fairfield Inn Anaheim for it’s proximity and Element for it’s family suits with bunk beds for kids.
– Another great option is the Howard Johnson by Wyndham Anaheim. It has an outdoor water park and very close walking distance to the park entrance. - 2 Nights in Yosemite
Try to get a room at the Yosemite Valley Lodge so you’re staying inside the park. If they don’t have availability or it’s too expensive, we also love Yosemite View Lodge – they have family suites and an indoor pool. - 2 Nights in Monterey (or Carmel-by-the-Sea)
Check out The Clement Monterey for lovely water views and walkable to shops and restaurants. - 3 Nights in Los Angeles (preferably near Hollywood or Burbank to be close to studios, Universal, and Griffith park)
– Hilton Los Angeles – Universal City – beautiful hotel with a nice pool and close to Universal Studios if you plan to do that park.
– The Adler a Hollywood Hotel – fun Hollywood charm near Hollywood Blvd.
– Best Wester Plus Media Center & Suites – nice hotel near studios in Burbank
Tickets
Buying advance tickets for some attractions will save time. We recommend buying these in advance (all links below lead to direct sources, not 3rd party sellers, and no affiliate links thanks to your membership fee):
- Sea World – buy the date-specific ticket to save on cost. You can add an all-day dining deal to your ticket if you’d like but think about your group’s eating habits to calculate if it’s a good deal for you.
- San Diego Zoo – get the 1-day pass or the 1-day pass plus if you want to do the 4D theater.
- Disneyland – for this itinerary, you’ll need the 2-day, 1 park per day tickets.
- Monterey Bay Aquarium – get standard general admission.
- Warner Brothers Studio Tour – unless you have kids under age 5
- Universal Studios Hollywood – purchase 1-day general admission. If you’ll be visiting during the summer or on a weekend, you may want to consider doing the Universal Express ticket or adding the Super Nintendo World early access ticket (see day 13 for details).
- Clothes that match the season. Some parts of Yosemite can be very hot in the summer. It can also be cold and snowy in Spring. Check the weather and make sure you are prepared. Overall, clothing should be casual and suited for outdoor activity. You can also bring a few pairs of nicer clothes if you’d like to dine at the park restaurants in the evenings.
- Athletic or hiking shoes (something good for hiking with good tread)
- Tevas or other shoes that can get wet if you or your kids want to play in rivers and lakes.
- All Toiletries
- Backpage or cross-shoulder bag for carrying essentials during hikes
- If you have toddlers or babies, I highly recommend bringing a backpack carrier for hiking. This is the one we used and liked >
- All chargers – phones, watches, tablets, etc.
- Sunscreen
- Sunglasses
- Medicines
- Coats/jackets
- Ponchos or rain coats
- Bug spray
Prices are always going to vary! But here are some ranges/estimates to help you budget:
- Flights (if needed) – $300-600 per person
- Rental Minivan for 3 days (if needed) – $300-600
- 2 hotel nights – $150-600 per night (varies greatly depending on where you stay)
- Food – $60-80/adult per day, $30-40/kid per day
- Gas – this will really depend on the car you rent and the price of gas, but keep it in mind!
- Shopping – this can vary a lot depending on your shopping habits. There is a great gift shop at the Visitor’s Center.
Jump to a Day
Day 1
Arrive in LA, Drive to San Diego
- If you can get a flight that arrives before 3pm that is ideal.
- Pick up your bags at luggage claim then walk outside and look for the purple “Rental Car Shuttles” sign.
- Take the shuttle for the company where you reserved a vehicle.
- Pick up your vehicle from the rental car facility.
(Skip this step if you can drive to Southern California)
- Plug in “La Jolla Cove” to a map app and begin the 2 hour drive toward San Diego
- When you arrive in La Jolla, there are free 2-3 hour parking spots along Coast Blvd. and the side streets. If you can’t find a spot you can park in this garage: 1200 Prospect St., La Jolla, CA
- Walk down to the beach and look for sea lions! Many like to come to the Cove Beach area, but make sure you keep your distance.
- Walk along the coastline and stay for a gorgeous sunset
Kid-friendly but nice dinner options nearby include Cody’s (American cuisine), Duke’s (Hawaiian-inspired cuisine with great ocean views), Bubba’s Smokehouse (BBQ) or just grab some quick food on the way to your hotel.
Check in to your hotel and sleep! We stayed at the Residence Inn at 5995 Pacific Mesa Ct., San Diego. We choose it because they had good rates on a 2-bedroom suite, but it is about a 20 minute drive into downtown San Diego.
Day 2
Sea World San Diego
Sea World San Diego is a great option for families with its combination of animal exhibits, rides, and shows. The park typically opens at 10am and closes between 5-10pm depending on the day. Check the schedules and buy tickets in advance at seaworld.com/san-diego.
- Download the SeaWorld app to use the interactive map
- Arrive to the park 15-20 minutes before opening time so you can get through security and ticket-checking before the park opens.
Dress for the weather, which could mean needing layers or a jacket for the evening. There’s also a penguin exhibit that is quite cold so you may want a jacket for that also.
There are several water rides at the park and the option to sit in “splash zones” at the dolphin and orca shows, so either wear shoes that can get wet and quick-drying clothes, or bring a poncho and a change or shoes.
What to bring into the park:
- Phone and extra external charger
- Sunscreen
- Ponchos
- Sunglasses
- Jackets
This plan is for people with kids over 48″ in height that want to do both thrill rides and animal shows. If you have some kids over 48″ and some under, you can talk to ride attendants about swapping adults so one adult can ride with the older kids while another is with the smaller kid(s), then swap without having to wait in line again.
- Head to Arctic Rescue, this is the newest ride in the park and gets the longest lines. This is straddle roller coaster with a 48″ height requirement and tops speeds of 40mph. It has no big drops, no loops, but 3 fun accelerated starts and it’s a great family coaster.
- Journey to Atlantis – part dark ride, part water flume ride, all fun! You will get wet but not soaked. Similar to Splash Mountain at Disney parks. 42″ height requirement.
- Emperor – a thrilling roller coaster with a 52″ height requirement
- Walk through the Wild Arctic exhibit to see beluga whales.
- Walk through the Penguin exhibit
- Eat at Calypso Bay Smokehouse. View menu >
- Arrive between 12:40-45 for the 1pm Dolphin Show
- Check out the Sloths exhibit
- If you have any kids still interested in the rides or play areas in the Rescue Jr. kids area, check that area out for a bit. Others may be interested in riding Electric Eel, a roller coaster with a 54″ height requirement.
- Head up behind the dolphin theatre to see the Sea Turtle and Sharks exhibit
- Ride Riptide Rescue if desired, a classic spinner ride near the sharks
- Arrive between 3:40-45 for the 4pm Sea Lion & Otter Show
- Ride Manta, a family rollercoaster with a 48″ height requirement and a fun multi-media launch.
- Check out the dolphins in Dolphin point
- Arrive at 5:40 for the 6pm Orca Show
- Get Dinner at the Shipwreck Reef Cafe
- Ride Shipwreck Rapids if desired. You may get very wet on this ride so wear a poncho if you prefer. This ride is set later in the day in this itinerary because it is low capacity and often gets a long line during the heat of the day.
- If you have time and don’t mind an extra fee, you can ride the Bayside Skyride. It give you great views (especially at sunset) but the line can get long and it costs an extra $6 per person.
- Check the app to see if there are fireworks the day you are there.
- Head to the Rescue Jr. kids area first. This area will get crowded and kid rides are low-capacity so do some of the kid rides first, then let kids play in the play area.
- If you have kids over 42″ interested in trying a big kid ride, head to Journey to Atlantis early in the day before the line gets too long
- Walk through the Wild Arctic exhibit to see beluga whales.
- Walk through the Penguin exhibit
- Eat at Calypso Bay Smokehouse. View menu >
- Arrive between 12:40-45 for the 1pm Dolphin show
- Walk through the Sea Turtle and Sharks exhibit. This is an indoor exhibit that is pretty quiet and a good time for a stroller nap for kids of napping age.
- Ride Riptide Rescue if desired, a classic spinner ride near the sharks with a 45″ height requirement. There is also a little play area next to the ride for smaller kids.
- Checkout the sea lions at Sea Lion Point
- Visit the dolphins at Dolphin Point
- Arrive between 3:40-45 for the 4pm Seal and Otter Show
- If you have kids over 42″ and don’t mind getting wet or wearing a poncho, ride Shipwreck Rapids, a classic circular raft white water rafting ride.
- Touch sea stars and other critters in the Tide Pool
- Arrive at 5:40 for the 6pm Orca Show
- If your kids are worn out by now, you can leave the park to get dinner and be done for the day. If they still have energy, get dinner in the park and do more kid rides (the lines should be shorter in the evening). You could also choose to ride the Bayside Skyline or the SkyTower which offer great views but cost $6/person. Also check the app to see if there are fireworks in the evening.
Day 3
San Diego Zoo
The San Diego Zoo is one of the best zoos in the country and should not be missed!
- Purchase your tickets online in advance
- Download the San Diego Zoo app for an interactive map
- The zoo typically opens at 9am, but check the website or app. We recommended getting there when it opens because there is so much to see and younger kids may get tired.
- If you have kids 5 or under – bring a stroller! It’s a big zoo with hills.
You can do the zoo many ways, but if you’d like to minimize walking up hills a lot and minimize crowds, we recommend following this plan:
Touring Plan for the San Diego Zoo
- From the entrance, head to the right and do the guided bus tour first. It gives you a give overview of the zoo and it can get longer lines later. The tour is included with your ticket.
- Head to the left of the entrance and do the reptile house, then keeping heading left toward the Wildlife Explorers area. This area has places for kids to play and a splash area.
- When you’re done with that area take the Skyfari Aerial tram to the back of the zoo.
- From there, go through the Northern Frontier area to see Polar Bears
- Take the Lower Parkway toward the Leopards and Red Pandas
- Take the elevators up to Treetop Way and wind through the monkey trails and aviaries until your back at the front of the park
- Take the Skyfari tram again but this time do the right side of the park
Touring Plan for the San Diego Zoo
- From the entrance, head to the right and do the guided bus tour first. It gives you a give overview of the zoo and it can get longer lines later. The tour is included with your ticket.
- Head to the left of the entrance and do the reptile house, then keeping heading left toward the Wildlife Explorers area. This area has places for kids to play and a splash area.
- When you’re done with that area take the Skyfari Aerial tram to the back of the zoo.
- From there, go through the Northern Frontier area to see Polar Bears
- Take the Lower Parkway toward the Leopards and Red Pandas
- Take the elevators up to Treetop Way and wind through the monkey trails and aviaries until your back at the front of the park
- Take the Skyfari tram again but this time do the right side of the park.
- Do the Elephant Odyssey area, then head up through the African Rocks exhibit, ending with the penguins.
- From there head down Center Street to see the sun bears and other bears.
- Turn to the left to do the Outback area to see koalas and the Urban Jungle section where you’ll see rhinos and giraffes.
- At this point you have covered most of the zoo with as little uphill walking as possible!
If you still have energy after the zoo, you can explore Balboa park (right outside the park). There is a miniature train and a carousel kids can ride.
Day 4
San Diego Beach Day, Drive to Anaheim
After 2 days of a lot of walking, and before you walk more the next day, take this day a little slower. Sleep in if your kids will let you!
Pick a local beach to enjoy that fits the vibe you like. Some of the beach options include:
- Mission Beach – this is a classic urban beach with a boardwalk with shops and activities, and Belmont park where you can pay per attraction to ride a few amusement park rides. There are lots food options around the beach.
- Coronado Beach – this beautiful beach on Coronado Island has a backdrop of gorgeous homes and resorts like the famous Hotel del Coronado. You can rent chairs and umbrellas from the hotel for the day, even if you aren’t staying there. You can also get food at the resorts.
- Torrey Pines State Beach – this beach lies within a nature preserve so it has less of an urban vibe then the others and more natural beauty featuring gorgeous cliffs and rocks. This beach won’t have as many food options around, so you may want to bring a picnic or plan to get lunch before you arrive.
Take I-5 north to Anaheim (about 1.5 hour drive). I’d suggest leaving around 5pm. Eat dinner on the way or when you arrive in Anaheim. The area around Disneyland has many dining options to choose from.
There are many hotels within walking distance to Disneyland so pick one of those! There are also official Disney hotels (the Disneyland Hotel, the Grand Californian, and Paradise Pier) but those may come with a higher price tag. The main benefit of a Disney hotel is you can enter the parks 30 minutes early. It’s a nice benefit, but not as essential at Disneyland as it is at Disney World. We usually choose to stay in a Marriott hotel (we collect Marriott points) that’s within walking distance to save on cost.
Get to bed early if you can! You have a big day ahead! Don’t forget to set an alarm and charge your devices and external chargers. No sleeping in or dead phones allowed
tomorrow.
Day 5
Disneyland
What to wear:
Dress for the weather and for comfort. This could mean layers. Pick layers that you can tie around your waste or fit in a backpack.
If you or your kids have any Disney-themed clothing, this is the place to wear them! It’s also smart to dress in bright colors or even matching colors so you can easily spot each other in crowds.
Shoes: Wear what you can walk many miles in. For most, that means socks and a good pair of running/walking sneakers. Make sure your shoes are broken in before your trip.
What to bring into the park with you:
- Smartphones
- Stroller if needed (recommended for kids age 6 and under, even if they don’t use a stroller at home anymore) Ideally bring or rent one that reclines, has an under-compartment for storing things, and folds easily so you can bring it on a bus or pack it in your car.
- A comfortable backpack or fanny pack packed with:
- Sunscreen (Face or body stick is great for putting on your family quickly on the go)
- External phone charger and correct chord (really important…trust me)
- Ponchos or packable rain gear (take out if there is no chance of rain)
- Band aids
- Medicines (Ibuprofen, Dramamine, allergy, kids Tylenol, anything you might need that comes in a small pill or chewable form)
- Chafing Stick (helpful for thighs if wearing shorts, helpful for males on sweaty days)
- Sunglasses
- Lip balm with sunscreen
- Snacks (plenty of snacks to purchase in the parks, but if you have picky kids or young kids that need snacks to entertain them at times, bringing your own will be helpful!)
- In hot months, neck fans or portable fans are really helpful
- Suckers (obviously not required but if your kids are getting bored in a line or waiting for a show to begin, hand them a sucker for instant delight that helps pass the time)
- Water bottle(s) (They give out free water at quick service restaurants, but having a few water bottles you can fill on your own is helpful. Use ones that won’t leak if they’re knocked over or bumping around in a stroller and ones that will keep water cool on a hot day.)
- Stroller rain cover (no one wants to sit in a wet stroller)
- Baby/toddler gear if needed. (You know what you need…diapers, bottles, pacis, etc. If your little one will need to nap while at the park, bring something you can drape over the stroller and consider bringing a portable sound machine. This will create a good nap environment while in the parks while older kids and adults can still enjoy the fun. This is often a lot easier than going all the way back to your hotel for a nap. Even if your kid doesn’t usually nap in a stroller – they might once they’re Disney tired.)
Times based on 8am park opening:
6/6:30am – Wake up! It’s going to be a magical day! But not a day to sleep in! Get ready for the day and eat some quick breakfast at your hotel if you can. Why so early? The first hour of the day at Disneyland is the best and least crowded and you don’t want to miss it!
7am – leave you hotel and start walking to the park. We are assuming you are staying within a 15min walk to the park. If not, adjust times accordingly.
7:15am – arrive at the entrance and get in lines for security and ticket checking
Once you enter the park – book your first Genie+ attraction for Indiana Jones Adventure. Aim for a time around 10am. Modify it if it’s too early.
7:30 – gates open! The park doesn’t officially open until 8am but being there when the gates open gives you a chance to enjoy the sights and sounds of mainstreet and get photos before heading off to attractions. If you are staying at an official Disney resort, you can (and should) go straight to rides at 7:30!
This general plan assumes you are only spending 1 day at Disneyland and are using Lightning Lane MultiPass to maximize your day. You also may want to buy a Lightning Lane Single Pass for Star Wars: Rise of the Resistance if you don’t want to stay up late to ride it at the very end of the night.
This plan helps you avoid waiting in long lines AND avoids crisscrossing the park all day. With that said…crowds vary, people’s priorities vary, rides go down, kids meltdown – you need to be flexible!
This plan will not work on really crowded days – on those days focus on getting Lightning Lane attractions in the order of priority listed in the Lightning Lane tab below instead of going by proximity like this plan does. You will crisscross the park a lot which isn’t the most fun, but you will spend less time in lines.
———-
Arrive at the park entrance BEFORE the park opens. It takes some time to get through security and ticket check and they will often let you into the park so you can enjoy Main Street as you walk to your first attraction. If you are staying at a Disney hotel, you can enter the park early! Take advantage of this perk, but still get to the entrance BEFORE the start of early entry time.
As soon as you enter the park, book your first Lightning Lane. Try to get Tiana’s Bayou Adventure. If you don’t want to ride Tiana’s, book Indiana Jones Adventure.
As soon as the park opens – Peter Pan’s Flight – We recommend heading to Fantasyland first because most of the attractions don’t use Lightning Lane plus they are delightful and a great way to start the day! Start with Peter’s Pans Flight because this one gets the longest line and is low capacity.
Early morning in Fantasyland – Do as much as you can in Fantasyland while crowds are low in the morning and before your first Lightning Lane return time. You’ll come back to do more later. A good order to do things in:
- Snow White’s Enchanted Wish
- Alice in Wonderland
- Dumbo
- Casey Jr. Circus Train
- Mr. Toad’s Wild Ride
- Storybook Land Canal Boats
- Pinocchio’s Daring Journey
As soon as you tap into your attraction, book your next Lightning Lane attraction. Try to book something that is on the side of the park you are in if the return times are within 2 hours. If you booked Tiana first, now book Indiana Jones. If you already did Indiana Jones you can see if there are pretty immediate return times for Pirates of the Caribbean. Trying to do things in the same section is nicer so your not constantly crisscrosssing, but if it’s a really crowded day return times will be later and this method may not work.
Adventureland – Ride Jungle Cruise! While you’re waiting, mobile order some Dole Whip from the Tiki Juice Bar. When you get off Jungle Cruise, pick up your mobile order and head into the Enchanted Tiki Room and watch the first-ever animatronic show designed by Walt Disney while you eat! Ride Indiana Jones when your return window arrives.
As soon as you use a Lightning Lane, book another! You can try to get attractions that are in the same section area like Pirates of the Caribbean and Haunted Mansion if the return times are soon, or the standby lines may be short enough. Keep an eye on the return times for Space Mountain and Matterhorn and book one of those if they are getting too late.
Lunch – In the advanced prep section we recommended getting an Advanced Dining Reservation for either Blue Bayou or Cafe Orleans. It’s nice to have a sit-down meal break in the middle of the day. If you did not get a reservation, mobile order food at Tiana’s place.
Haunted Mansion with Lightning Lane if you have it. As soon as you tap in, book your next Lightning Lane, Millennium Falcon: Smugglers Run.
Winnie the Pooh
Star Wars: Galaxy’s Edge – If you bought a Lightning Lane for Rise of the Resistance, use it during your window. You can also wait and ride this one at the end of the night. Head to Millenium Falcon Smuggler’s Run using your Lightning Lane. As soon as you tap in, book Big Thunder Mountain if there is a return time close (refresh the screen a few times if not to see if any pop up). If not, go ahead and book Space Mountain (the return time will be a bit later but that’s ok).
Big Thunder Mountain Railroad – if you got a Lightning Lane for it or if the line isn’t too long and you have time to ride it before the parade, do it now while you’re still on that side of the park. If you use a Lightning Lane, book Space Mountain immediately after you tap in.
Parade – if you want to see the parade, it starts at 3pm from Toon Town and goes down through Main Street USA. You’ll be headed to Tomorrowland next so try to find a place around the hub (the circle in front of the castle).
Tomorrowland – Ride Astro Orbiter (or skip it if the line is long – it’s just Dumbo in rockets and is low capacity so the line moves slow). You could do Buzz Lightyear and Star Tours if the lines aren’t too long, or wait until later and you can try to book Lightning Lanes for them. You can go into Star Wars launch bay and meet Star Wars characters, let your kids drive a car at Autopia, and board a submarine at Finding Nemo Submarine Voyage. Ride Space Mountain as soon as your return window comes up using the Lightning Lane. As soon as you tap in, book Matterhorn Bobsleds.
Matterhorn Bobsleds using Lightning Lane. As soon as you tap in, book Roger Rabbit’s Car Toon Spin.
More Fantasyland – As you wait for your Roger Rabbit return time to arrive you can meet characters (check the app to see what characters are around), ride the Mad Tea Party, ride any Fantasyland rides you didn’t before, get a snack, then head up and ride It’s a Small World.
Dinner – Mobile order food from Troubadour Tavern (near Small World), Cafe Daisy (Toontown), or grab food from a stand for a quick dinner.
Toon Town – Ride Roger Rabbit when your return time arrives, then immediately book Mickey & Minnie’s Runaway Railway. If it’s a busy day and the return times are out, choose whatever you’d like! In between Roger Rabbit and Mickey & Minnie’s Railway, you can meet Mickey and Minnie, ride Chip n’ Dale’s GADGET coaster (this low-capacity coaster can get a pretty decent line) and play in Goofy’s Play Yard.
Fireworks – Usually at 9:30pm (but check the app for times), get a spot to view them in front of the castle around 9pm to ensure you get a good spot. If you still need to ride Rise of the Resistance, or if there’s another ride you want to quickly get to after fireworks for one last ride of the day, try to position yourself on that side of the hub and do not go down Main Street.
After Fireworks – If you’re ready to leave, follow the massive slow crowd to the exit. But what’s even more fun is to run (actually just walk quickly) to one last ride! If you get in line even one minute before closing time you get to ride it! Rise of the Resistance is a good candidate to ride at the end of the night so there is little wait, but there is always a chance the ride could be down. Another fun ride to do one last time at night is Big Thunder Mountain Railway.
Day 6
California Adventure
This is the other park at Disneyland! It’s located directly across from Disneyland park. If you feel like you didn’t get enough of Disneyland park the day before, you could opt for a parkhopper pass and do more Disneyland on this day plus some of California Adventure, but we think it’s a great park that deserves its own day.
Highlights of this park include: Cars Land, Marvel’s Avengers Campus, Pixar Pier, a large California Redwoods-themed kids play area, and much more!
(If you’d prefer a typical amusement park instead, try Knott’s Berry Farm. It’s a Cedar Fair park with classic rides and roller coasters.)
California Adventure is the other park at Disneyland resort. It’s located directly across from Disneyland park. If you feel like you didn’t get enough of Disneyland park the day before, you could opt for a parkhopper pass and do more Disneyland on this day plus some of California Adventure, but we think it’s a great park that deserves its own day.
Highlights of this park include: Cars Land, Marvel’s Avengers Campus, Pixar Pier, a large California Redwoods-themed kids play area, and much more!
We recommend buying Genie+ in advance for both days at Disneyland. This park doesn’t need it as much, but it will save you time so you don’t have to make this day quite as long as the Disneyland day.
If you’d prefer a typical amusement park instead, try Knott’s Berry Farm. It’s a Cedar Fair park with classic rides and roller coasters.
What to wear:
Dress for the weather and for comfort. This could mean layers. Pick layers that you can tie around your waste or fit in a backpack.
If you or your kids have any Marvel or Pixar-themed clothing, this is the place to wear them! It’s also smart to dress in bright colors or even matching colors so you can easily spot each other in crowds.
Shoes: Wear what you can walk many miles in. For most, that means socks and a good pair of running/walking sneakers. Make sure your shoes are broken in before your trip. If you like white water rafting rides and plan to ride the one here, consider wearing shoes that can get wet or packing a pair of flip flops in your bag to wear just for that ride.
What to bring into the park with you:
- Smartphones
- Stroller if needed (recommended for kids age 6 and under, even if they don’t use a stroller at home anymore) Ideally bring or rent one that reclines, has an under-compartment for storing things, and folds easily so you can bring it on a bus or pack it in your car.
- A comfortable backpack or fanny pack packed with:
- Sunscreen (Face or body stick is great for putting on your family quickly on the go)
- External phone charger and correct chord (really important…trust me)
- Ponchos or packable rain gear (in case of rain or if you plan to ride the water rafting ride)
- Band aids
- Medicines (Ibuprofen, Dramamine, allergy, kids Tylenol, anything you might need that comes in a small pill or chewable form)
- Chafing Stick (helpful for thighs if wearing shorts, helpful for males on sweaty days)
- Sunglasses
- Lip balm with sunscreen
- Snacks (plenty of snacks to purchase in the parks, but if you have picky kids or young kids that need snacks to entertain them at times, bringing your own will be helpful!)
- In hot months, neck fans or portable fans are really helpful
- Suckers (obviously not required but if your kids are getting bored in a line or waiting for a show to begin, hand them a sucker for instant delight that helps pass the time)
- Water bottle(s) (They give out free water at quick service restaurants, but having a few water bottles you can fill on your own is helpful. Use ones that won’t leak if they’re knocked over or bumping around in a stroller and ones that will keep water cool on a hot day.)
- Stroller rain cover (no one wants to sit in a wet stroller)
- Baby/toddler gear if needed. (You know what you need…diapers, bottles, pacis, etc. If your little one will need to nap while at the park, bring something you can drape over the stroller and consider bringing a portable sound machine. This will create a good nap environment while in the parks while older kids and adults can still enjoy the fun. This is often a lot easier than going all the way back to your hotel for a nap. Even if your kid doesn’t usually nap in a stroller – they might once they’re Disney tired.)
You will be more tired on this day after doing Disneyland the day before. We suggest either sleeping in and staying until park close, or getting to the park early and leaving earlier. What ever works best for you family’s rest needs.
As soon as you enter the park – book your first Lightning Lane selection for Toy Story Midway Mania.
If getting to the park early – do Radiator Springs Racers first! This line will get very long later in the day. To get to this one before the crowd, you’ll need to arrive at the park entrance 30 minutes before the official opening time. There are 2 other fun little rides in Cars Land you can do after that first ride.
*IF you don’t want to get to the park early or stay until the end of the night, buy a Individual Lightning Lane for this attraction.
If getting to the park later – check the wait times around the park, check what time you get for Toy Story Midway Mania, and decide what part of the park to head to first.
Pixar Pier – use your Lightning Lane for Toy Story Midway Mania. As soon as you tap in, book Incredicoaster if the time slots are still within 2 hours. In between these 2 attractions, ride the other rides in this land: Jessie’s Carousel, Inside Out Emotional Whirlwind, Pixar Pal-A-Round (the swinging ferris wheel). You can also meet Pixar characters!
Ride Incredicoaster when your time comes up, then immediately book Goofy’s Sky School (keep an eye on return times for the Marvel attractions though – if they start to get to late you’ll need to start booking those and just use the standby queue for some others.)
Paradise Gardens – head up to the next section of the park along the lake. Ride Goofy’s Sky School using your Lightning Lane if you booked this. As soon as you tap in, book your next Lightning Lane attraction for either Web Slingers or Guardians of the Gallaxy. While you’re in this section, also ride some of the smaller rides if you’d like – Silly Symphony Swings, Jumpin Jellyfish, and Golden Zephyr. Last, ride Little Mermaid.
Avengers Campus –
What It Is:
Lightning Lanes are a paid skip-the-line feature that you set up using the Disneyland app. It will allow you to skip the regular line and have a shorter wait at some attractions. You can add Lightning Lane MultiPass to your ticket purchase in advance, or you can buy it the day you are visiting through the Disneyland app. Prices are date-based and start at $30/person.
Is it worth it?
I don’t think it’s AS helpful at California Adventure as it is at Disneyland park since there are fewer attractions overall, but it can still save you a lot of time, and is pretty easy to book most attractions since fewer people use it in this park.
- Once you enter the park, open the Disneyland app and click the Lightning Lane button.
- This will open up the Tip Board. You can scroll through the Tip Board to see what attractions are available and at what time. You are not able to choose your time, it’s simply the next time available. Click on the button for “Book Experience” to select that attraction for that time.
- If the return time for the attraction you chose is more than 2 hours away from the current time, you can book another attraction in 2 hours. When you open the Tip Board, it will tell you what time you can book your next Lightning Lane. Set an alarm on your phone for a few minutes before that time so you don’t forget.
- When the time arrives for your attraction, you have 1 hour to head to that attraction and enter through the Lightning Lane entrance. You will tap your card or app at the touchpoints to confirm that you have a valid Lightning Lane. Your wait should be much shorter than the standby queue.
- As soon as you tap into your attraction, open the Disneyland app and book another attraction.
- Continue to use and book attractions one at a time.
- Some attractions go faster than others and can run out. At California Adventure, you should prioritize these popular attractions first in case they run out: Guardians of the Gallaxy: Mission Breakout, Goofy’s Sky School, Incredicoaster, Web Slingers, Toy Story Midway Mania, and Soarin’.
- Set alarms for the times you can book your next Lightning Lane. If you book an attraction and the return time is more than 2 hours away, set an alarm for 2 hours from when you last booked an attraction so you don’t forget to book another.
- You can have multiple bookings at the same time and the times can overlap. We call this “stacking” and will happen a lot on crowded days when booking the more popular attractions and having to wait 2 hours to book your next one. It can make a fun 2nd half of your day as you hop from Lightning Lane to Lightning Lane with little wait, but you have to be diligent about booking new attractions every 2 hours.
- You can modify times. Once you have an attraction booked, your My Day tab will show you all the Lightning Lanes you have booked and their times. You can click on the attraction and choose “Modify” and select a different time (if available) or a different attraction. If you don’t see the time you want, pull down on the screen to refresh it and see if any new times pop up. You can pull down on the screen as many times as you’d like to check for new options that could open. But be warned…the perfect time may pop up and you click select, but by the time it goes through that time slot is gone and it will give you the next time available, which may be later then you wanted. Modifying can really help but it can also be risky is you modify and let go of your current spot you may not get a better one.
- Refresh the screen. People’s plans are constantly changing and Disney sometimes adds more Lighting Lane availability, so keep checking the app and pull down to refresh the Tip Board and see if new times and attractions pop up.
Rides available with Genie+ at California Adventure:
- Goofy’s Sky School (42″ height requirement)
- Grizzly River Run (42″ height requirement)
- Guardians of the Galaxy – Mission: Breakout! (40″ height requirement, but kids that are tall enough still may not enjoy the big drops. This ride is formerly Tower of Terror but with a new theme.)
- Incredicoaster (48″ height requirement)
- The Little Mermaid
- Monsters, Inc. Mike & Sully to the Rescue!
- Soarin’ (40″ height requirement)
- Toy Store Midway Mania!
- Web Slingers: A Spider-Man Adventure
This ride is not part of Lightning Lane MultiPass but you CAN skip the line by paying for an Individual Lightning Lane. Depending on demand, you may pay $20-30/person for JUST this one ride. The line can get really long and this could save you a lot of time, and the ride IS AWESOME, but I don’t like paying that much for one ride. If it’s in your budget, go for it! If you’d rather not pay that much for your family to ride, I suggest riding this at the end of the night when the line will be shorter. This means staying at the park until after the nighttime show.
Day 7
Drive to Yosemite
Sleep in a bit if needed but try to leave by 10am.
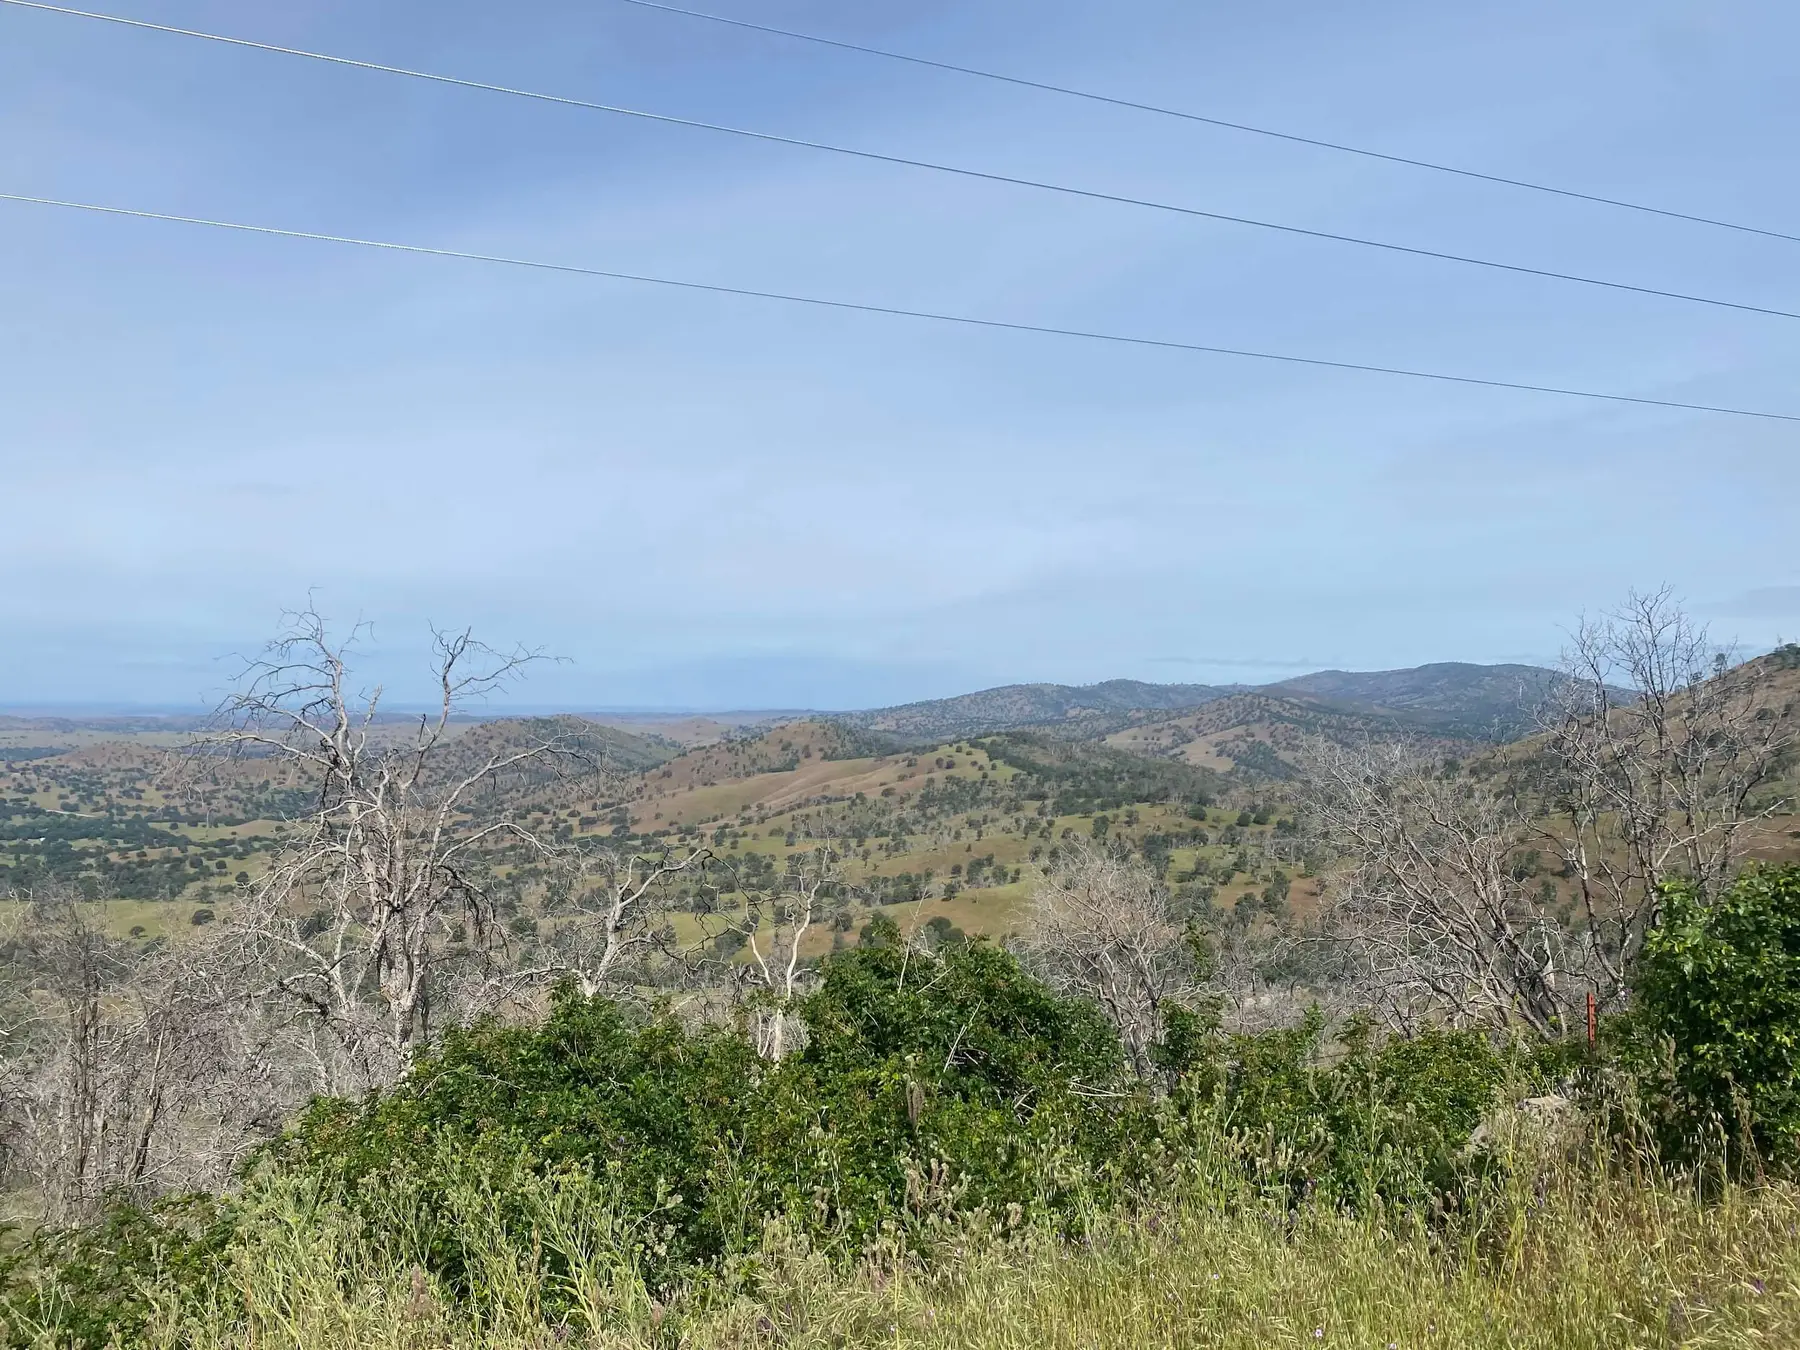
Drive to the South entrance of Yosemite National Park. The latter part of the drive is beautiful! The trip typically takes between 5-6 hours without stops. If possible, aim to reach the park before sunset so you can enjoy golden hour when the light hitting the rocks will be stunning! View Map
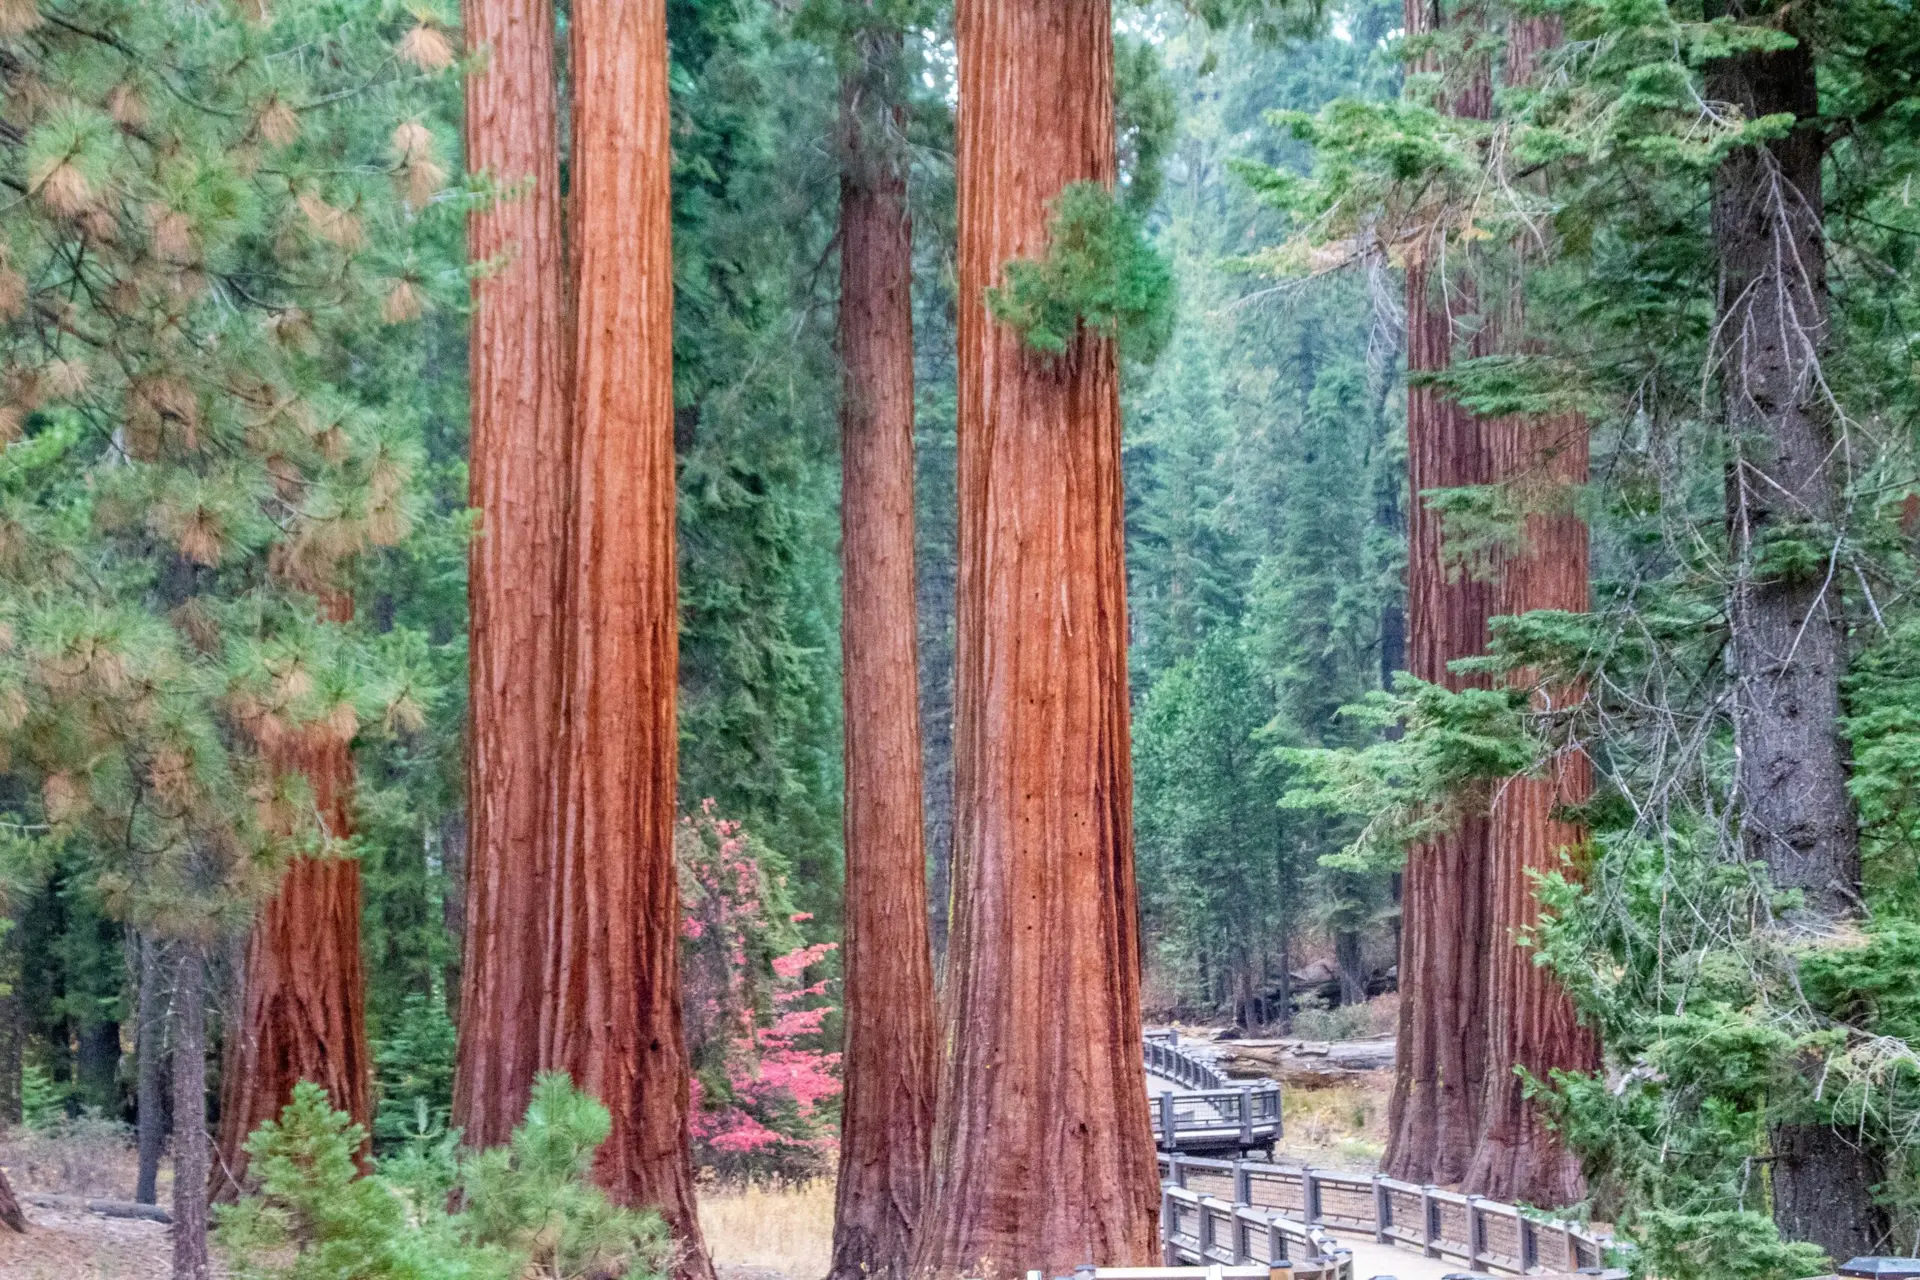
Park in the parking lot and take the free shuttle up to the Grove. Pick a trail option depending on time and interest:
- Big Trees Loop Trail – this trail is only .3 miles (about a 30 minute hike) and is wheelchair and stroller-friendly.
- Grizzly Giant Loop Trail – we highly recommend this trail if you have kids that can handle a 2-mile hike and have enough daylight left to do the hike and still make it to Yosemite Valley before sunset. This hike will take about 2 hours and has about 300 feet of elevation gain. It will take you to notable trees such as the Bachelor and Three Graces, the 3,000-year-old Grizzly Giant, and the California Tunnel Tree.
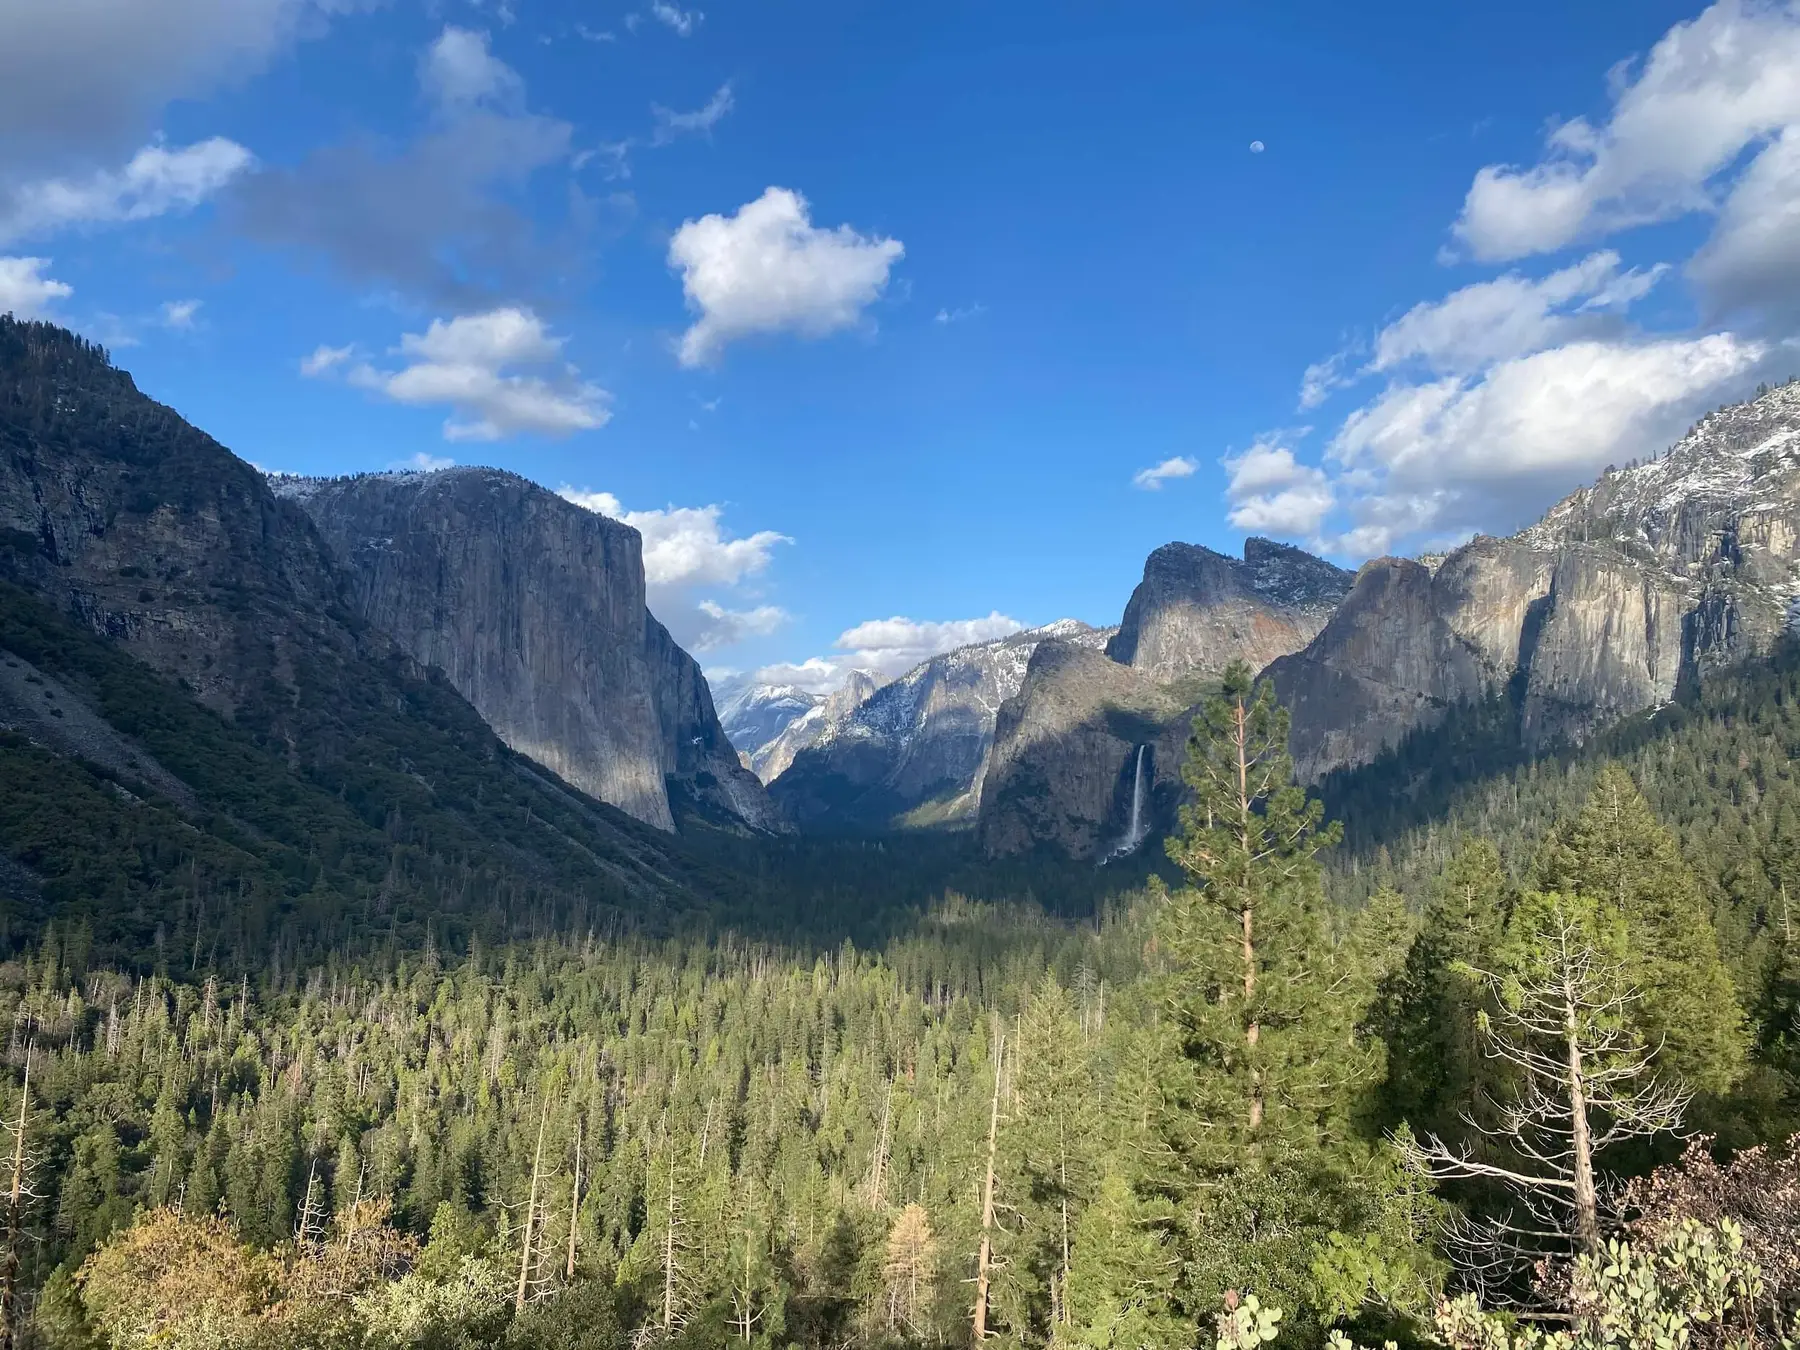
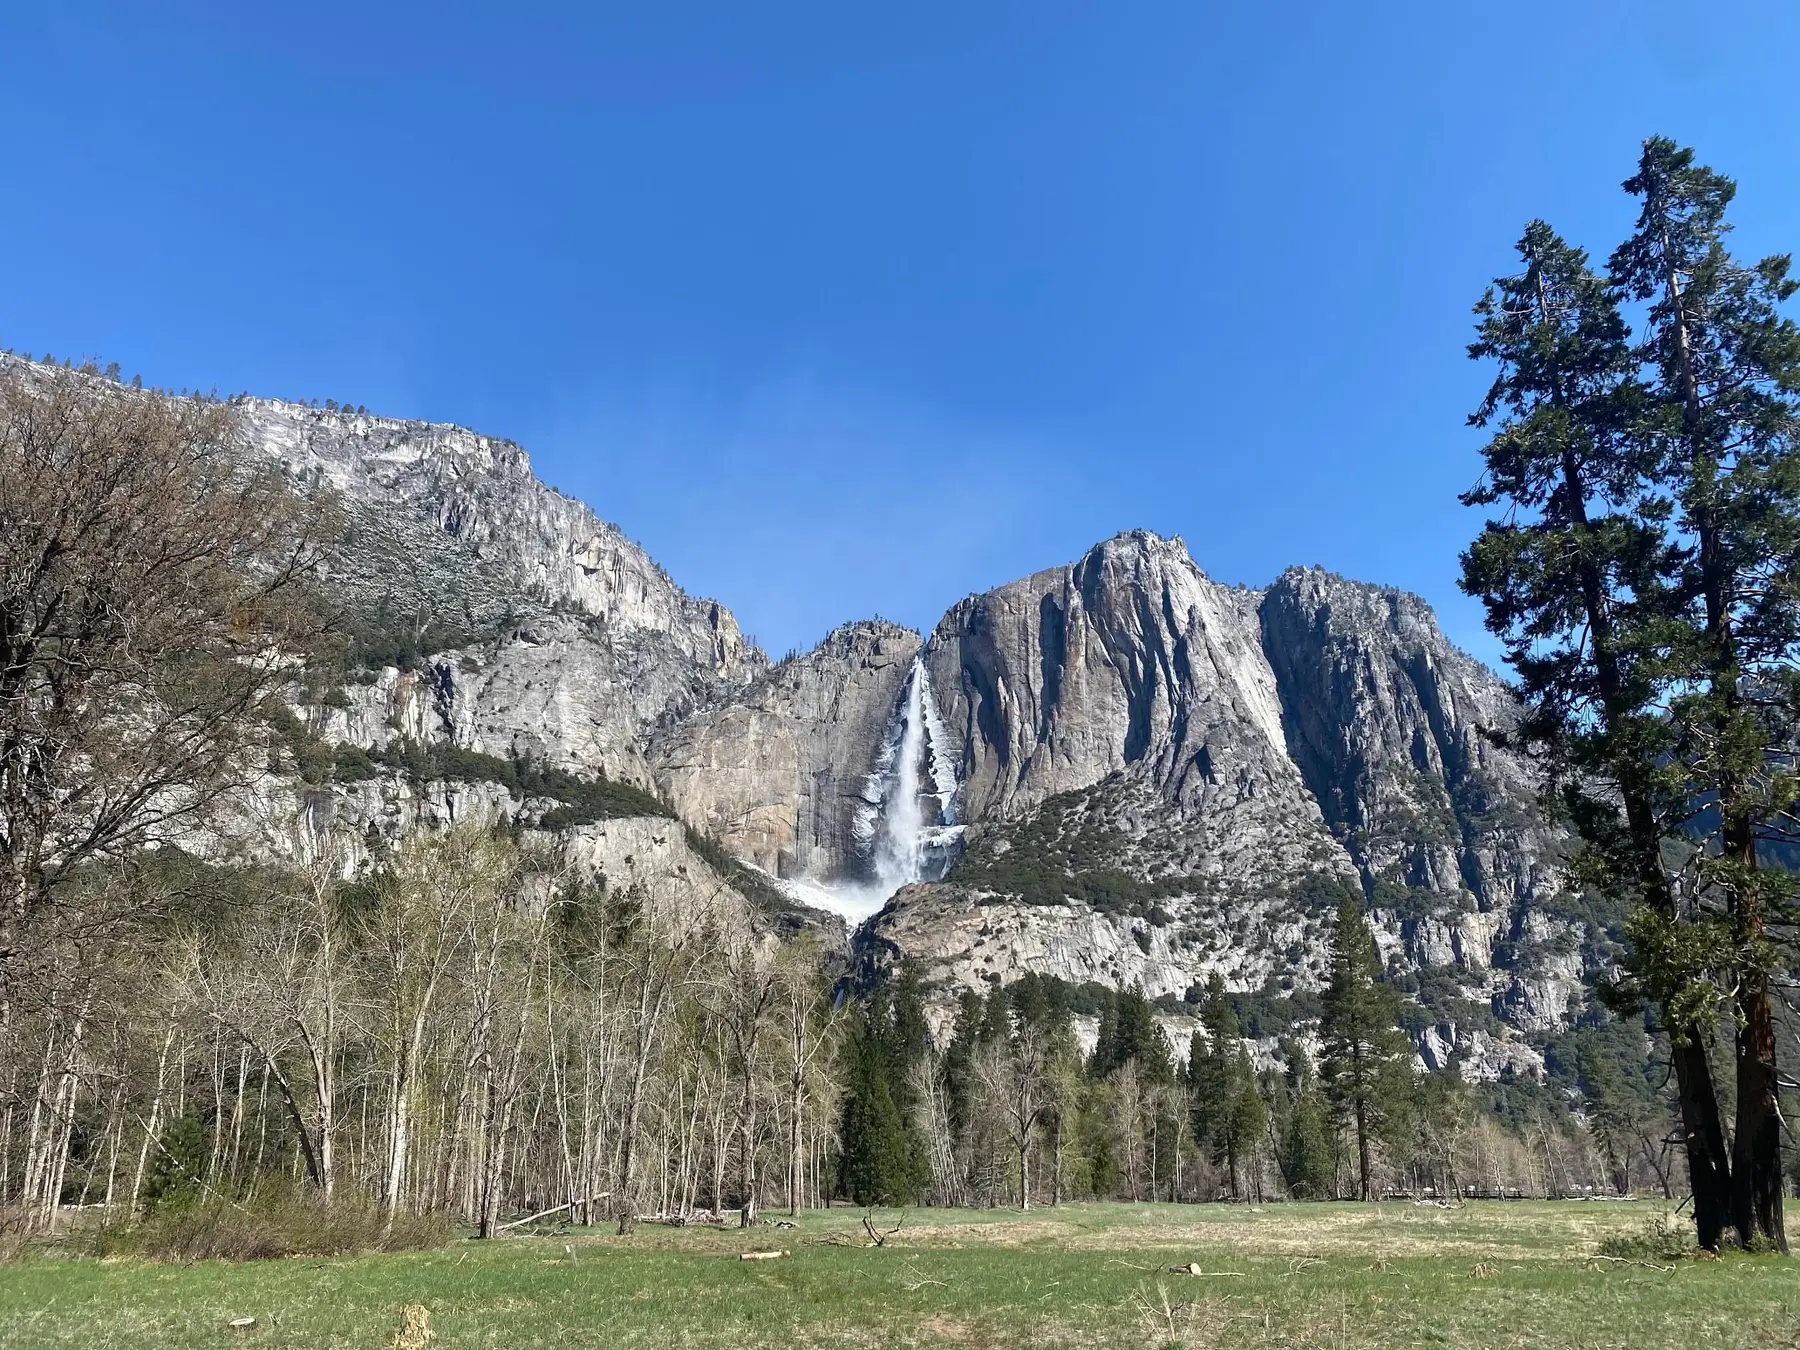
Continue north on Wawona Road, go through the tunnel and then immediatley turn left into the Tunnel View parking lot to enjoy the perfect first view of Yosemite Valley.

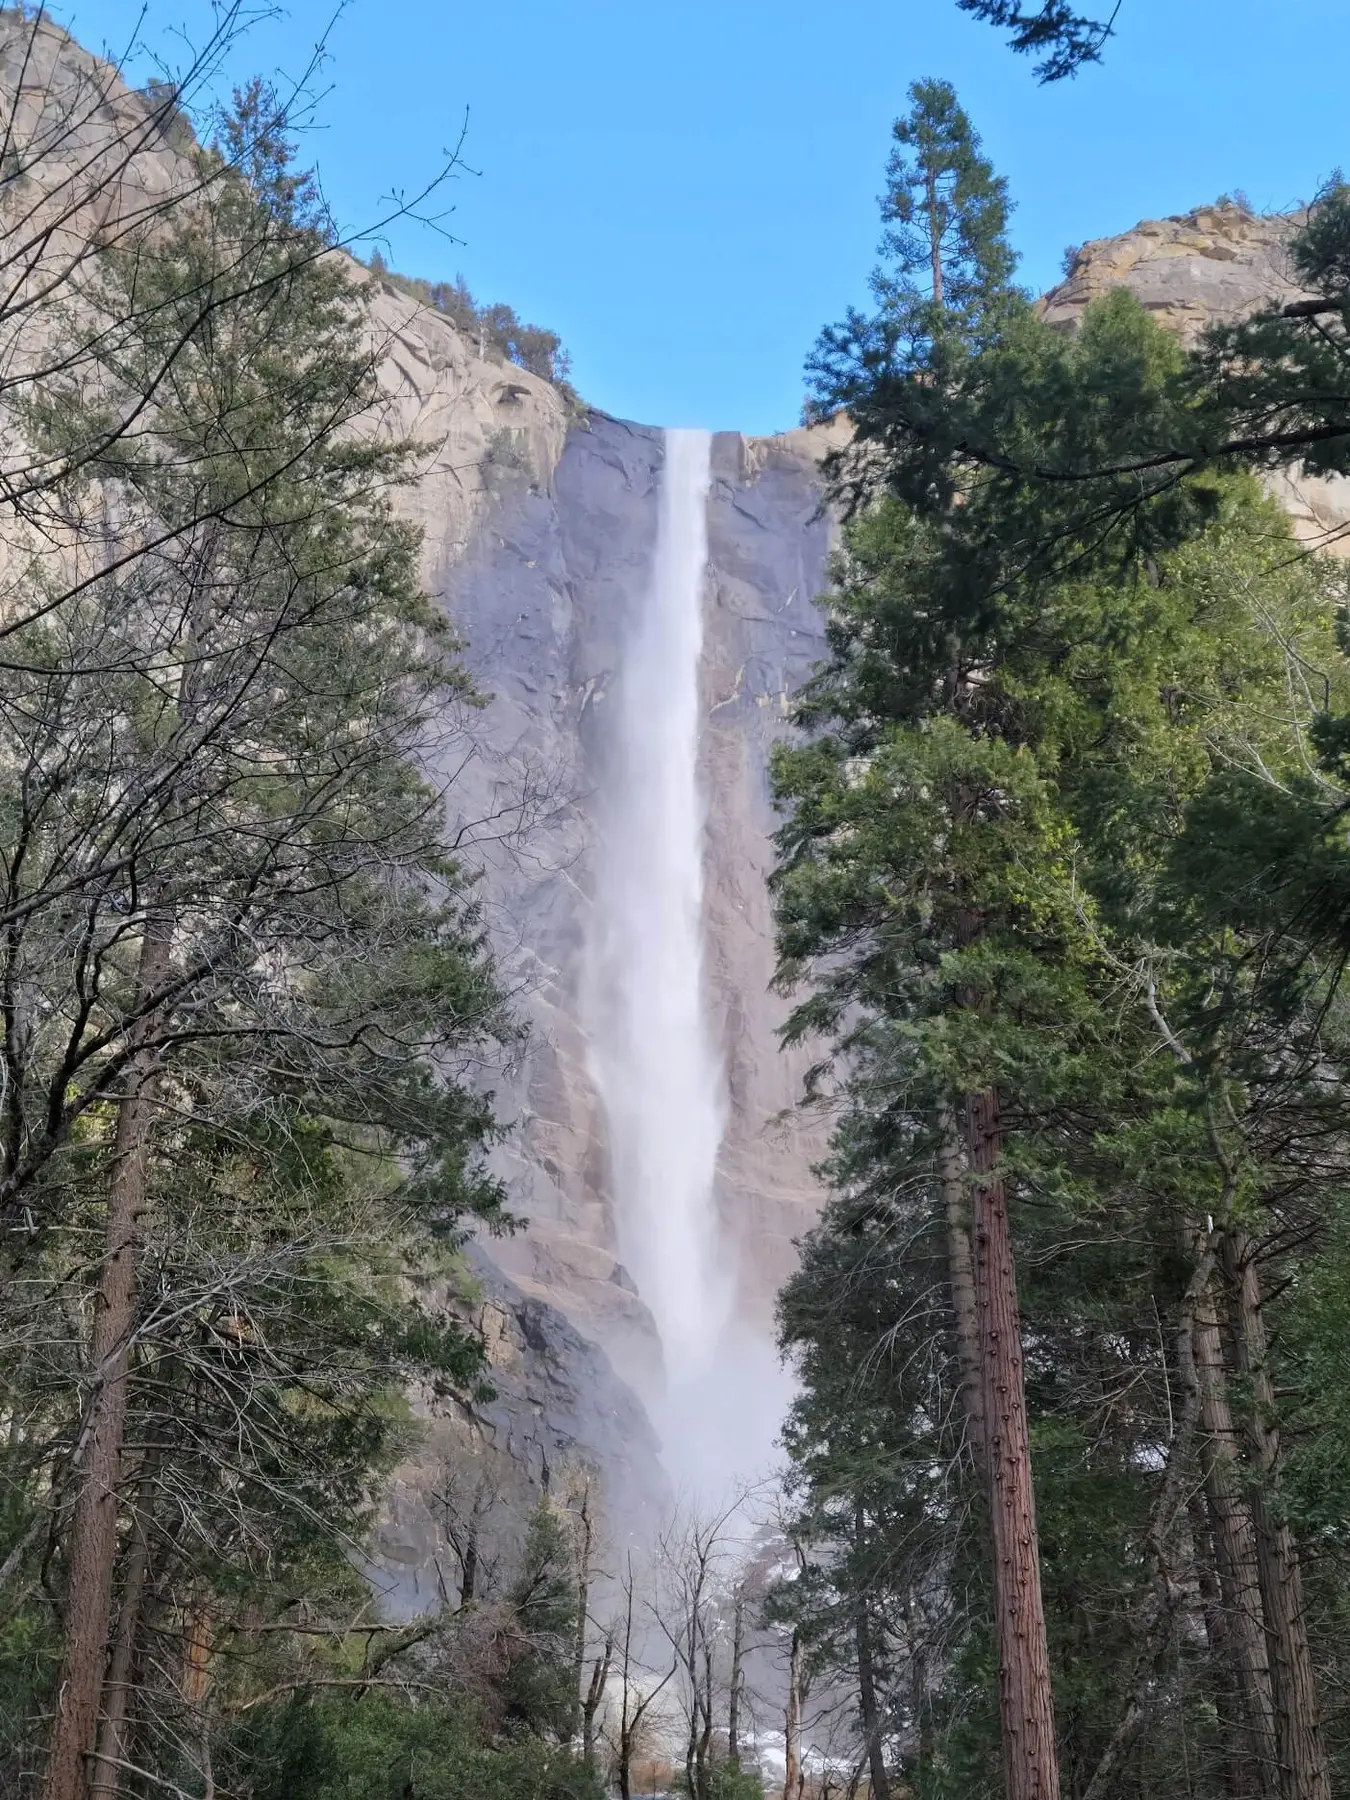
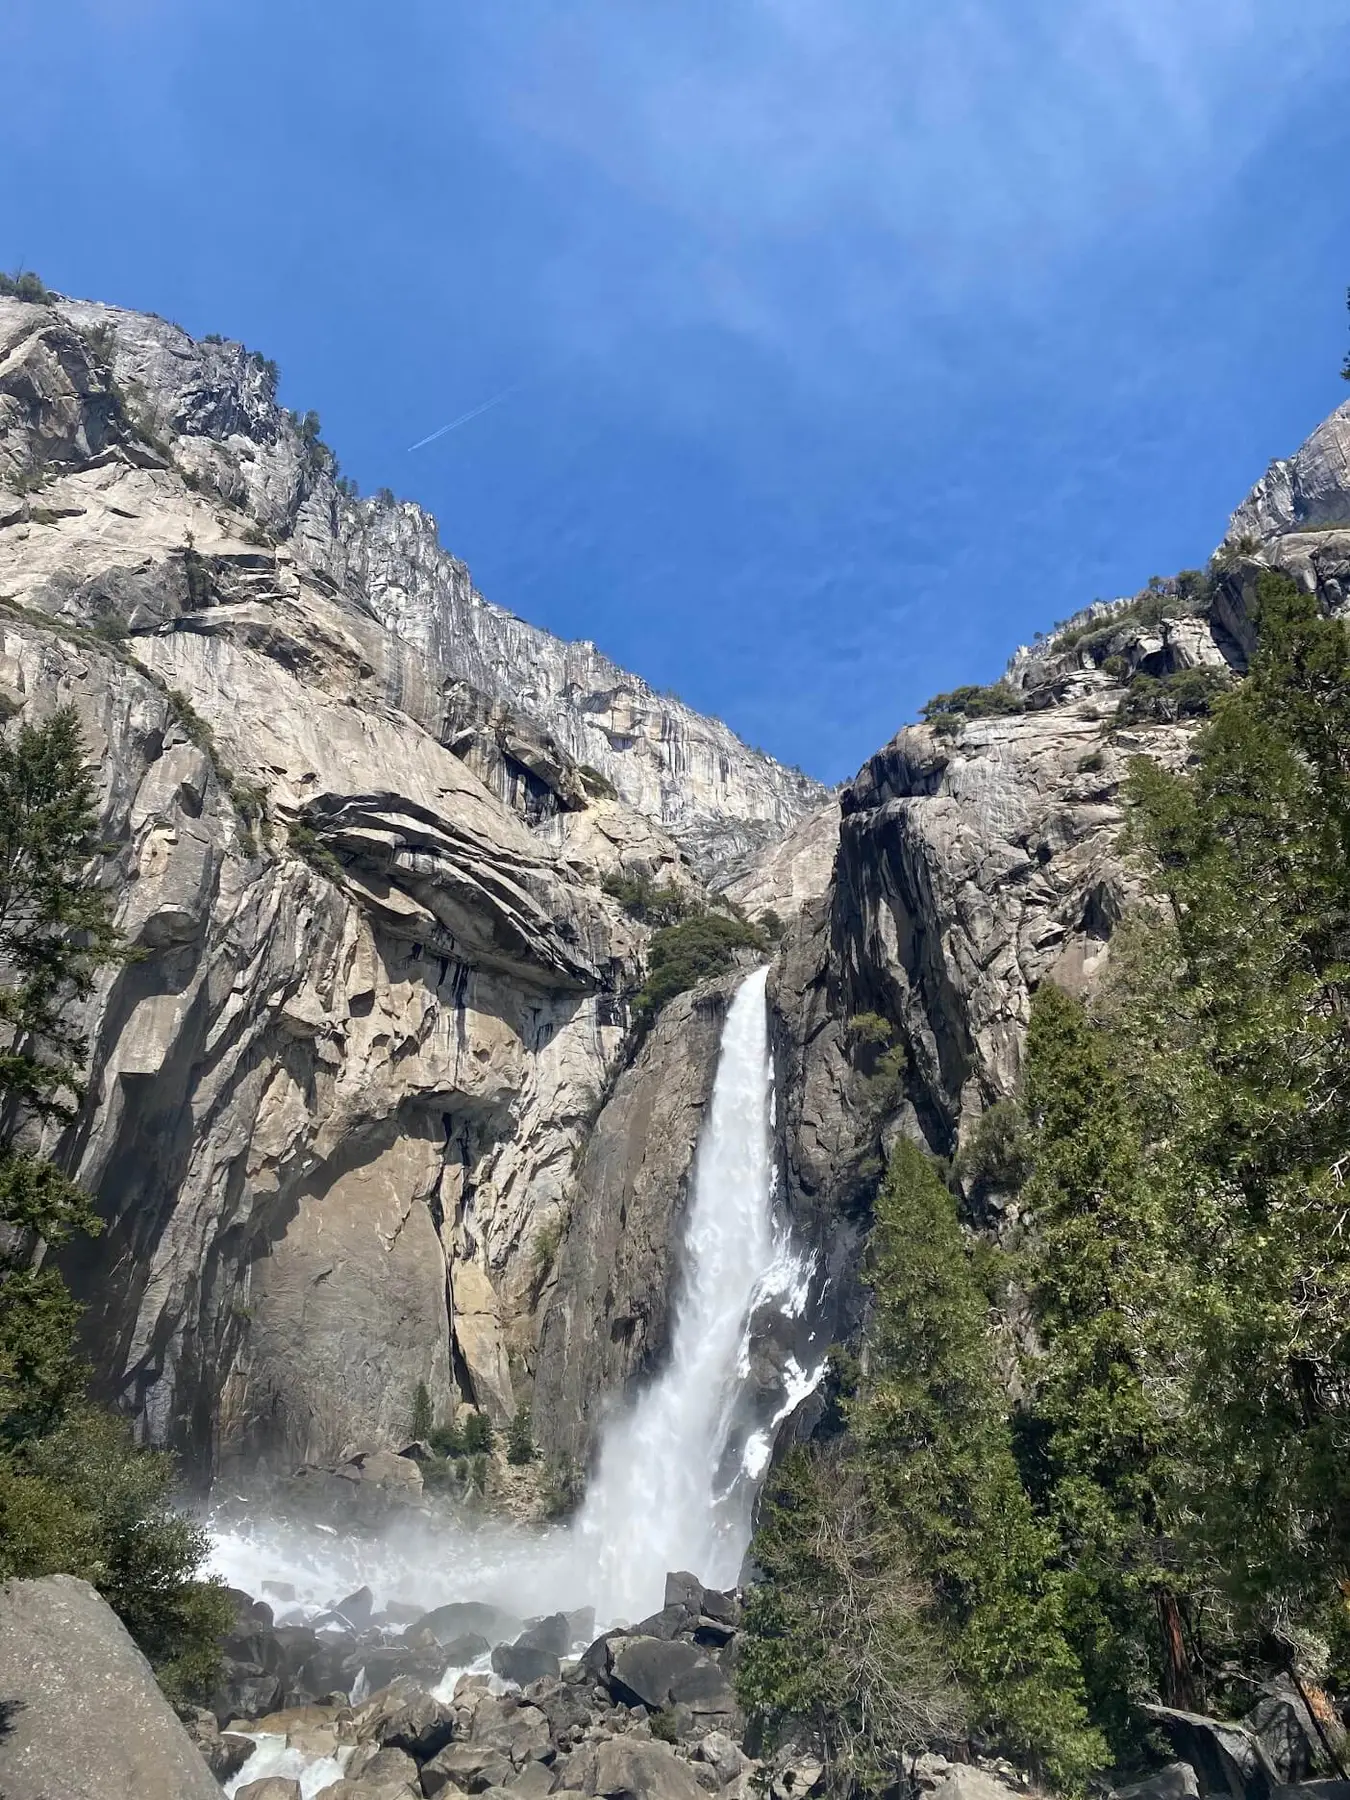
Continue on Wawona Road to the Bridalveil Falls trailhead. It’s an easy .5 mile paved trail to get you closer to this 620ft. waterfall. It can get icy in winter, can spray water onto the trail in Spring, and sometimes go dry in late summer.
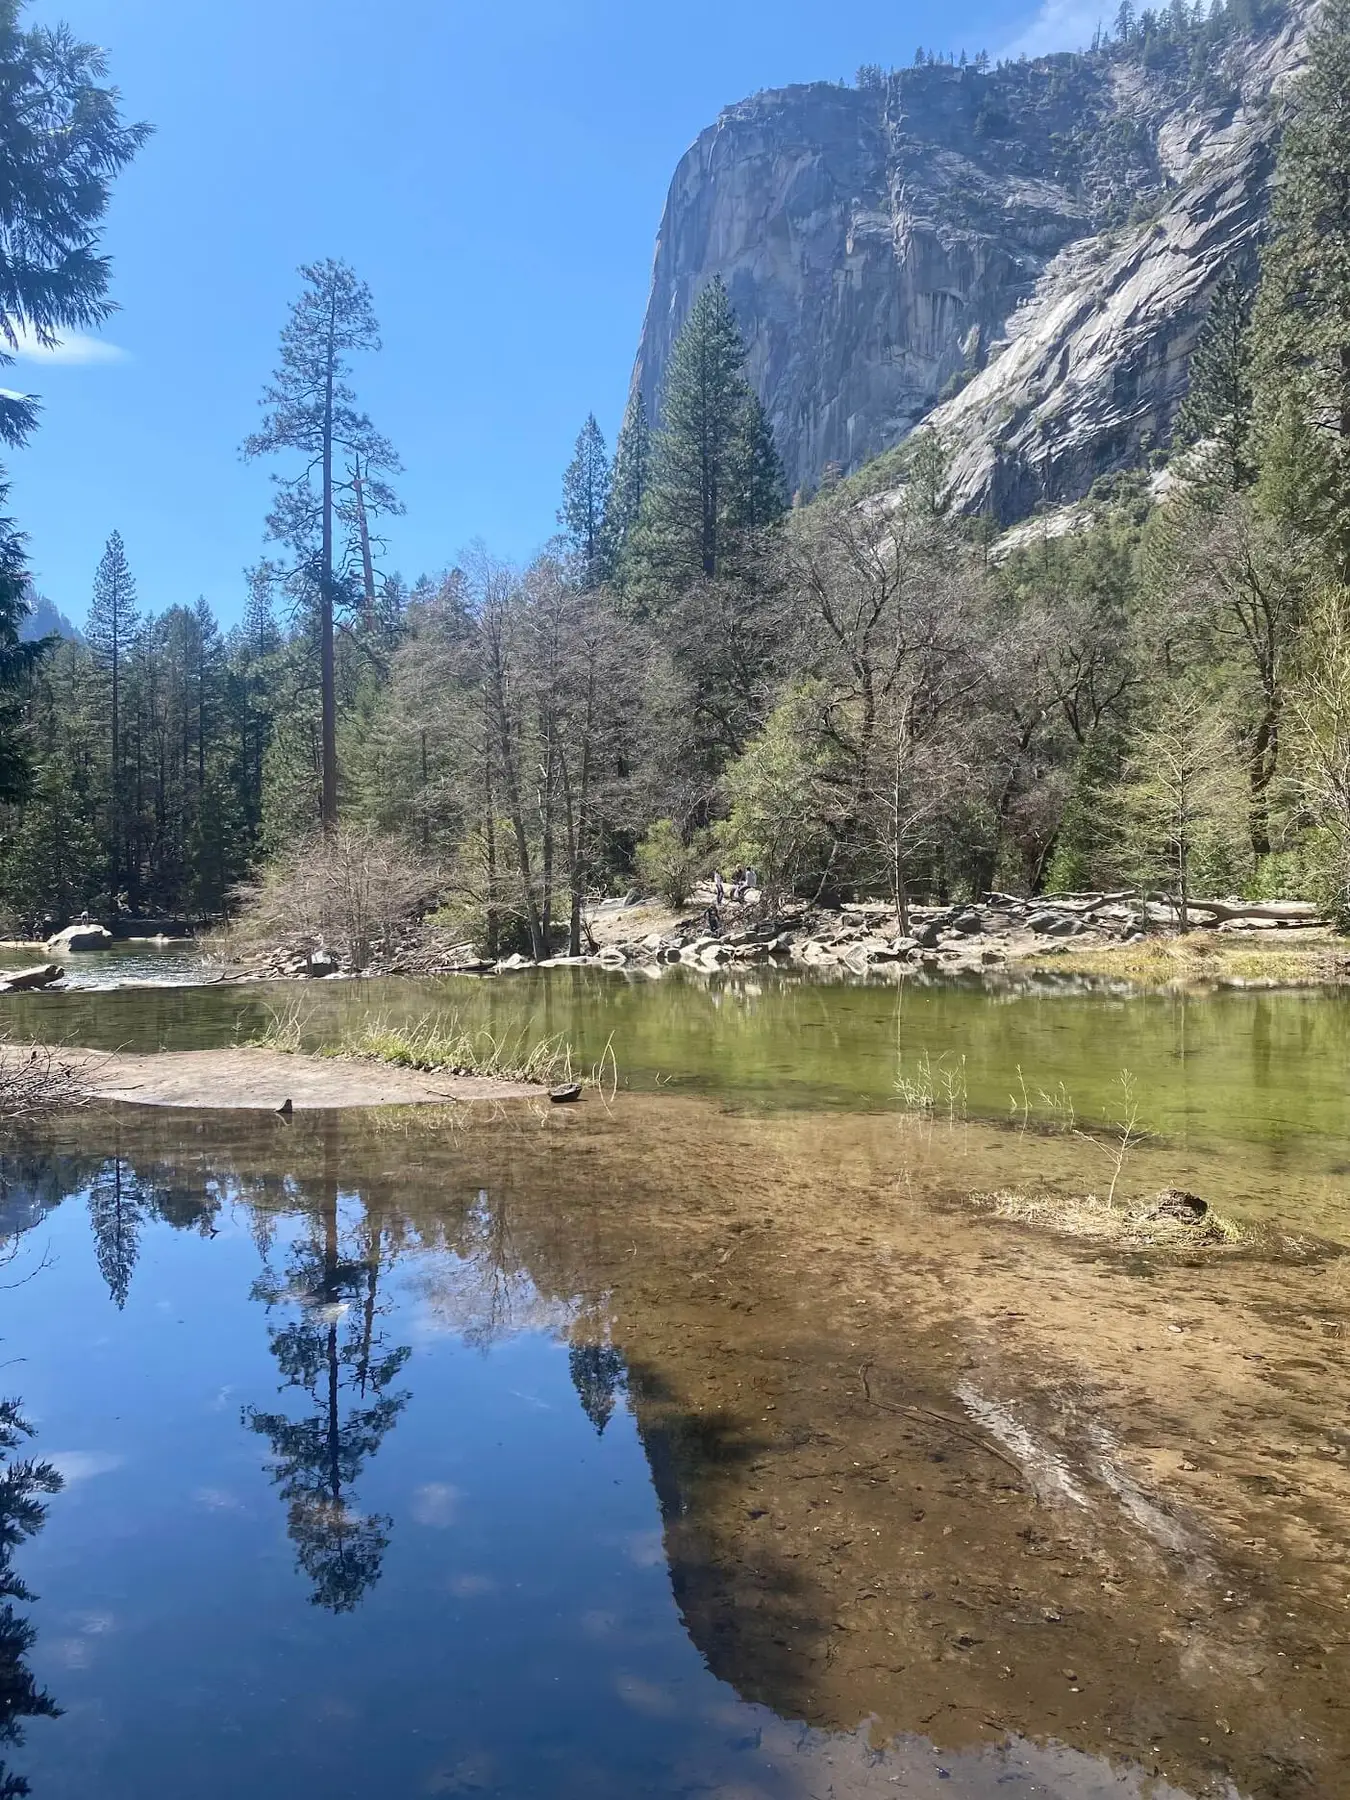
Drive further into the valley on Southside Dr. and enjoy the evening views. Turn left onto Northside Dr. and follow the signs to Yosemite Valley Lodge. There are two options for dinner at the Lodge.
1. The Mountain Room – A lovely restaurant with views of Yosemite Falls serving steaks, seafood, and more, plus it has a kids menu. Reservations are available on Open Table >
2. Basecamp Eatery – If you didn’t get a reservation at the Mountain Room or don’t want to do a traditional table-service restaurant, this food court offers a lot of good food variety sure to please everyone. View the Menu >
Head to your hotel. If you managed to get a room at Yosemite Lodge – well done! You’re home! We weren’t so lucky and needed a place to fit a family of 5 so we stayed at the Yosemite View Lodge and thought it was perfect for our family. It’s a short drive from the valley, had spacious rooms with rollaway beds available, an indoor pool, friendly staff, and a convenience store to grab snacks. Check out this list of other lodging options close to Yosemite.
Day 8
Yosemite National Park
- If staying at the Yosemite View Lodge, they do not offer free breakfast but they do have a restaurant on property and a convience store where you can grab protein bars and quick convience foods.
- Try to get up fairly early and eat breakfast quickly if you are visiting on a weekend between April – October. Even with a reservation, parking can get tricky if you don’t get there early.
This is the time of year when the falls have plenty of water, Glacier road is closed, and there may be some snow on the ground. Make sure you have proper winter apparel.
- Cascade Glade Trail off El Portal Rd.
If staying at Yosemite View Lodge, you will come to this trail before you enter the Valley, which also means it’s not very crowded! Enjoy the bit of tranquility before entering the valley! It’s a short hike to get a view of the falls with some fun rocks for kids to traverse over, but watch out for ice and don’t get too close to the water if the flow is quick. - Lower Yosemite Falls Trail
Continue to drive on El Portal Rd. and enter into the Valley. Turn left at Sentinal Drive and find parking near the Lower Yosemite Falls Trail (several options for parking including at the Lodge or the Village, then walk, bike, or take a shuttle to the trail head). This flat, .5 mile trail will take you close to the base of the falls. Stay on the trail and watch out for ice. There should be some nice snow and ice off the trail this time of year that makes for lovely pictures. - Cooks Meadow Loop
This flat loop in between the Lodge and Village areas gives lots of beautiful views of the valley. - Visitor’s Center and Lunch
Walk, bike, or take the free shuttle to the Visitor’s Center and watch the movie in the theater to take a break from the cold. You can also walk over to Degan’s Deli for lunch. If you’d like some souvenirs or snacks, walk over to the Village Store. All of these are in the Yosemite Village area. - Mirror Lake Trail
Take a free shuttle, re-park in the campground lot, or bike to the trailhead for Mirror Lake. This is a longer hike at 4.4 miles, but is pretty easy and a good family trail. The trail can be done as a loop or an out and back and you don’t have to go the whole way to enjoy the beauty. Most of the trail is natural but there is 1.5 miles that is paved (the first part if you go counter-clockwise). Don’t be too fooled by the name – there is never a true lake here, but in winter/early spring, there should at least be SOME water, although I’d call it a pond. About mid-way there is an area that usually has some water in it and a sign that marks Mirror Lake, and at the apex of the trail is a beautiful open meadow (sometimes with some water in the middle) where kids can run around underneath the beauty of half-dome. - Take in some beauty at Golden Hour
By this point in the day and time of year, the sun should be lower and if it’s clear it will shine beautifully golden on the rocks around the valley. On your way out of the valley back toward your hotel, feel free to stop at any of the streetside parking areas and take in some of the beauty. You could also travel back to Tunnel View to enjoy the view from there. - Dinner
If staying at Yosemite View Lodge, there is a good restaurant on-site called The River Restaurant and Lounge. - Pool time and bed
Yosemite View Lodge has an indoor pool that may be nice to swim in after a cold day if your kids still have some energy. The indoor pool is in a seperate building, so just a warning that the walk in between your room and the pool will be cold!
This is the time of year when the falls still have water (although maybe not as intense) and Glacier Point Road is open.
- Cascade Glade Trail off El Portal Rd.
If staying at Yosemite View Lodge, you will come to this trail before you enter the Valley, which also means it’s not very crowded! Enjoy the bit of tranquility before entering the valley! It’s a short hike to get a view of the falls with some fun rocks for kids to traverse over, but don’t get too close to the water if the flow is quick. - Lower Yosemite Falls Trail
Continue to drive on El Portal Rd. and enter into the Valley. Turn left at Sentinal Drive and find parking near the Lower Yosemite Falls Trail (several options for parking including at the Lodge or the Village, then walk, bike, or take a shuttle to the trail head). This flat, .5 mile trail will take you close to the base of the falls. - Cooks Meadow Loop
This flat loop in between the Lodge and Village areas has beautiful views of the valley. - Visitor’s Center and Lunch
Walk, bike, or take the free shuttle to the Visitor’s Center and watch the movie in the theater to take a break from the cold. You can also walk over to Degan’s Deli for lunch. If you’d like some souvenirs or snacks, walk over to the Village Store. All of these are in the Yosemite Village area. - Glacier Point
Glacier Point Road is usually open to cars late May – October or November. The drive to the top will take about an hour. Park in the lot and walk the short, paved, accessible trail to the viewing area where you’ll be 3,214 feet above Yosemite Valley. The views are truly breathtaking! - Sentinal Dome Hike
This 2.2 mile hike doesn’t have too much elevation gain until the very end (and even then it’s pretty short) and when you reach the top you are treated to incredible 360 degree views of Yosemite. I would do this hike with babies/toddlers in back carriers. Kids should be fine to hike this one and will enjoy climbing the rocks at the top, but definitely keep an eye on them at the top. It is a large, rocky dome with some large flat areas so it feels safe, but there are no guard rails so don’t let them venture far. - Dinner
If staying at Yosemite View Lodge, there is a good restaurant on-site called The River Restaurant and Lounge. - Pool time and bed
Yosemite View Lodge has an indoor pool and several outdoor pools that may be nice to swim in if your kids still have some energy.
This is the time of year when the falls may be dry, but Glacier Point road is still open.
- Mirror Lake Trail
Park in the campground lot (or the closest you can get to the trailheader). This is a longer hike at 4.4 miles, but is pretty easy and a good family trail. The trail can be done as a loop or an out-and-back and you don’t have to go the whole way to enjoy the beauty. Most of the trail is natural but there is 1.5 miles that is paved (the first part if you go counter-clockwise). Don’t be too fooled by the name – there is never a true lake here, and in late summer/early fall there may be no water at all. At the apex of the trail is a beautiful open meadow (sometimes with a bit of water in the middle that you can splash in) where kids can run around underneath the beauty of half-dome. - Visitor’s Center and Lunch
Walk, bike, or take the free shuttle to the Visitor’s Center and watch the movie in the theater to take a break inside if you’d like. You can also walk over to Degan’s Deli for lunch. If you’d like some souvenirs or snacks, walk over to the Village Store. All of these are in the Yosemite Village area. - Cooks Meadow Loop
This loop in between the Lodge and Village areas has great views of the valley. - Glacier Point
Head back to your car and start the drive to Glacier Point. The drive to the top will take about an hour. Park in the lot and walk the short, paved, accessible trail to the viewing area where you’ll be 3,214 feet above Yosemite Valley. The views are truly breathtaking! - Sentinal Dome Hike
This 2.2 mile hike doesn’t have too much elevation gain until the very end (and even then it’s pretty short) and when you reach the top you are treated to incredible 360 degree views of Yosemite. I would do this hike with babies/toddlers in back carriers. Kids should be fine to hike this one and will enjoy climbing the rocks at the top, but definitely keep an eye on them at the top. It is a large, rocky dome with some large flat areas so it feels safe, but there are no guard rails so don’t let them venture far. - Dinner
If staying at Yosemite View Lodge, there is a good restaurant on-site called The River Restaurant and Lounge. - Pool time and bed
Yosemite View Lodge has an indoor pool that may be nice to swim in after a long day!
Day 9
Monterey
- Check out of your Yosemite hotel. Try to leave by 8am at the latest.
- Drive to Monterey (and specifically the Monterey Bay Aquarium). It’s about a 4-hour drive with a lot of beautiful scenery along the way!
- Get a quick lunch on the way or when you arrive in Monterey
Head straight to the Monterey Bay Aquarium. Buy your tickets online in advance. There may be a queue to enter, even with advanced tickets, but the line moves pretty quickly.
There is an awesome sea otter area plus an outdoor area where you can often see wild sea otters. There’s a penguin exhibit and a fun kids play and splash area. There’s also a unique kelp forest aquarium and many other interesting exhibits that make this aquarium one of a kind!
The Aquarium usually closes at 5. When it’s over, you can walk down Cannery Row, a charming road along the coast full of restaurants and shops. It’s a bit touristy, but hey, you’re a tourist!
Eat at dinner in the area. Some delicious and kid-friendly options in the Cannery Row area include:
You can also walk all the way down (or re-park) near Fisherman’s Wharf. There are even more restaurants and shops in this quaint, but touristy pier. The Crab House and Rockfish Harbor Grill are two good seafood restaurants with water views. There are often sea lions near the pier.
We stayed at SpringHill Suites The Dunes On Monterey Bay. It had an indoor pool, breakfast included, and was perched on a hilltop with ocean views, but is outside the city.
For in-city options, check out the Monterey Marriott or The Clement Monterey.
Day 10
Central Coast
Eat breakfast at your hotel and check on the weather for the day. There is often a layer of marine fog so you may want to wait to start your day until the fog starts to burn off. Today is all about coastal views, but you won’t see as much in the fog.
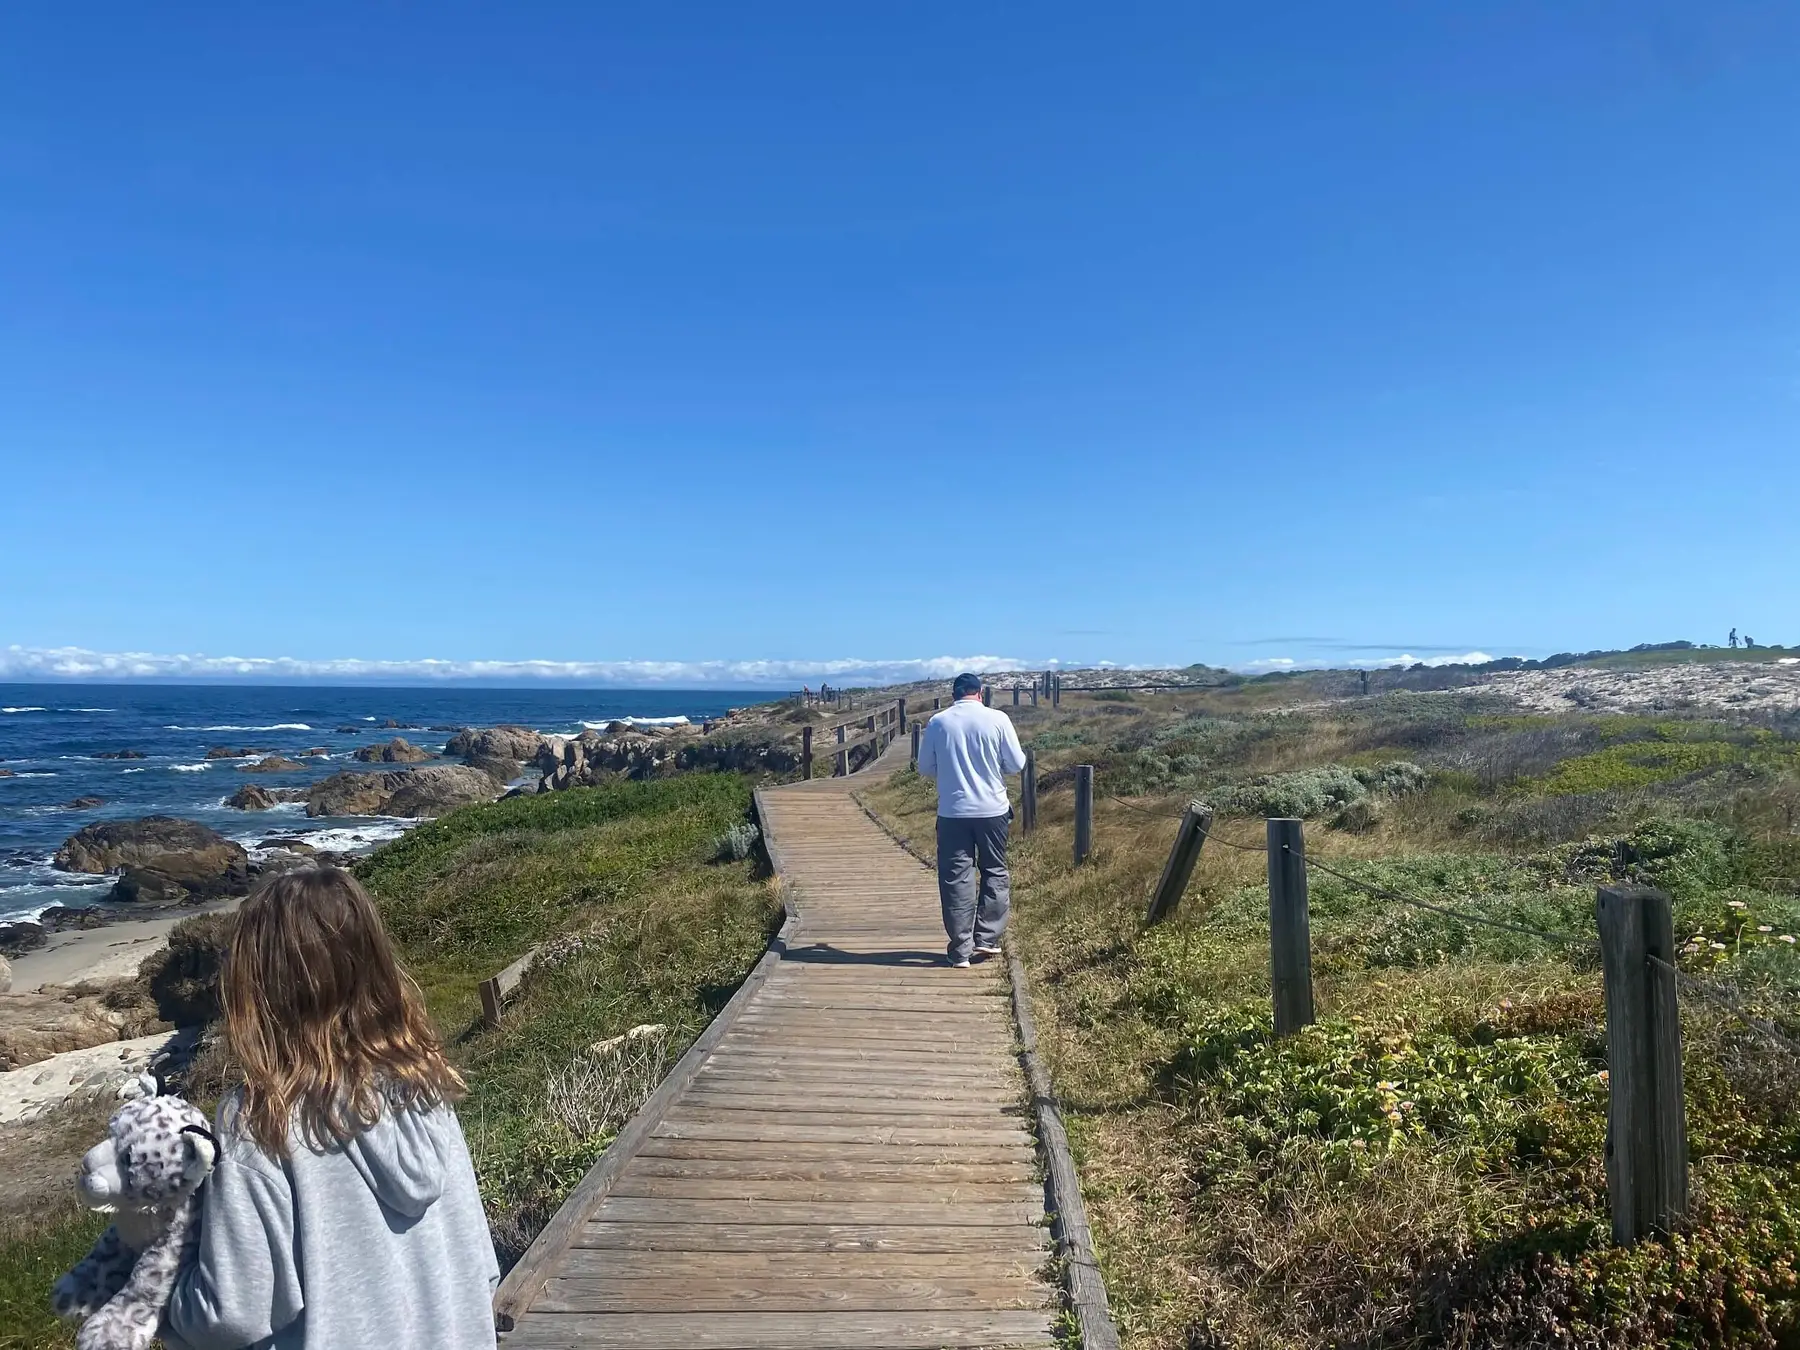
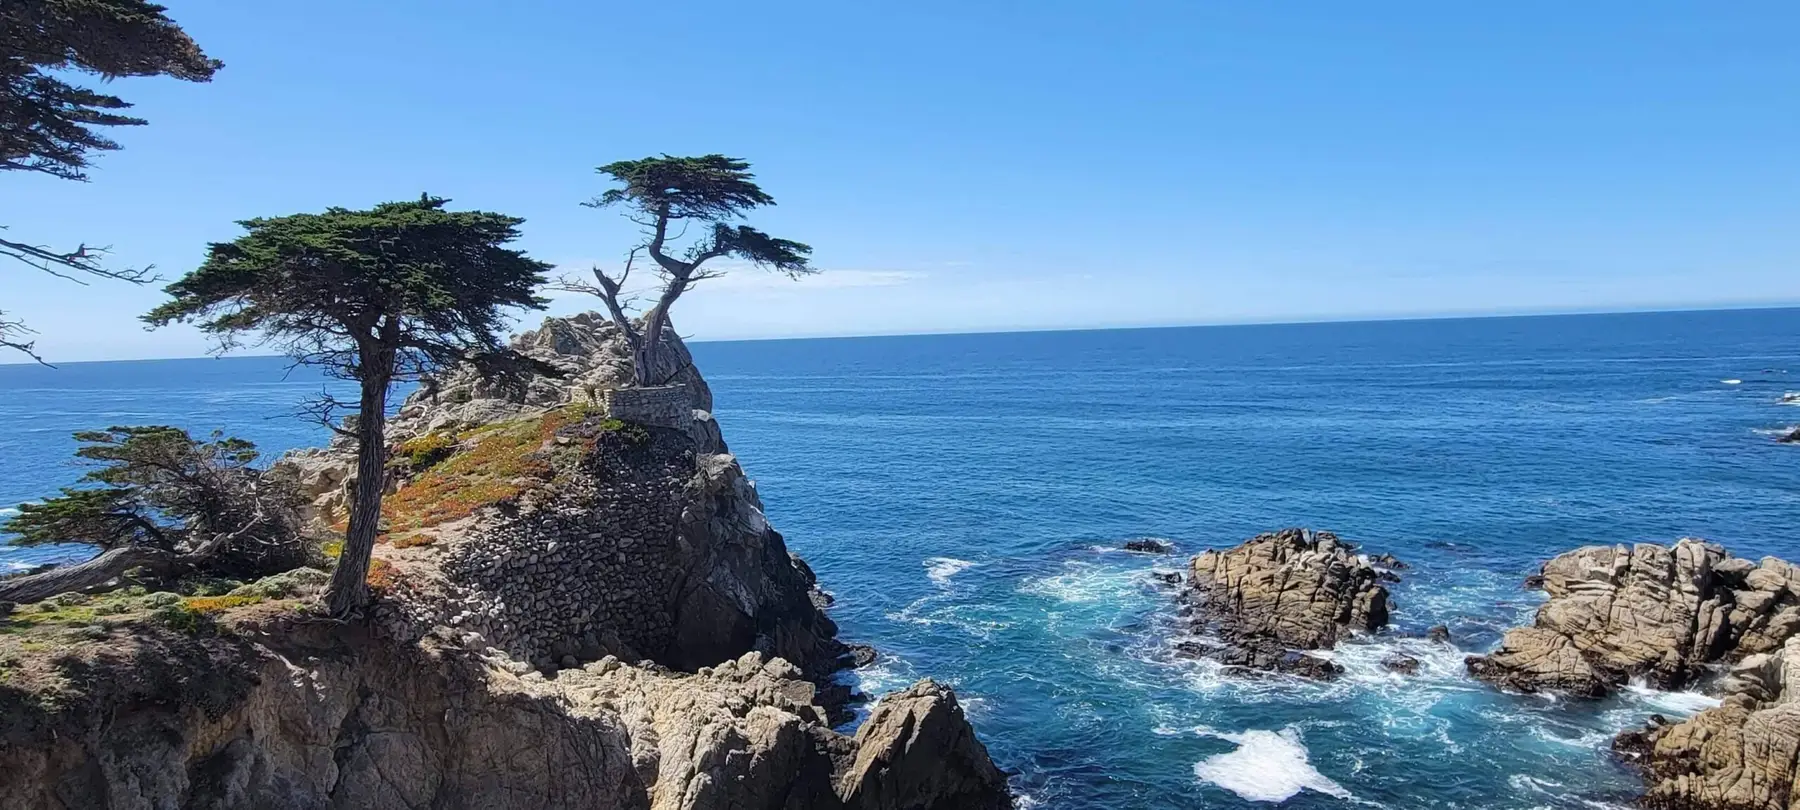
Drive to the start of 17-mile drive in Pebble Beach. Enter at the Pacific Grove Gate. This gorgeous drive offers many stunning views of the coastline and the Pebble Beach golf course. It also includes the famous “Lone Cypress” tree. There are many marked stops along the route where you can get out and walk to further explore the beauty. Our kids loved stopping at some of the beach stops where they could climb on the coastal rock formations.
Admission is $11.27 per vehicle but is reimbursed with a purchase of $35 or more at any of the Pebble Beach restaurants or stores.
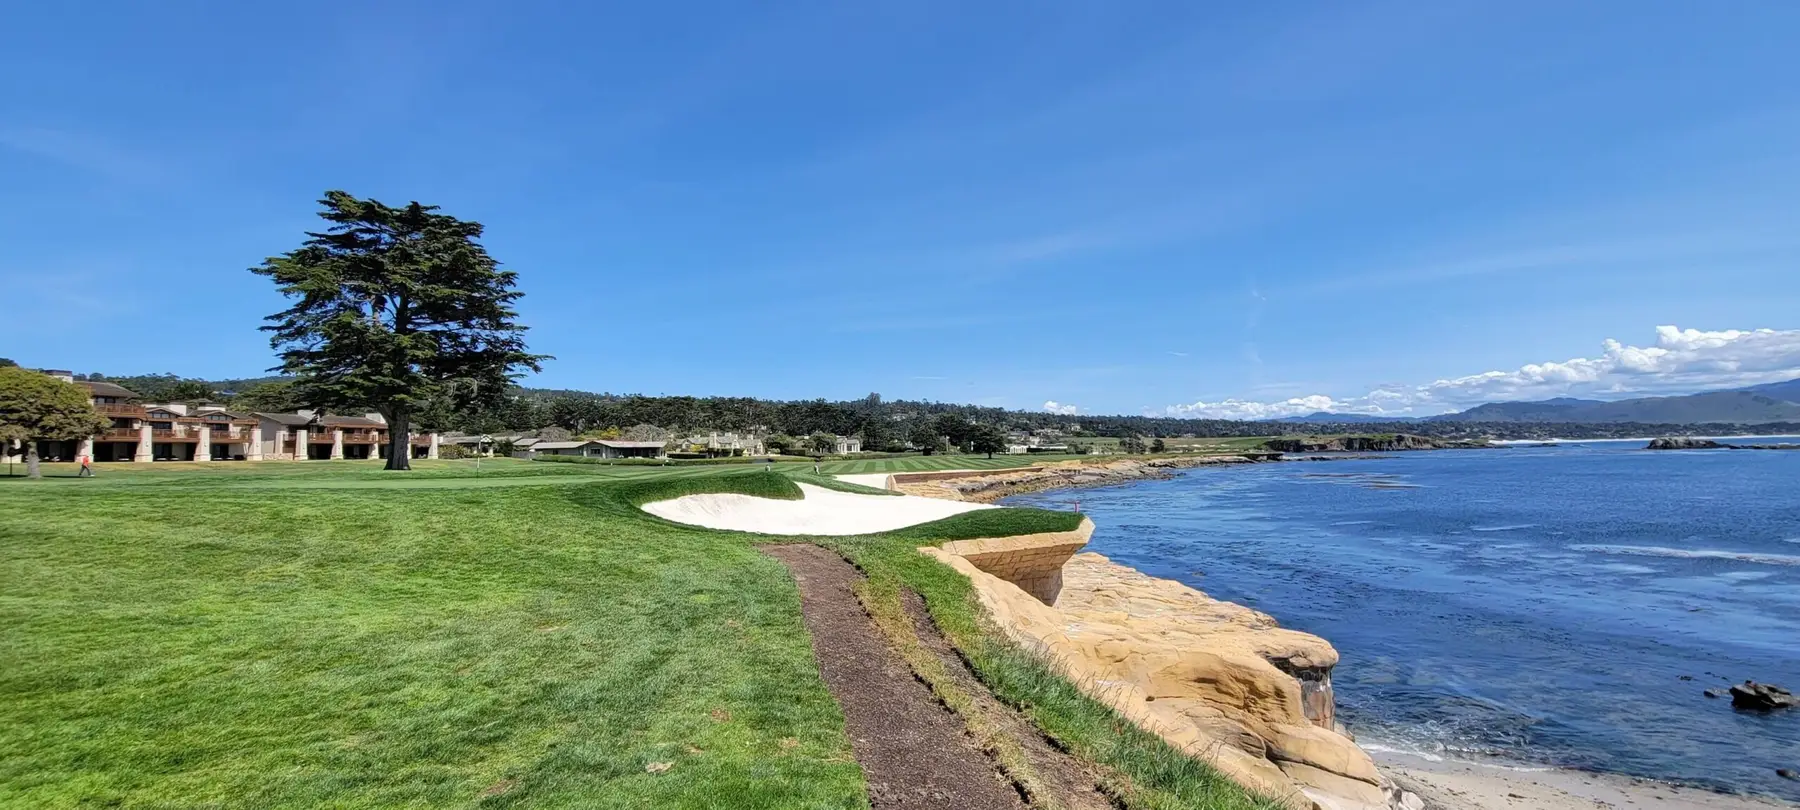
Eat Lunch at the Lodge at Pebble Beach. Most of your stops will be on the coastline, so by the time you reach the Lodge area, you will probably be hungry! There are several restaurant options, but we recommend The Gallery Cafe – it’s kid-friendly (has a kids menu), the food is good, and you have views of the putting green and tee of hole 1.
If you have a golf fan, I recommend looking through the shops and checking out the visitor’s center to learn more about the history of the Pebble Beach golf course.
Exit the 17-mile drive on the south end at Carmel Gate and drive south to Point Lobos. The 17-mile drive will make a full loop, but the rest of the loop is not as special so we recommend exiting at the south gate. You’ll drive through Carmel-by-the-Sea and down Highway 1 a few miles to Point Lobos State Natural Reserve. This drive should take about 10 minutes. There is a $10 entrance fee per vehicle.
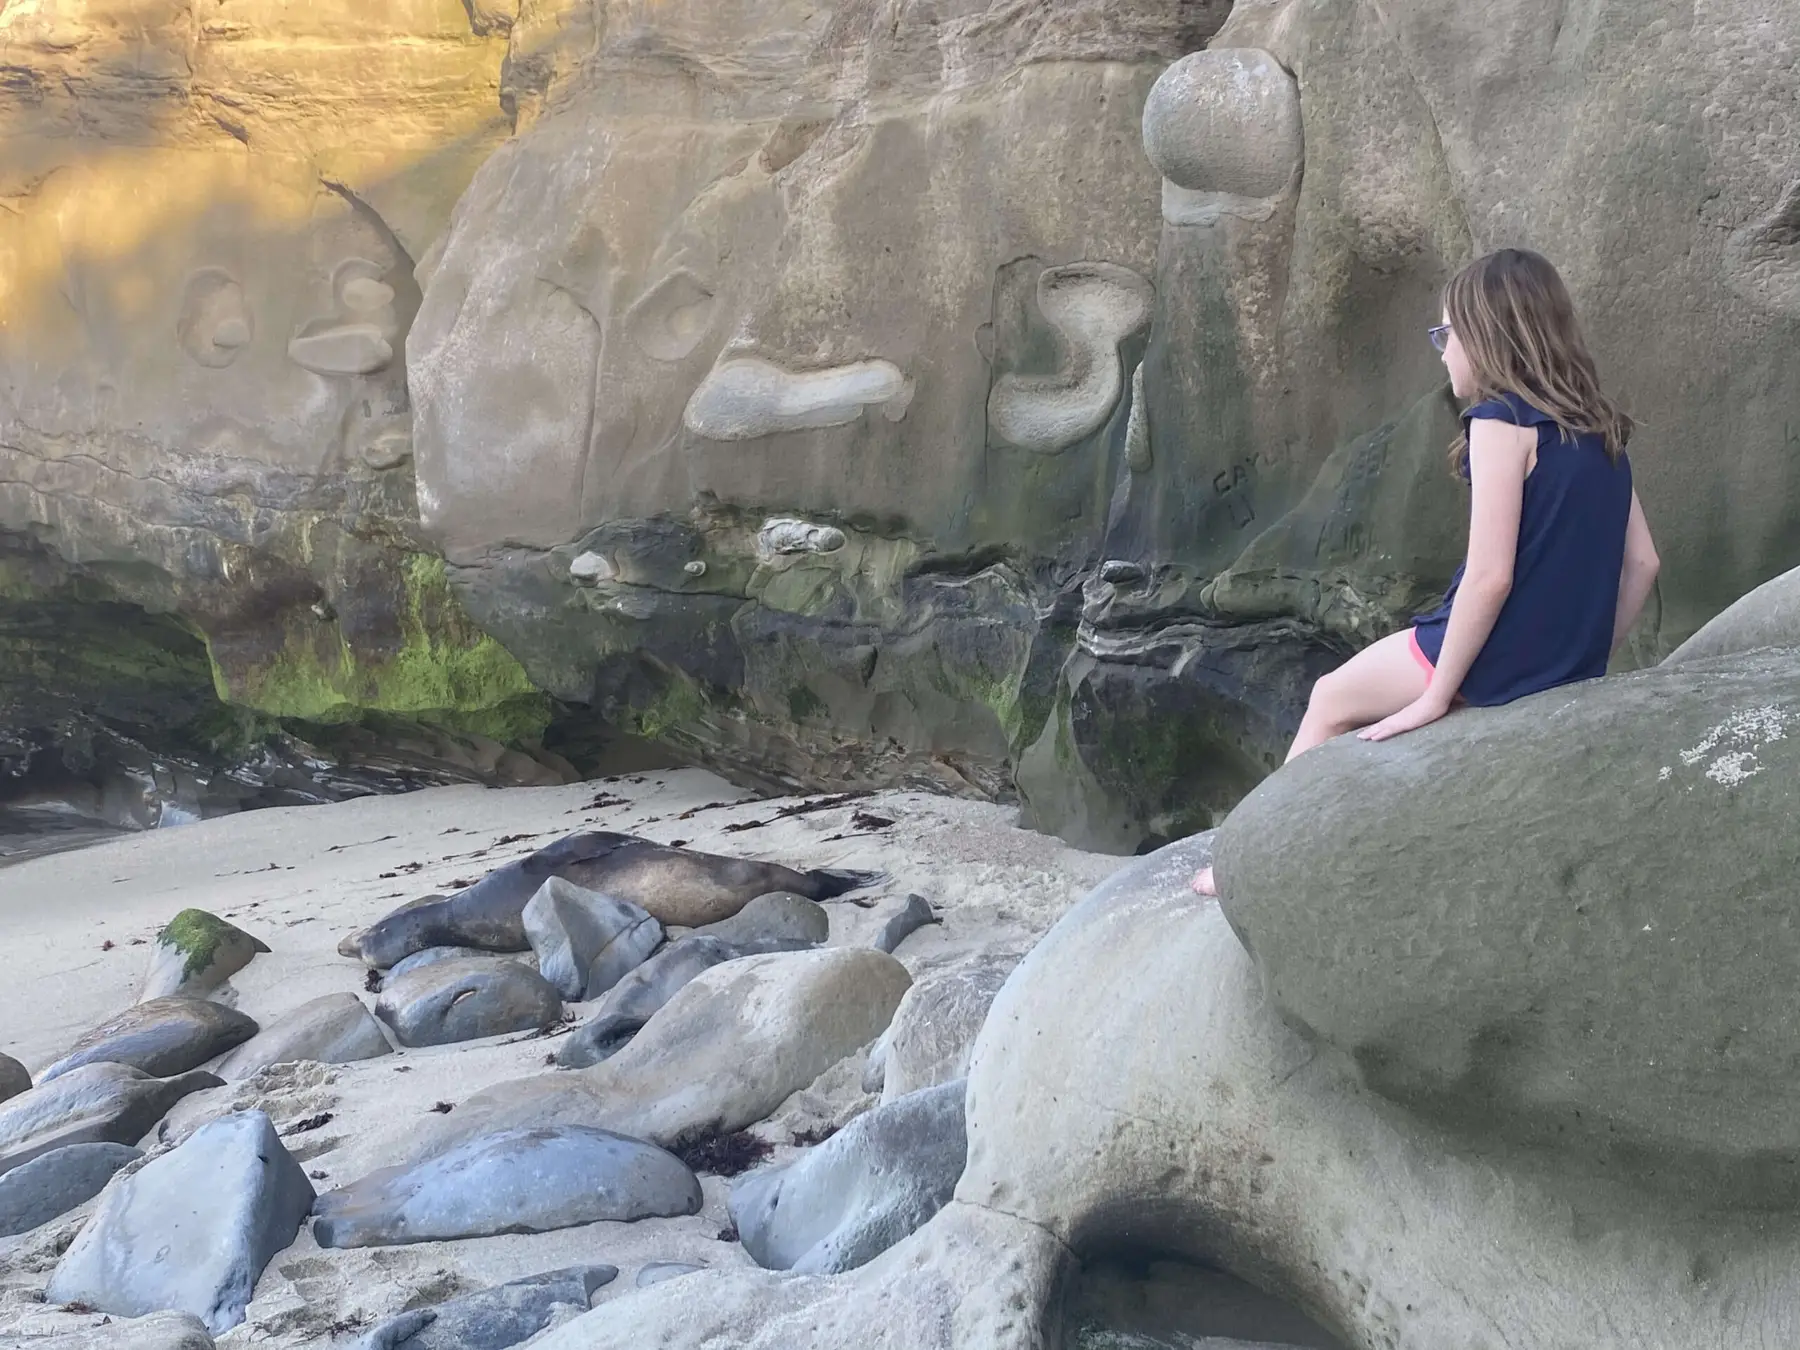
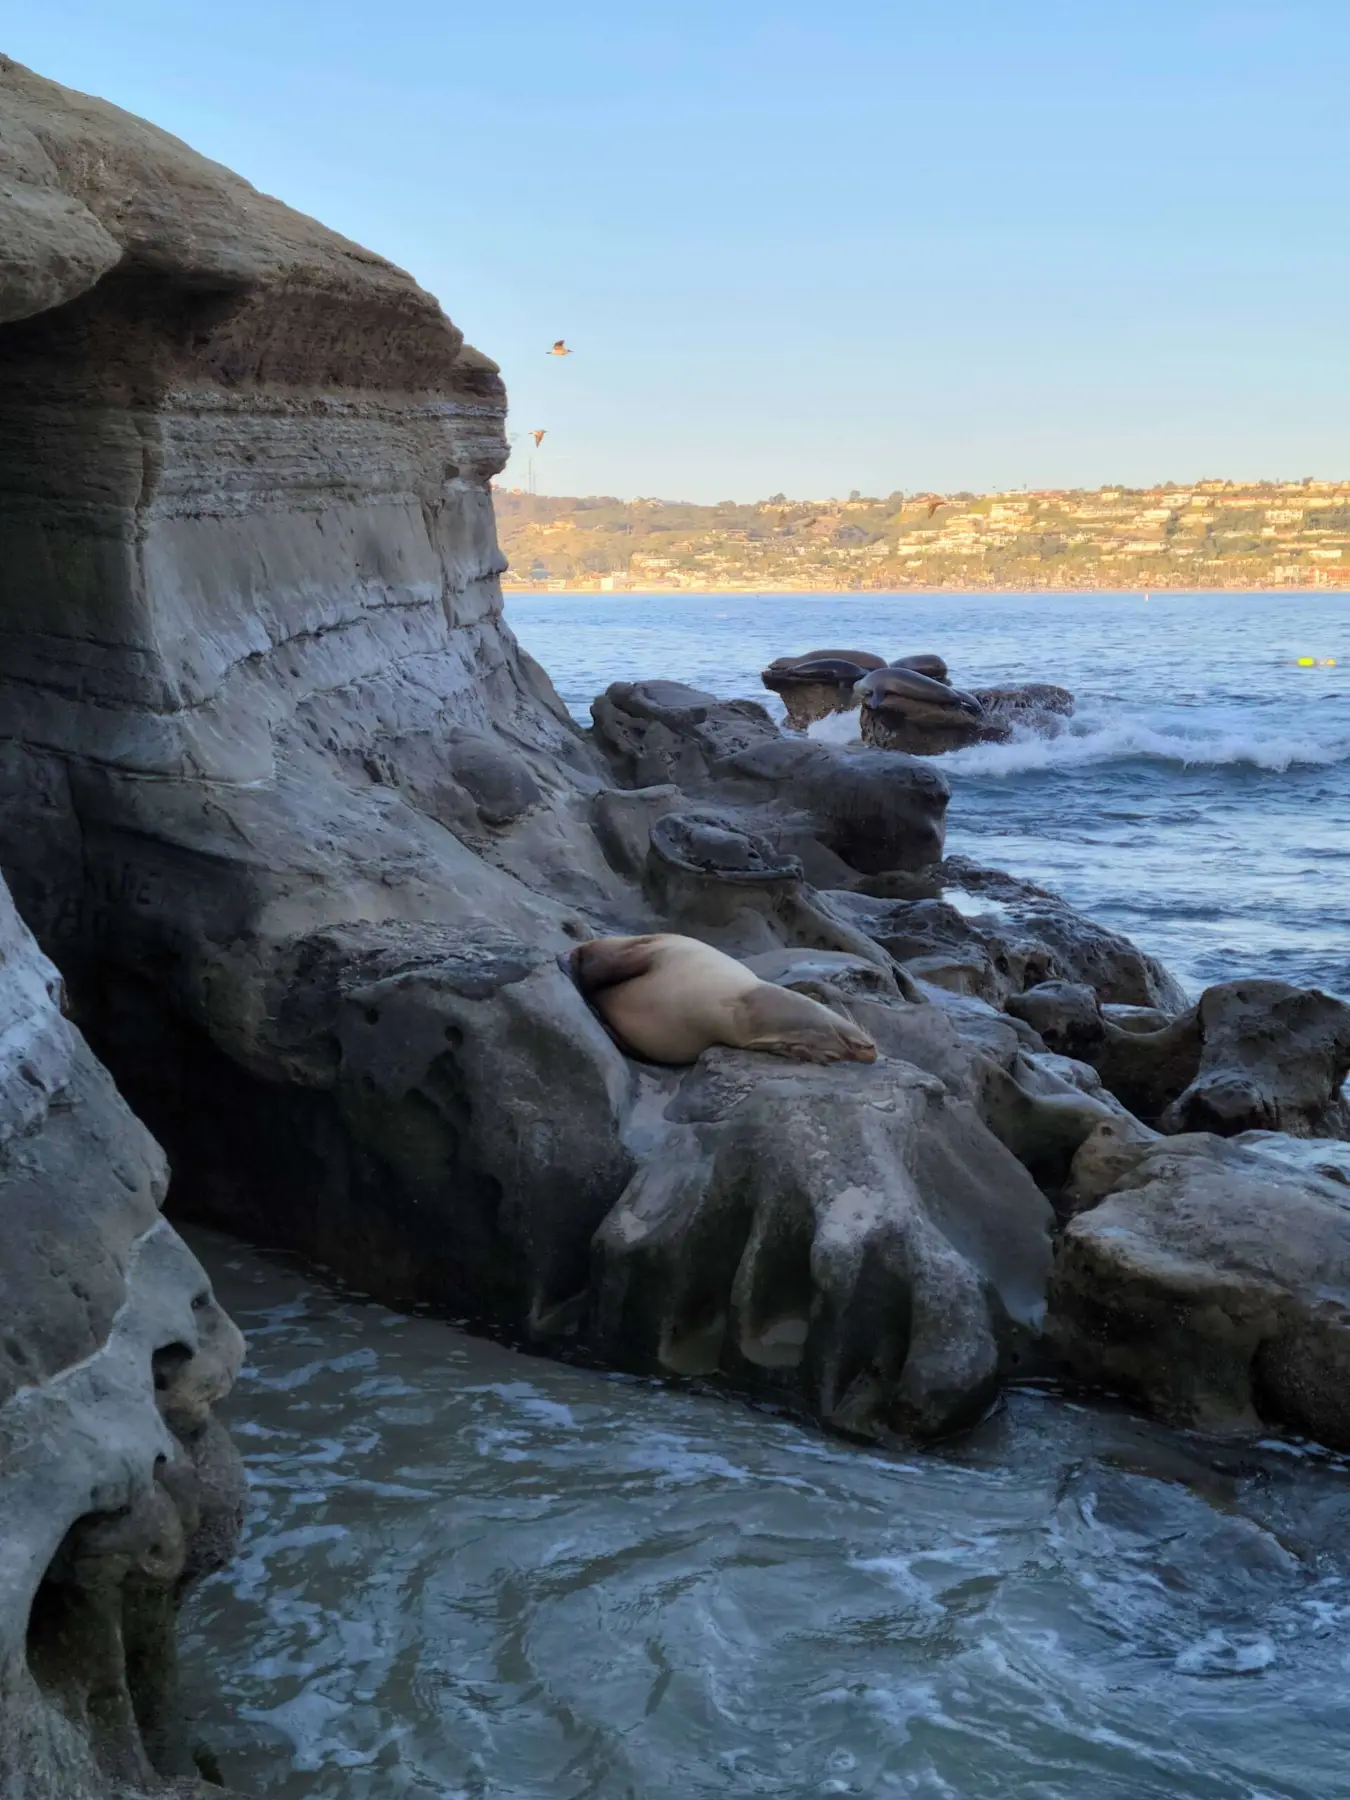
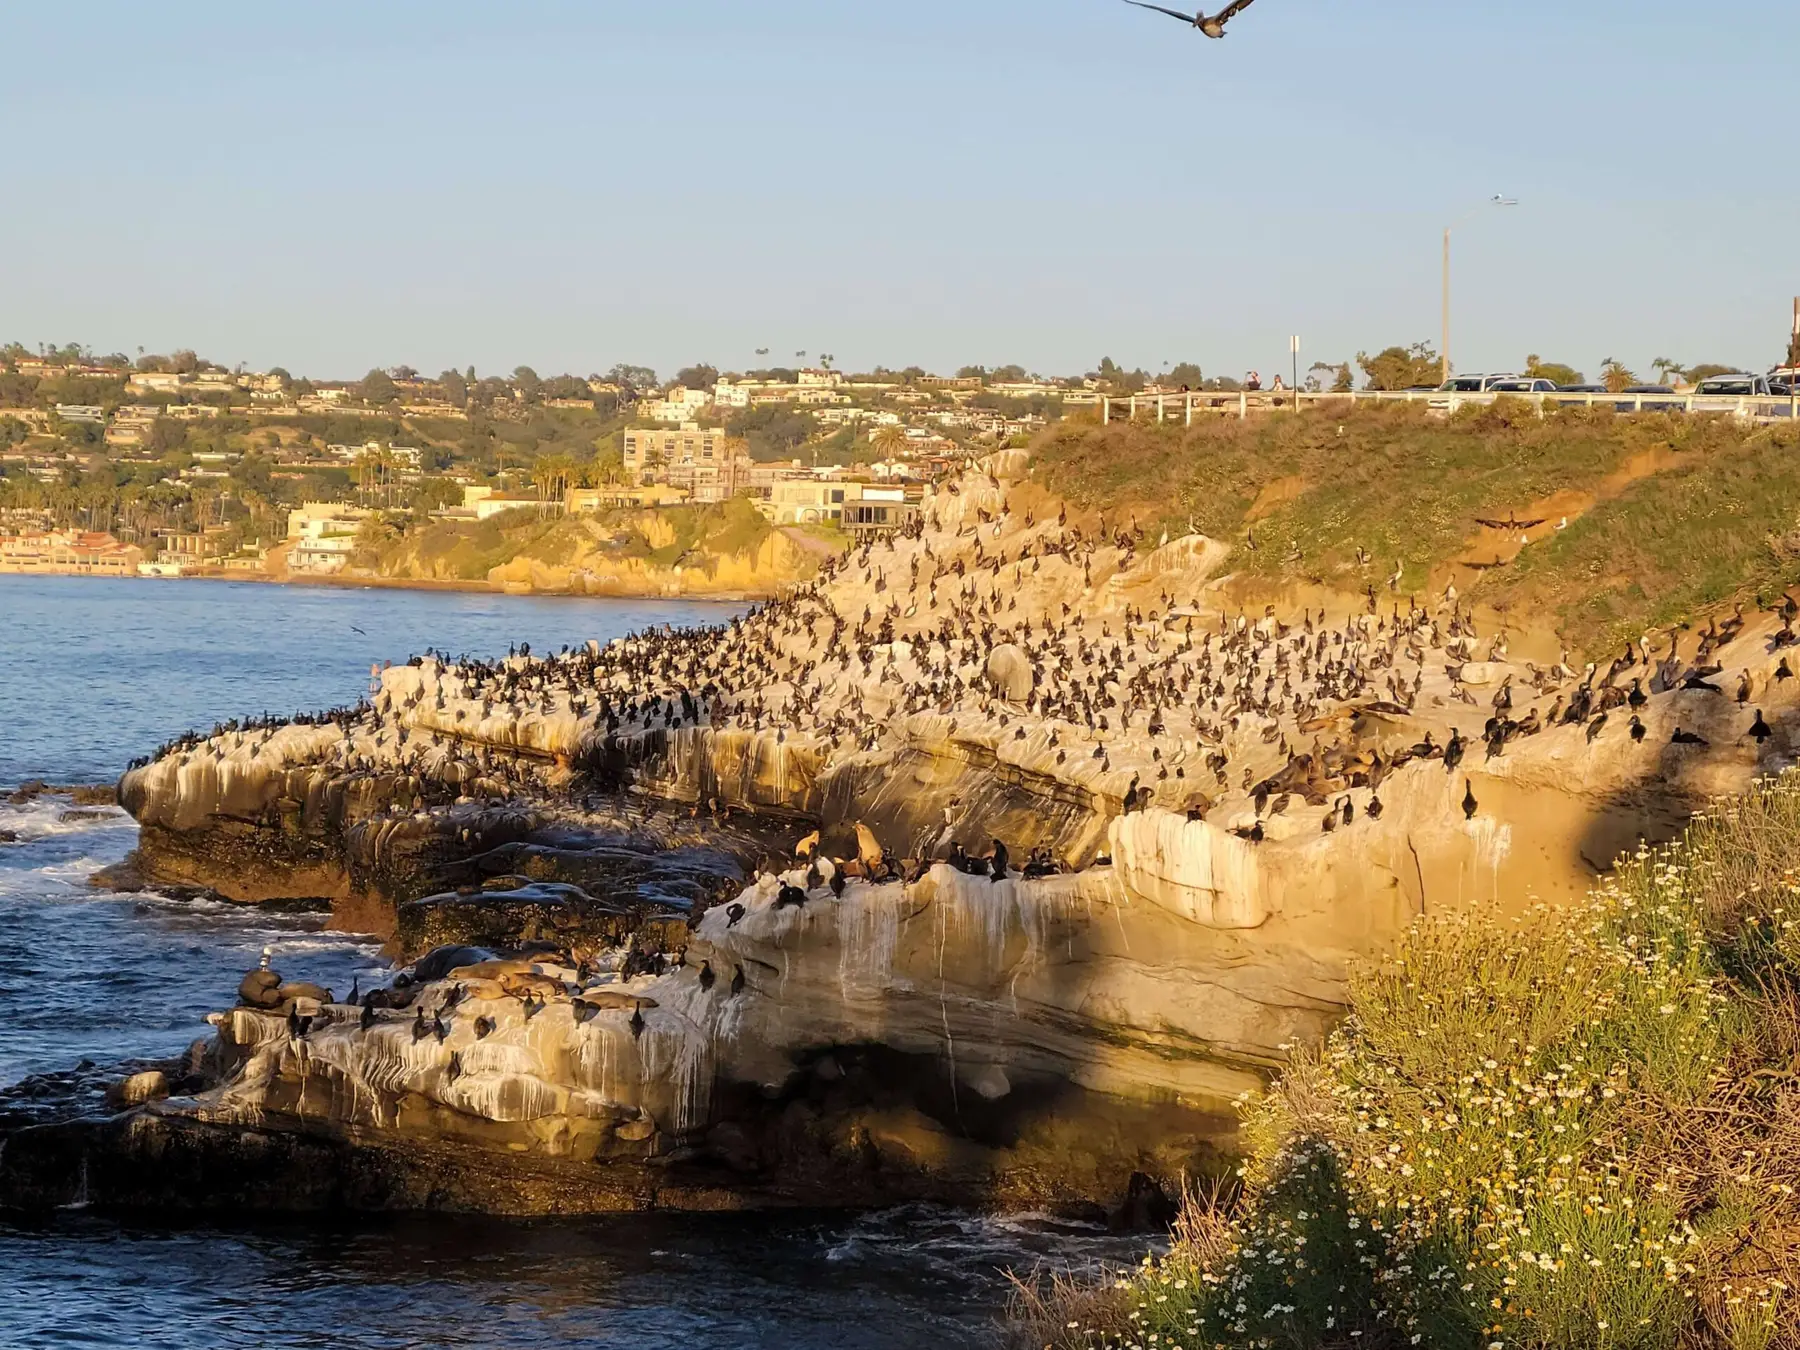
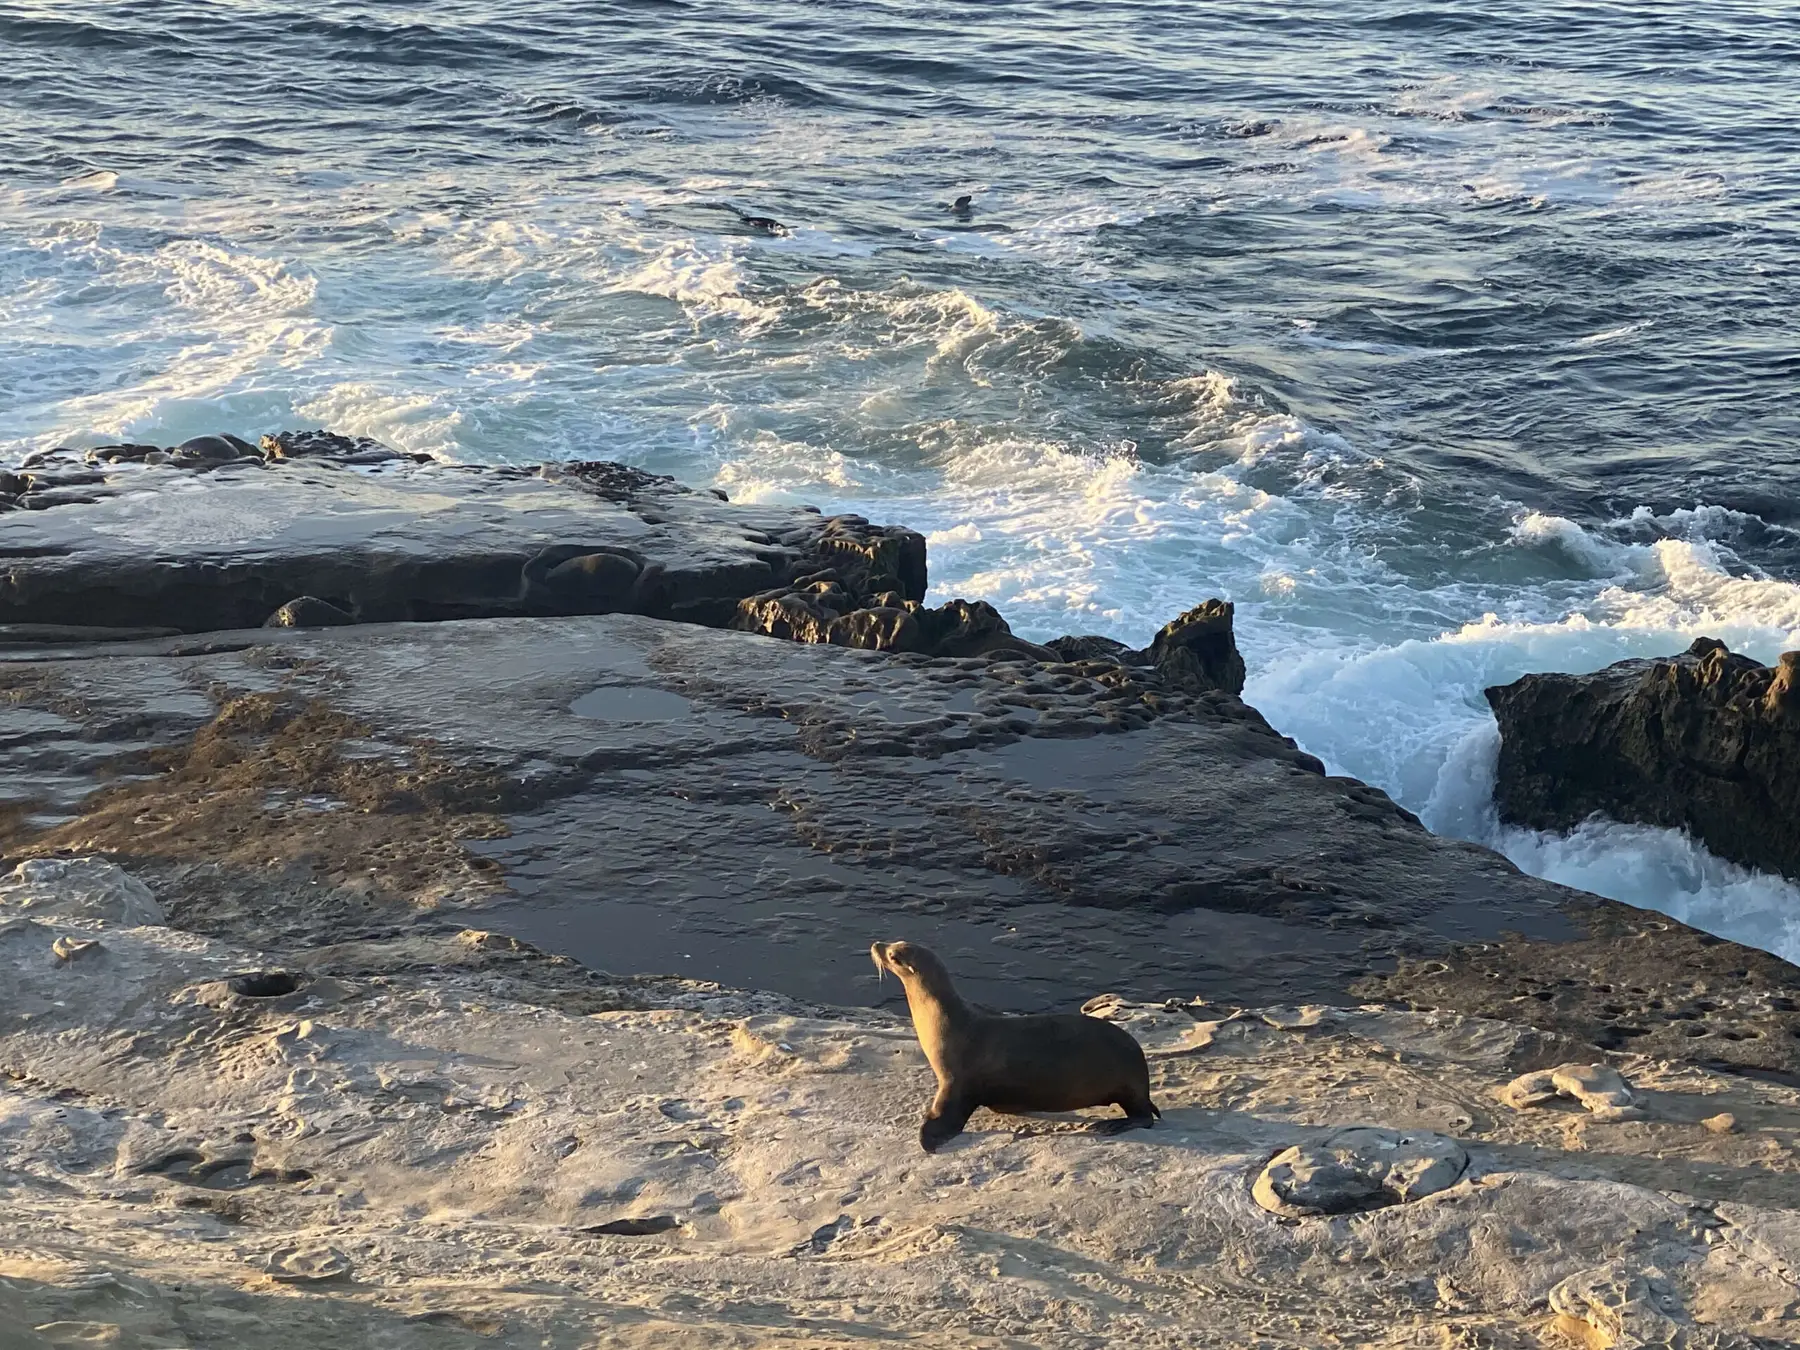
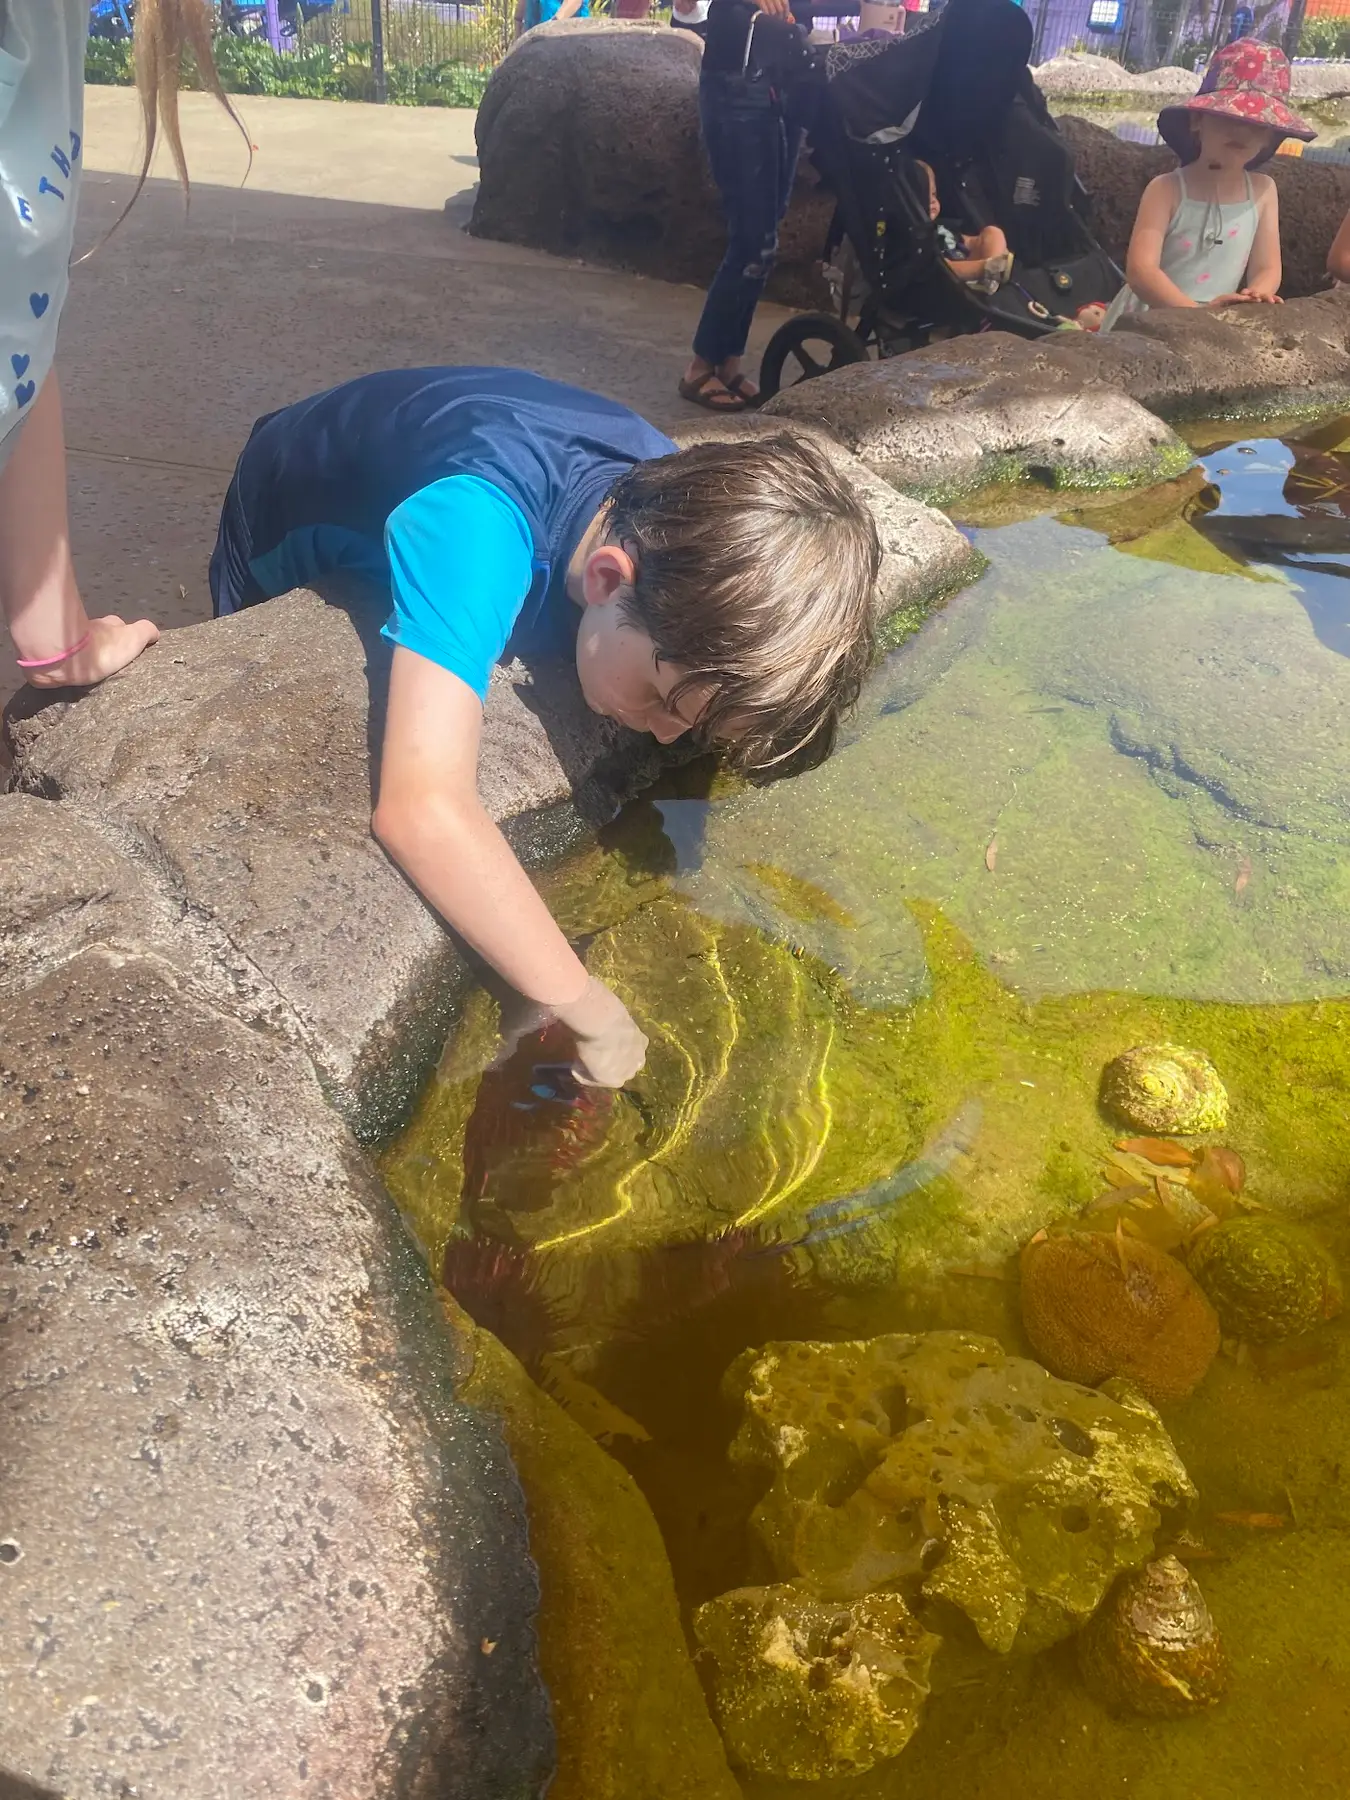
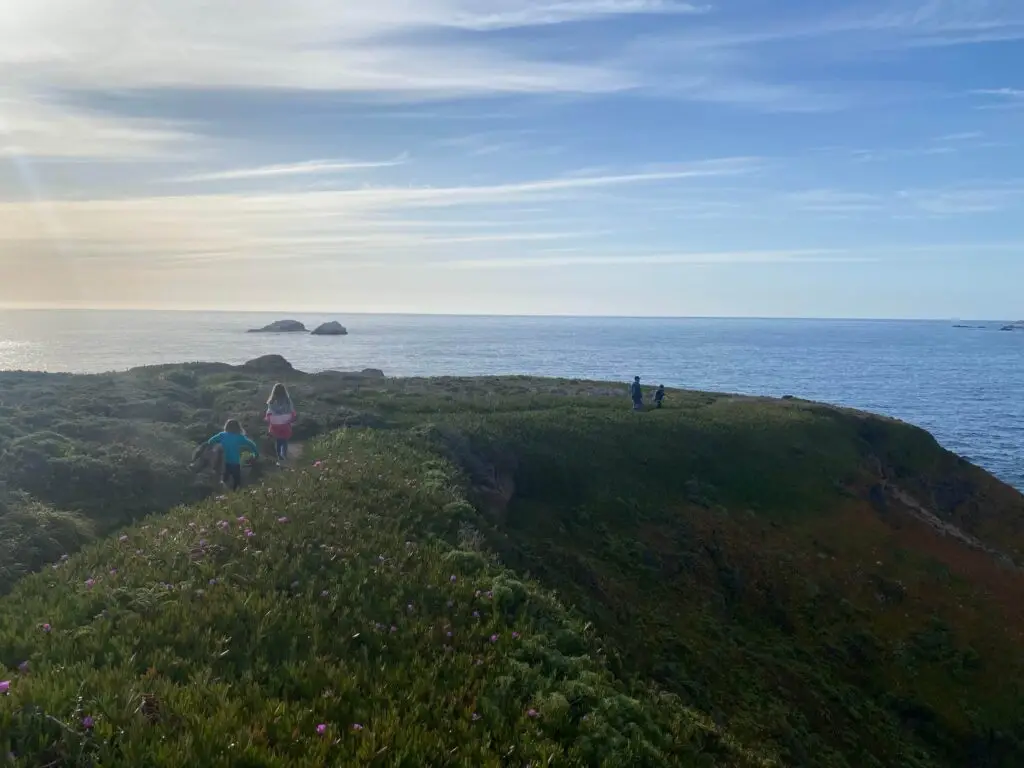
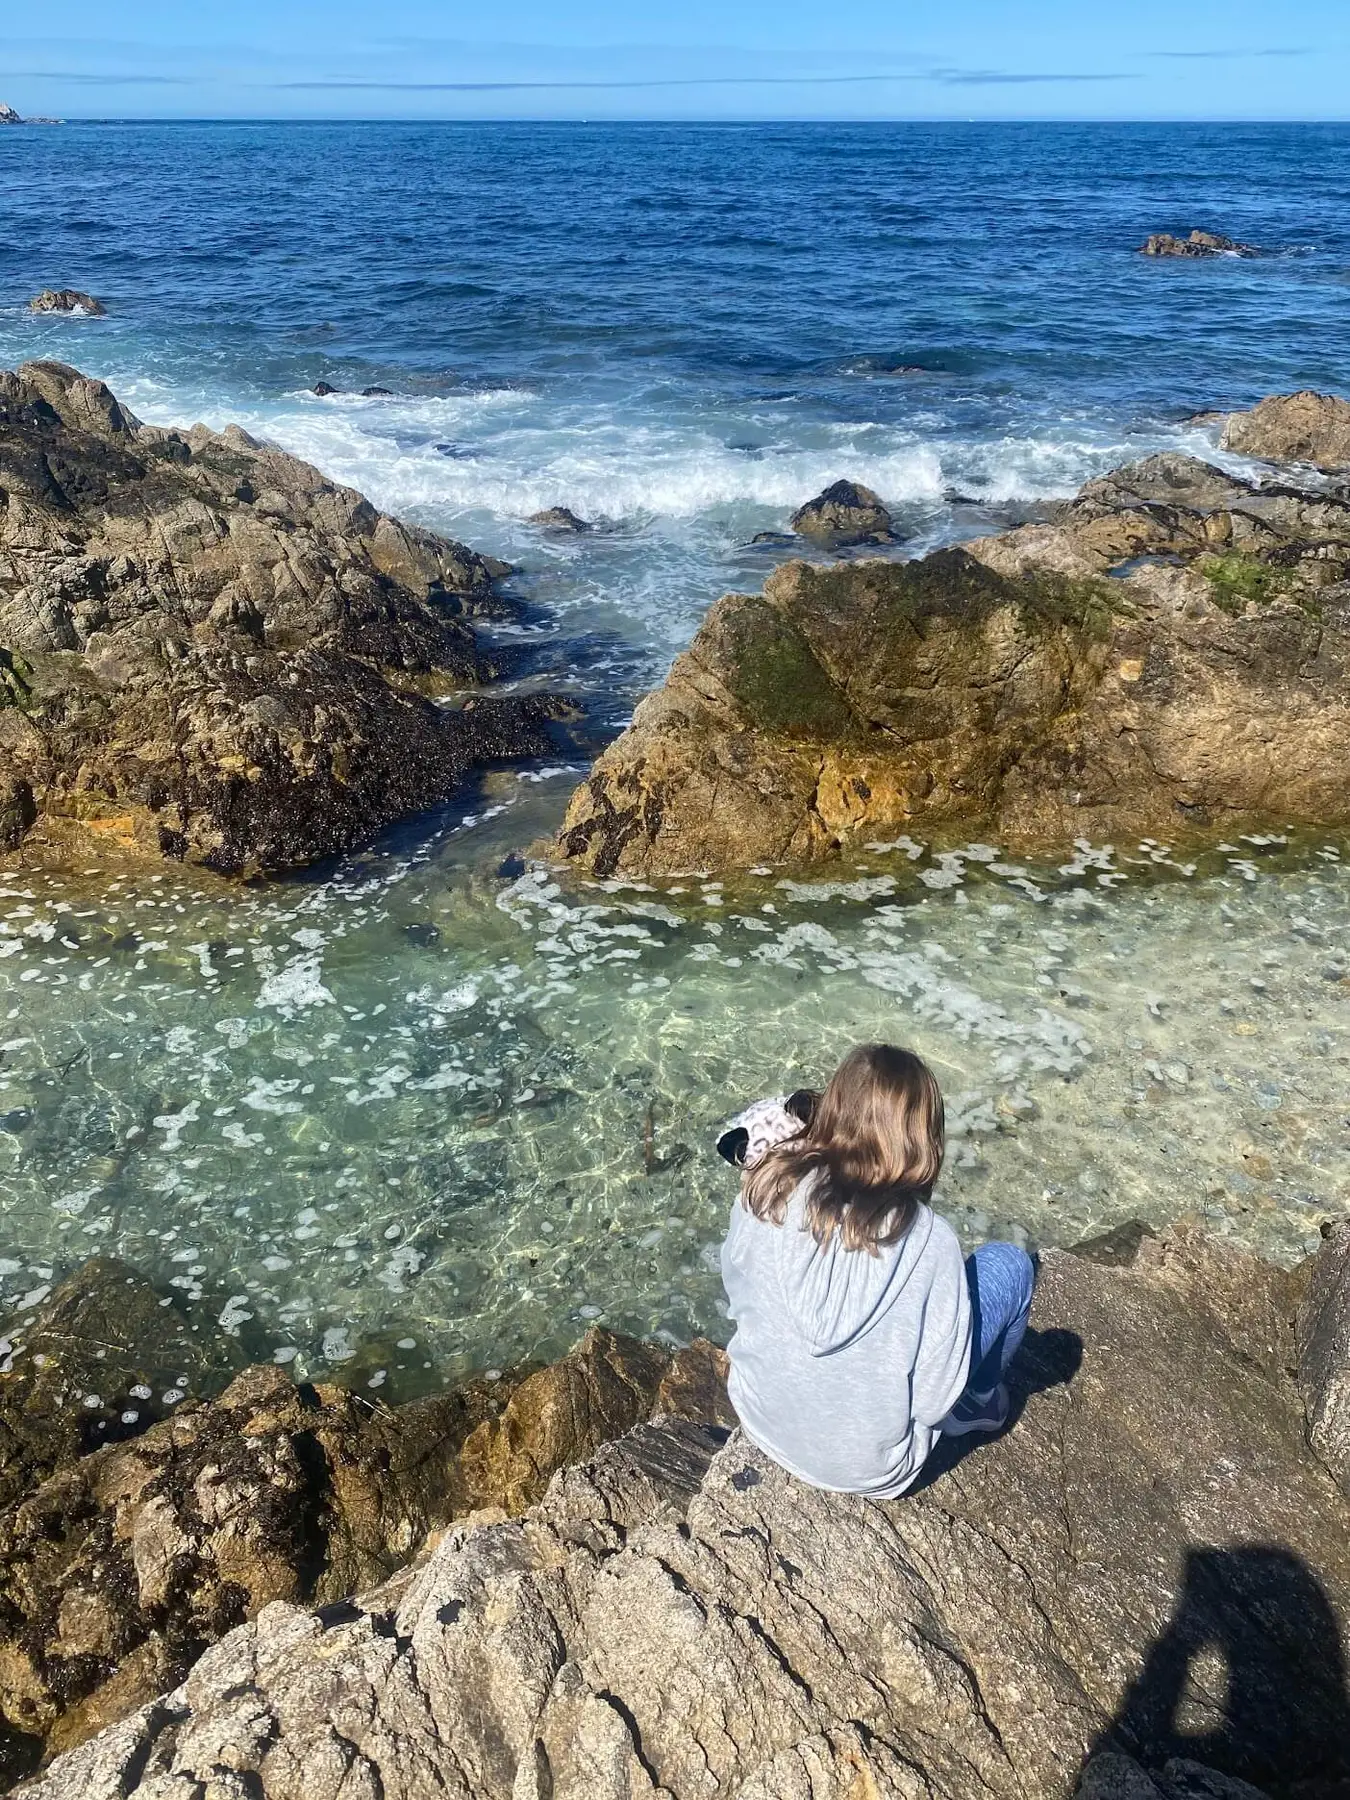
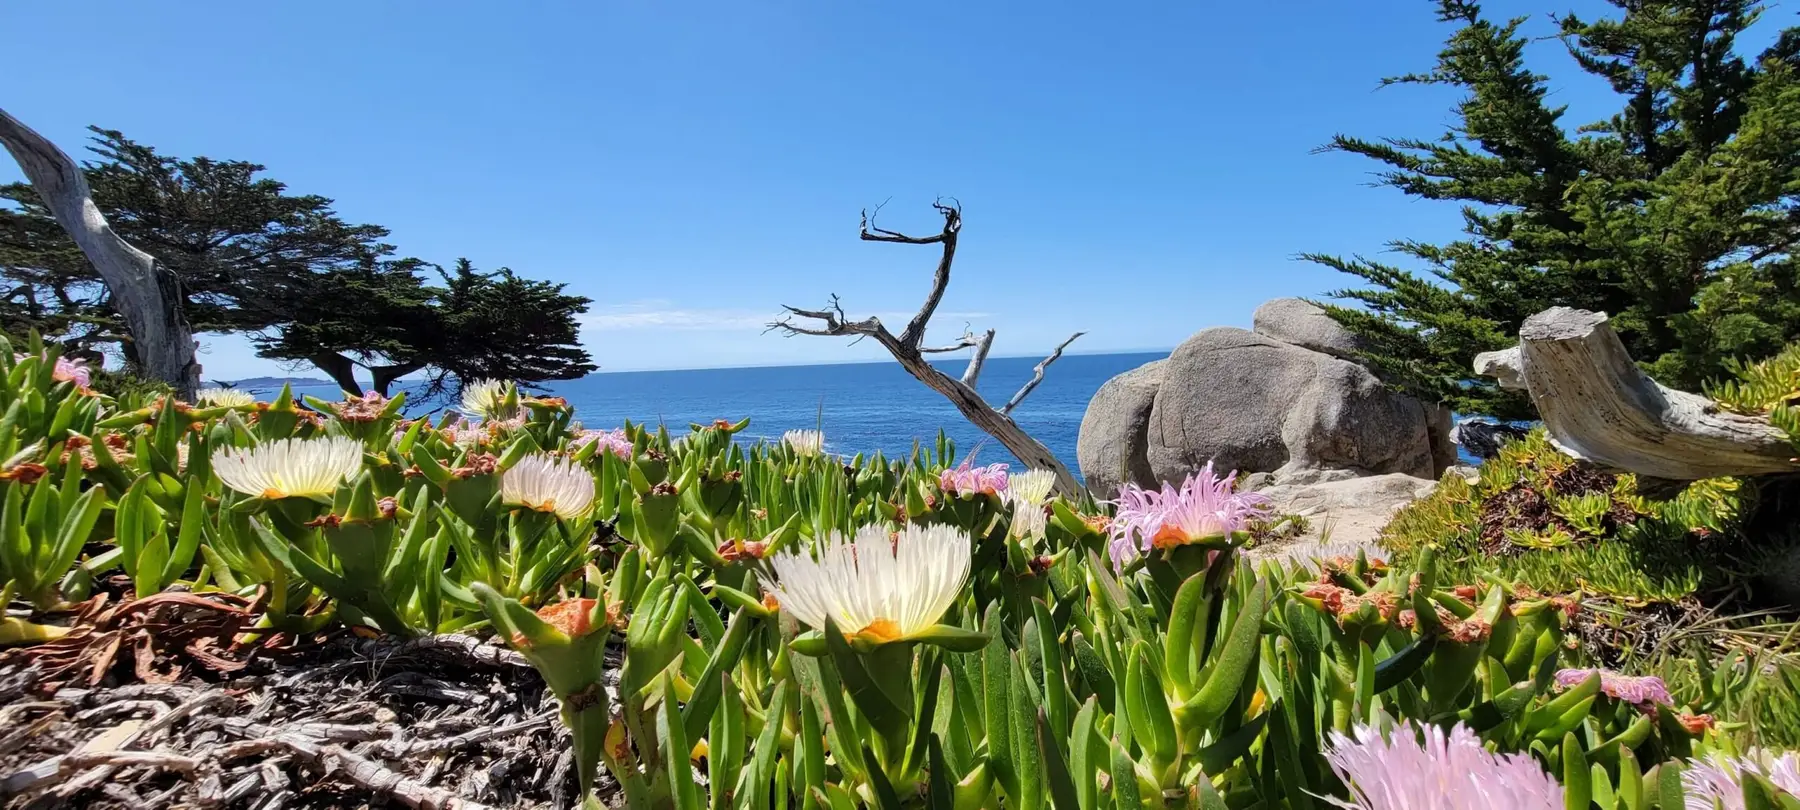
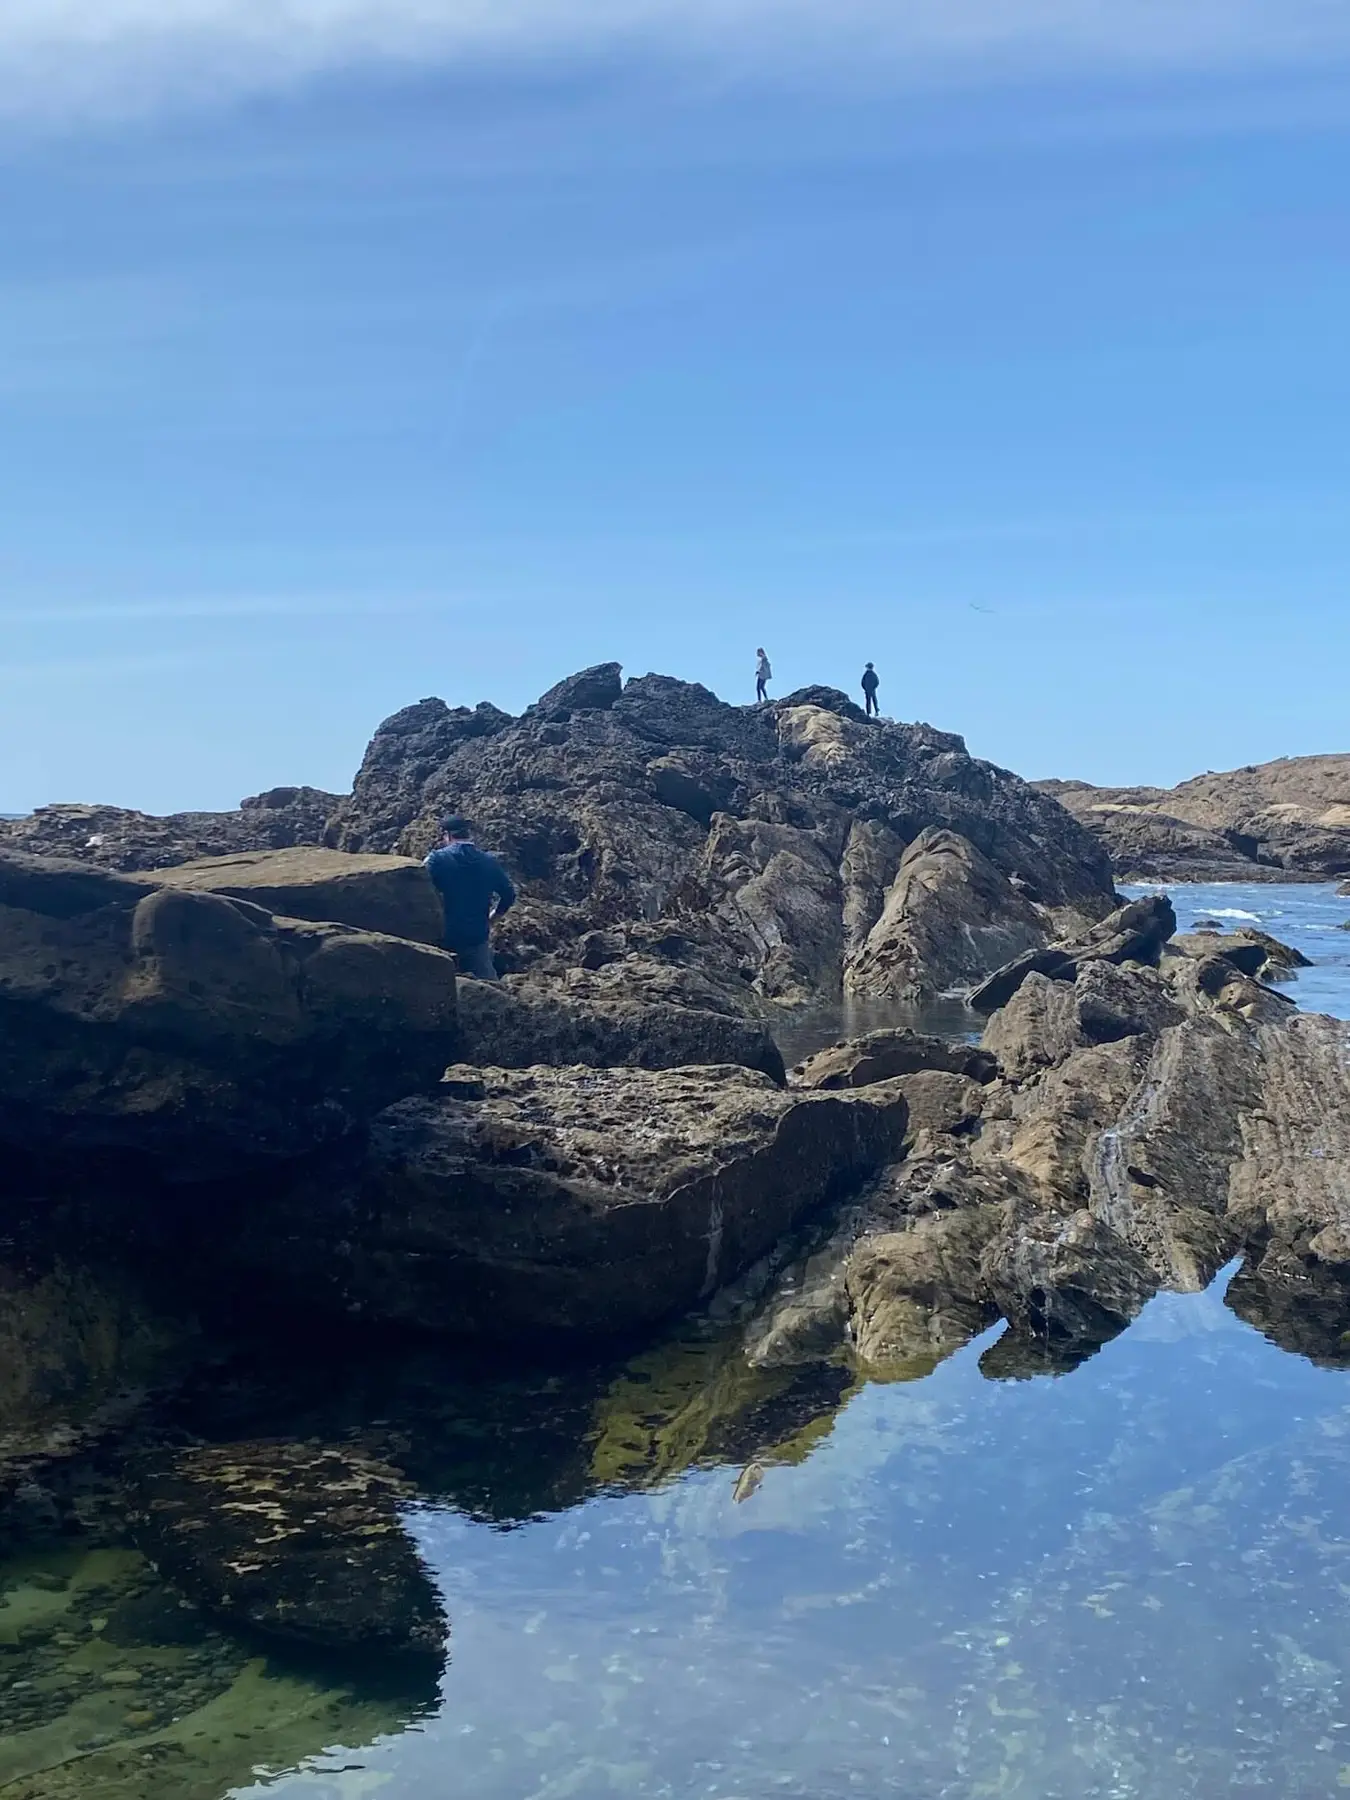
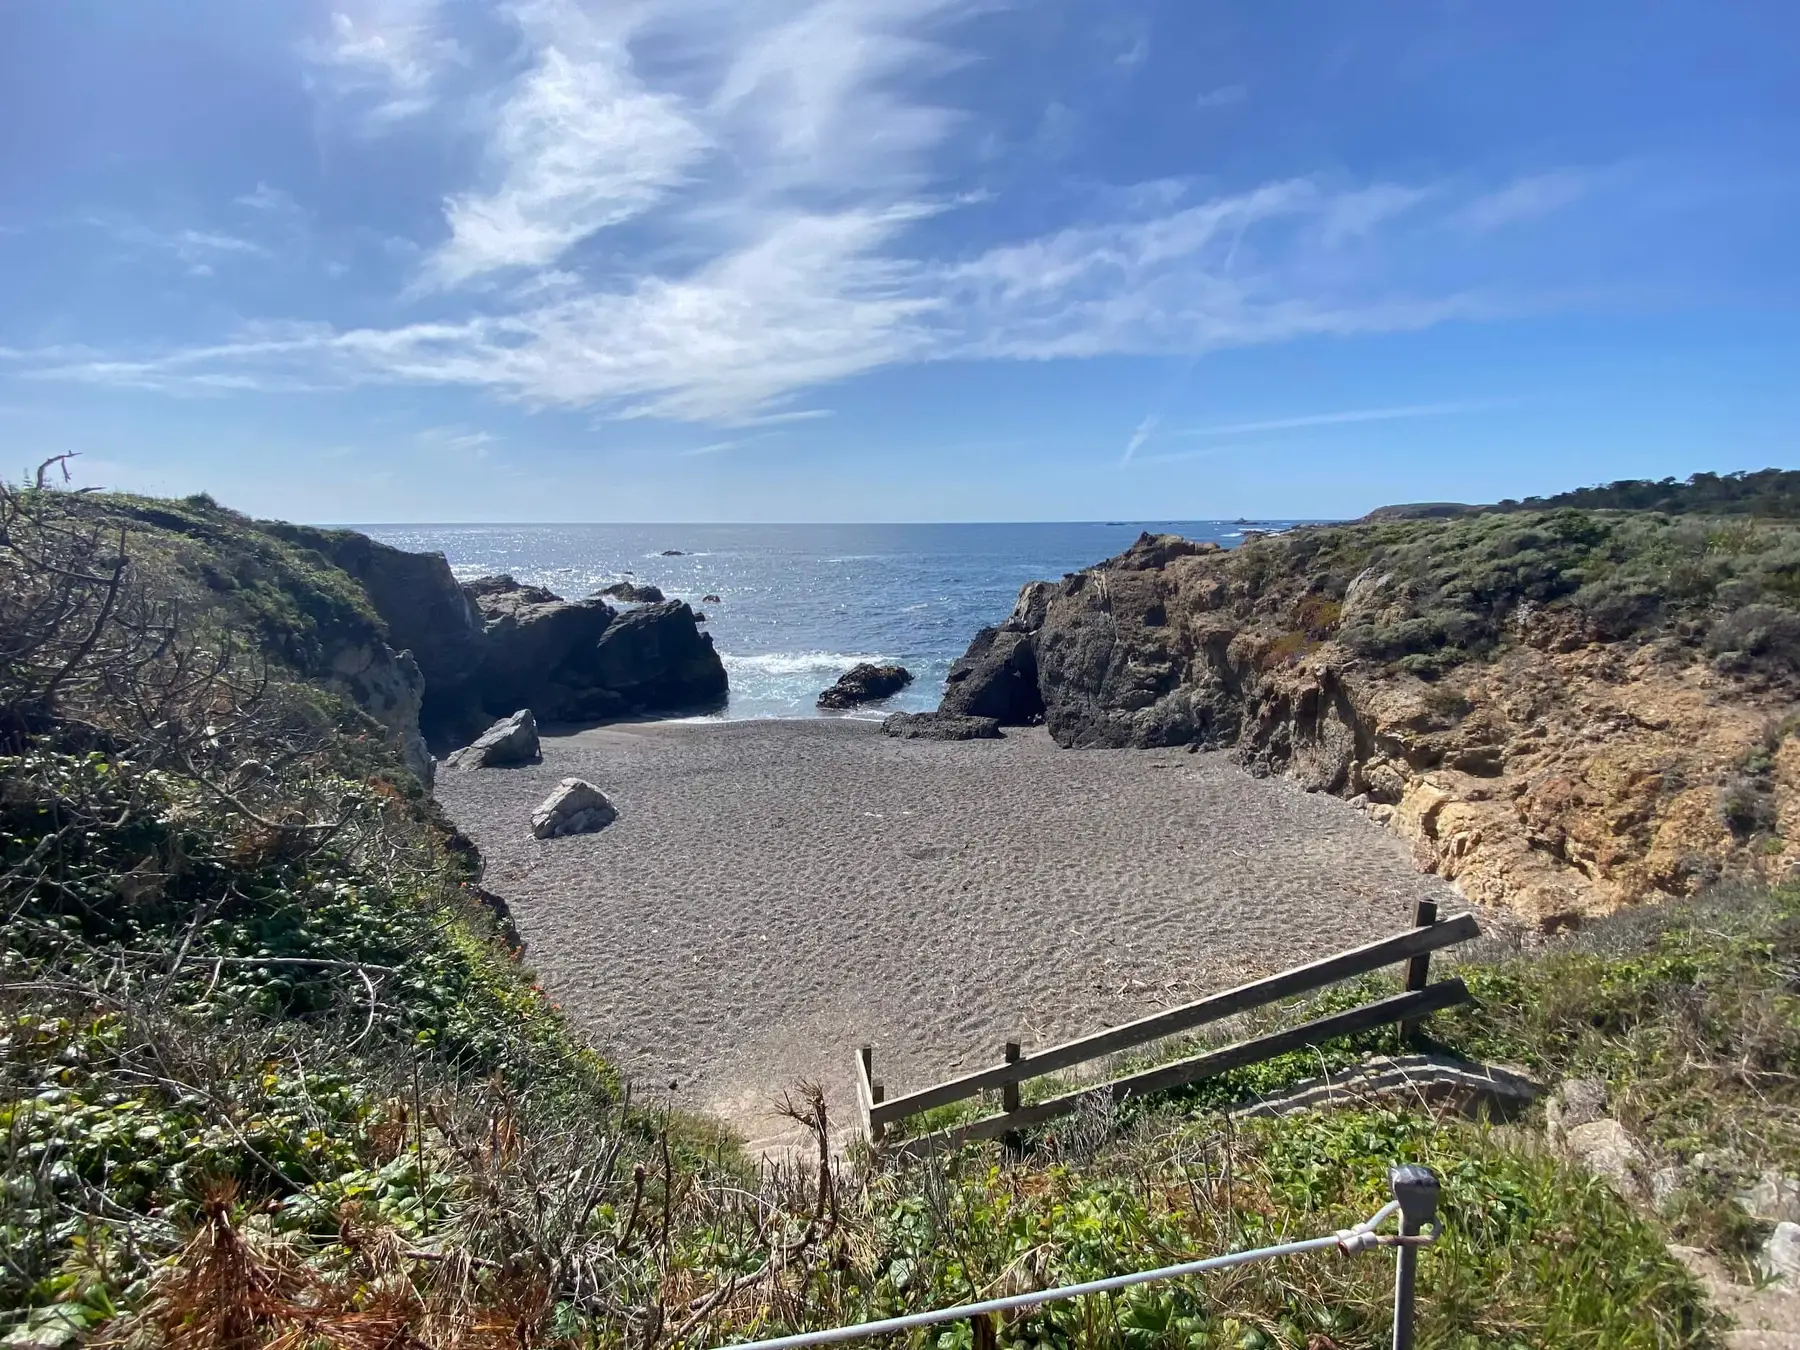
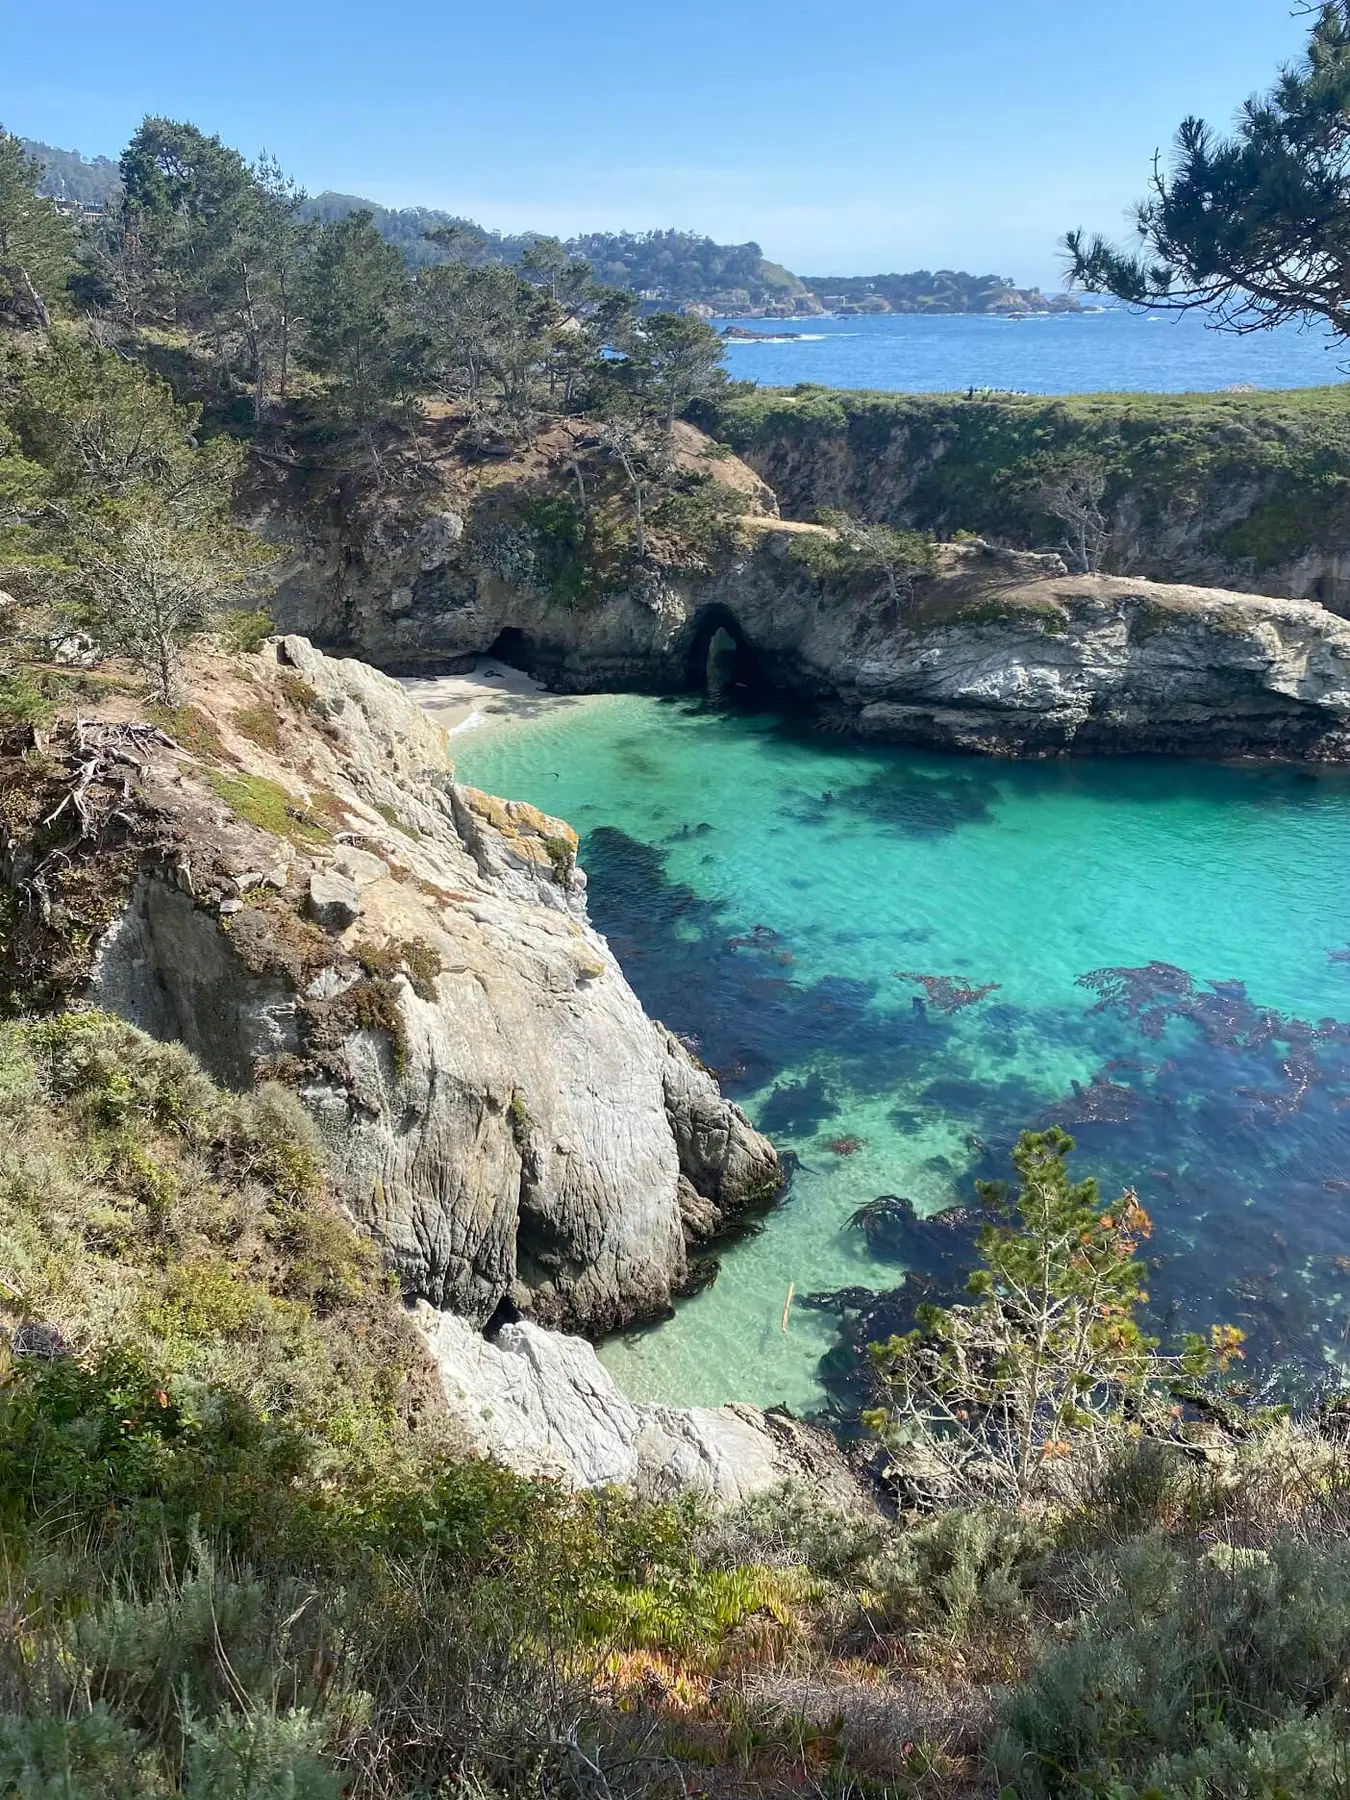
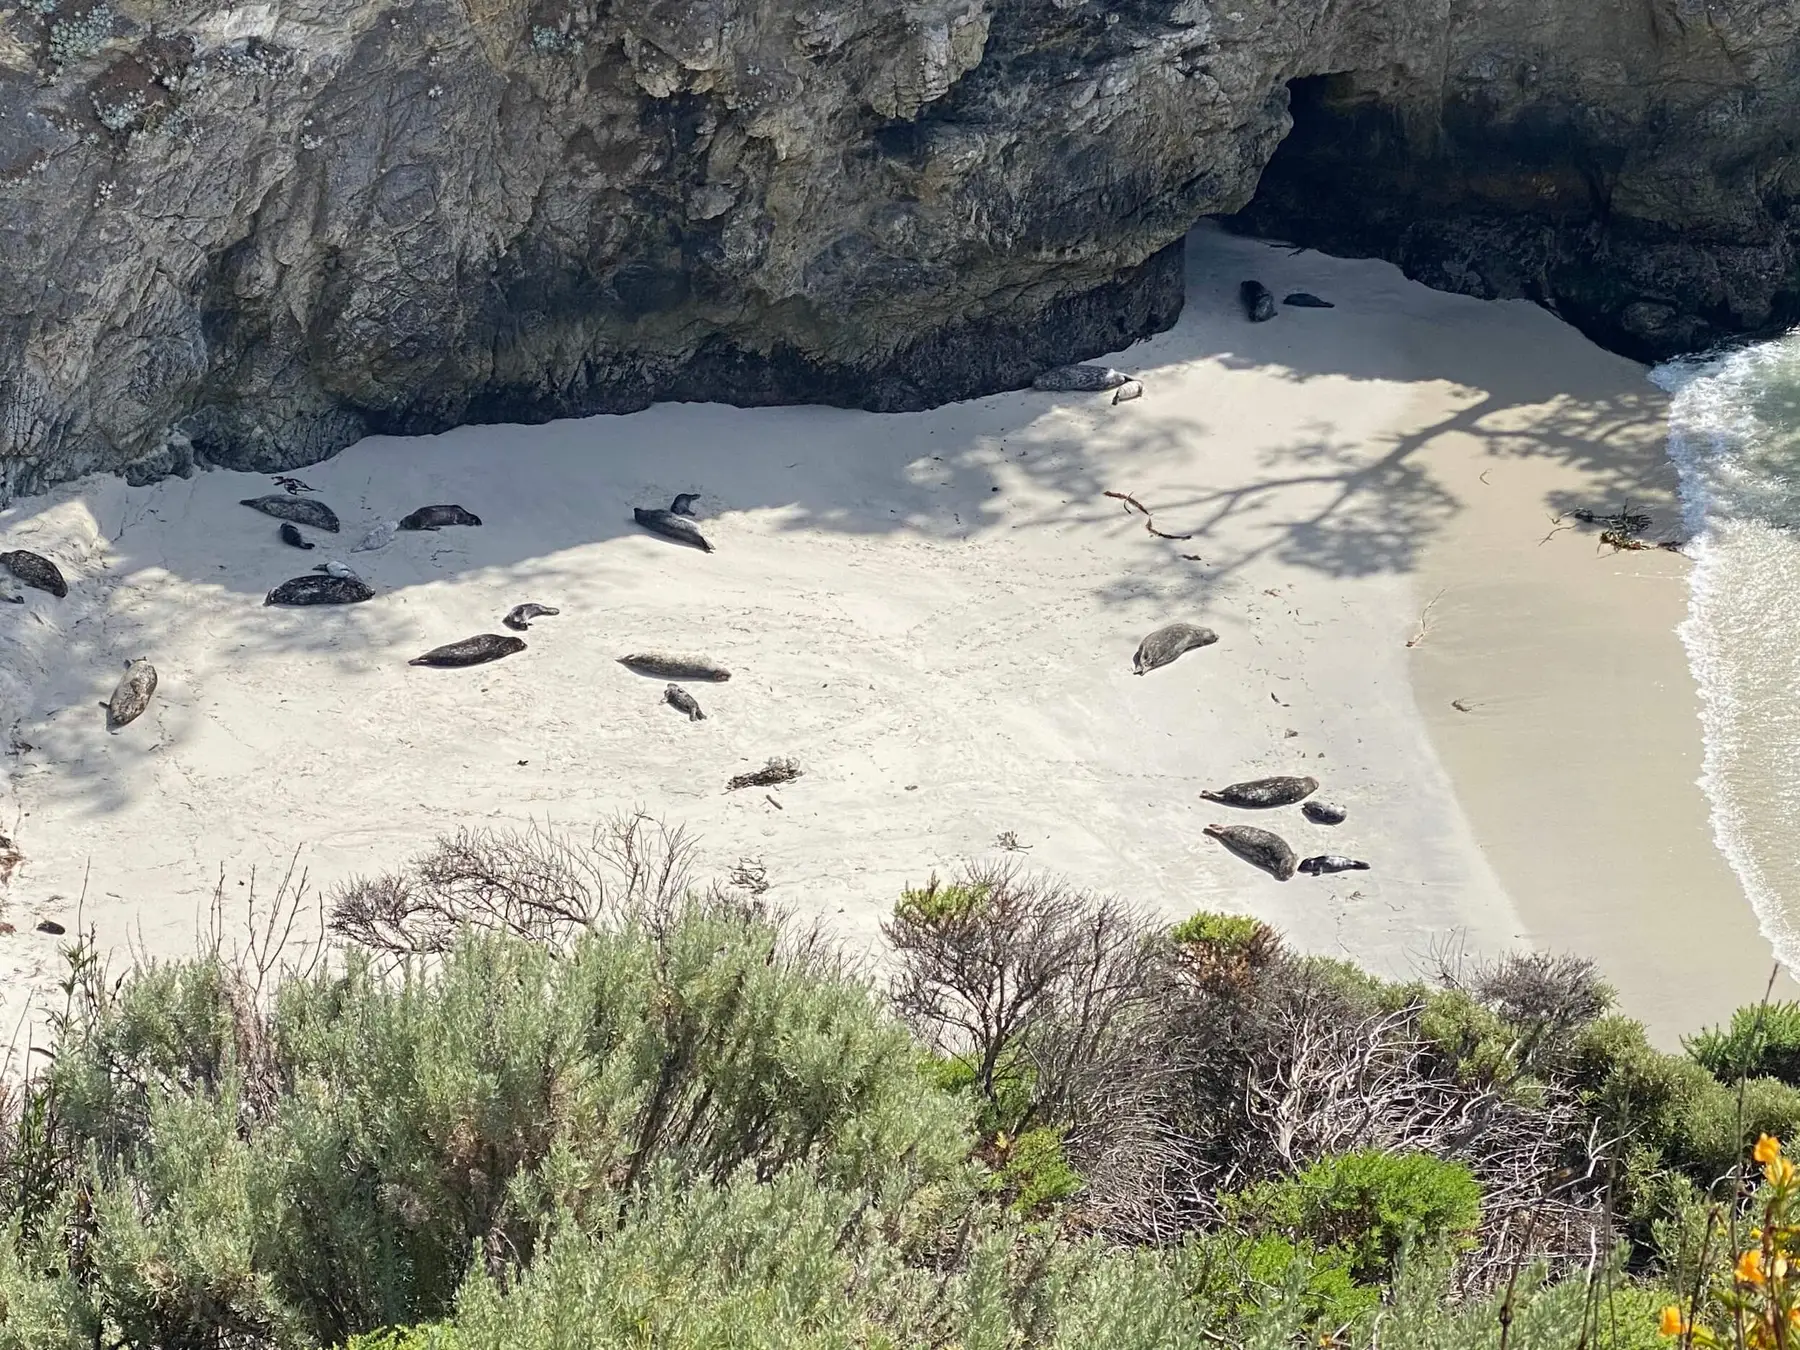
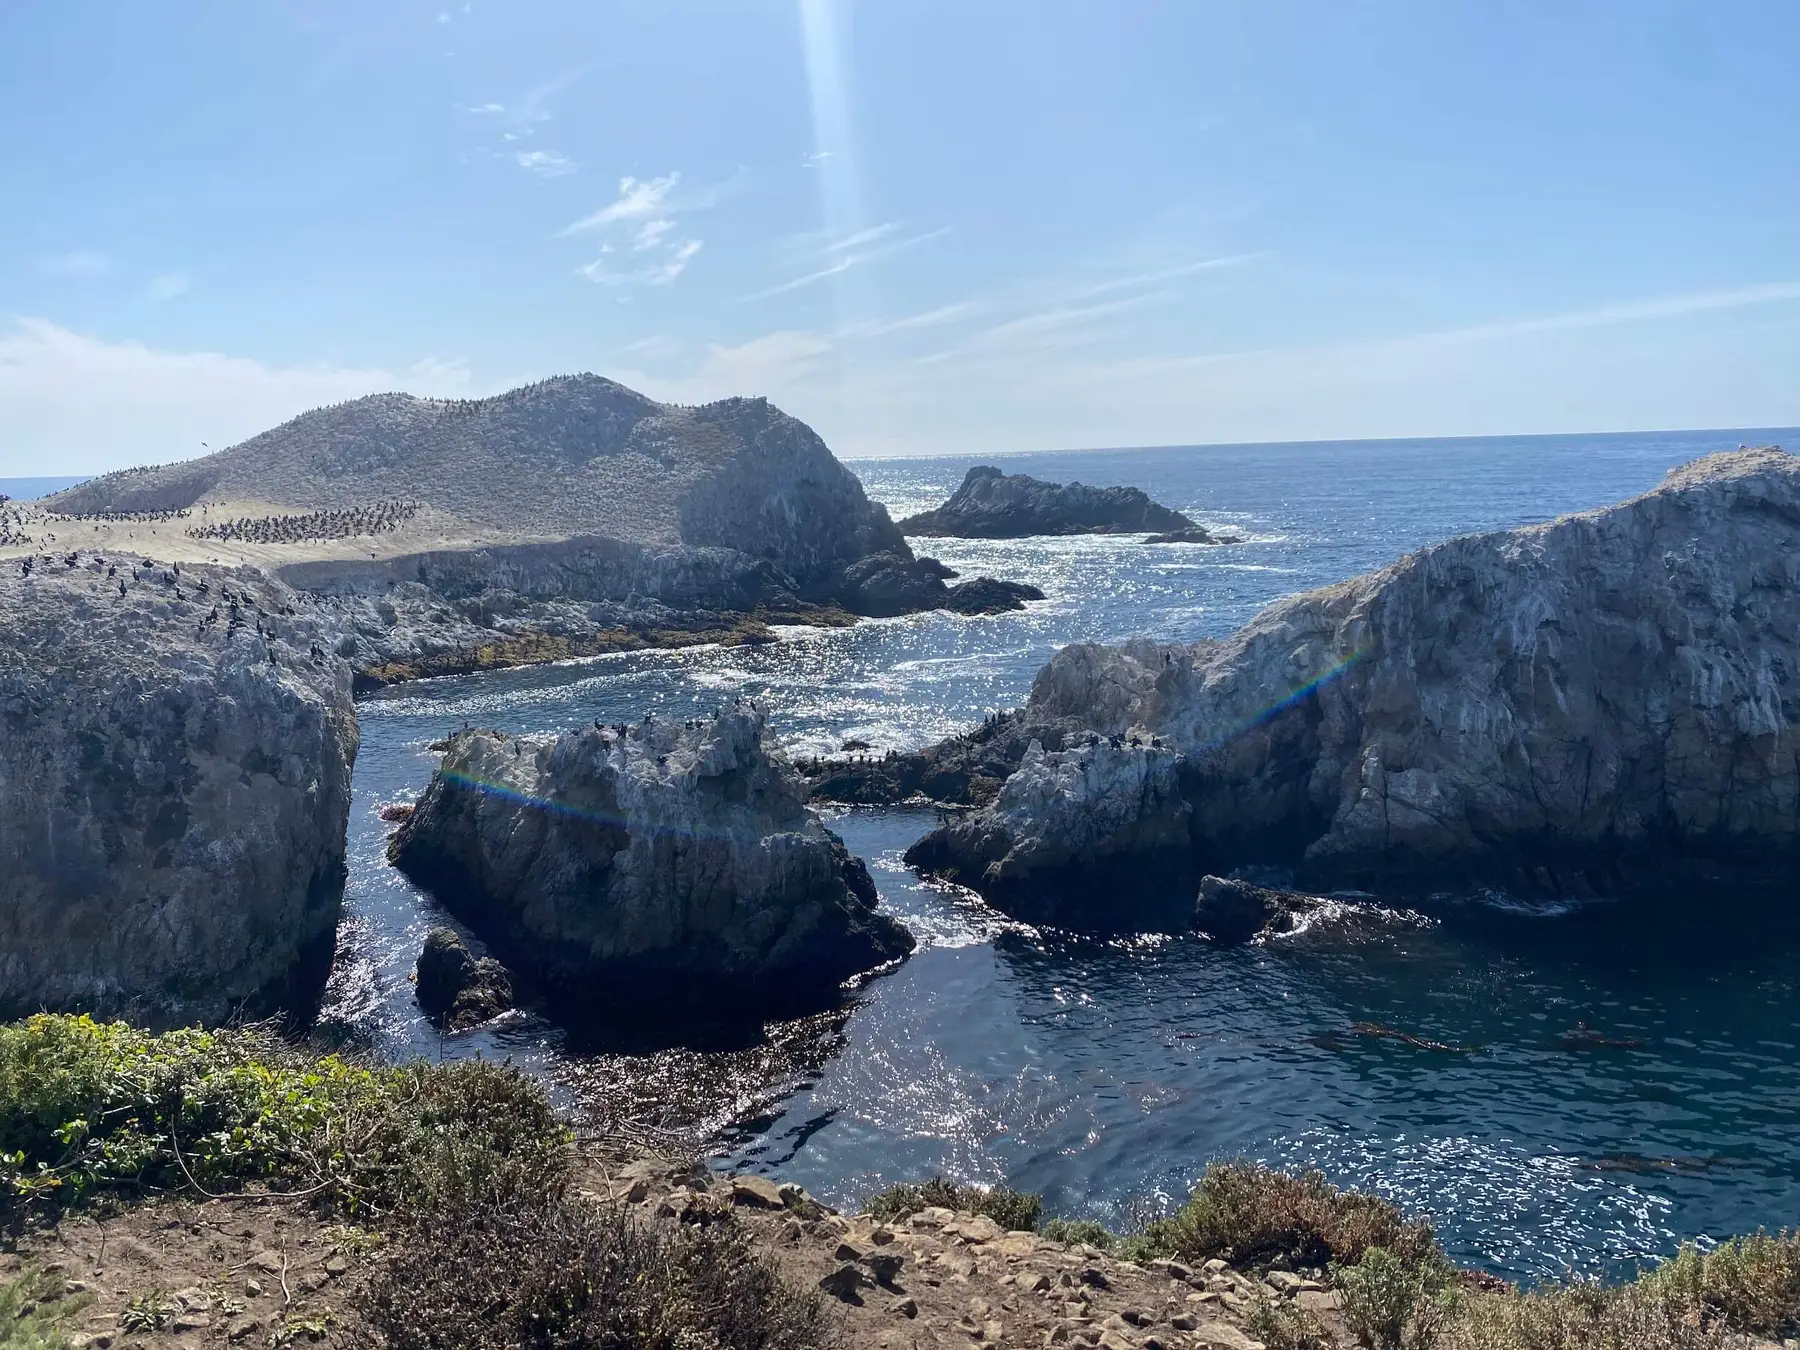
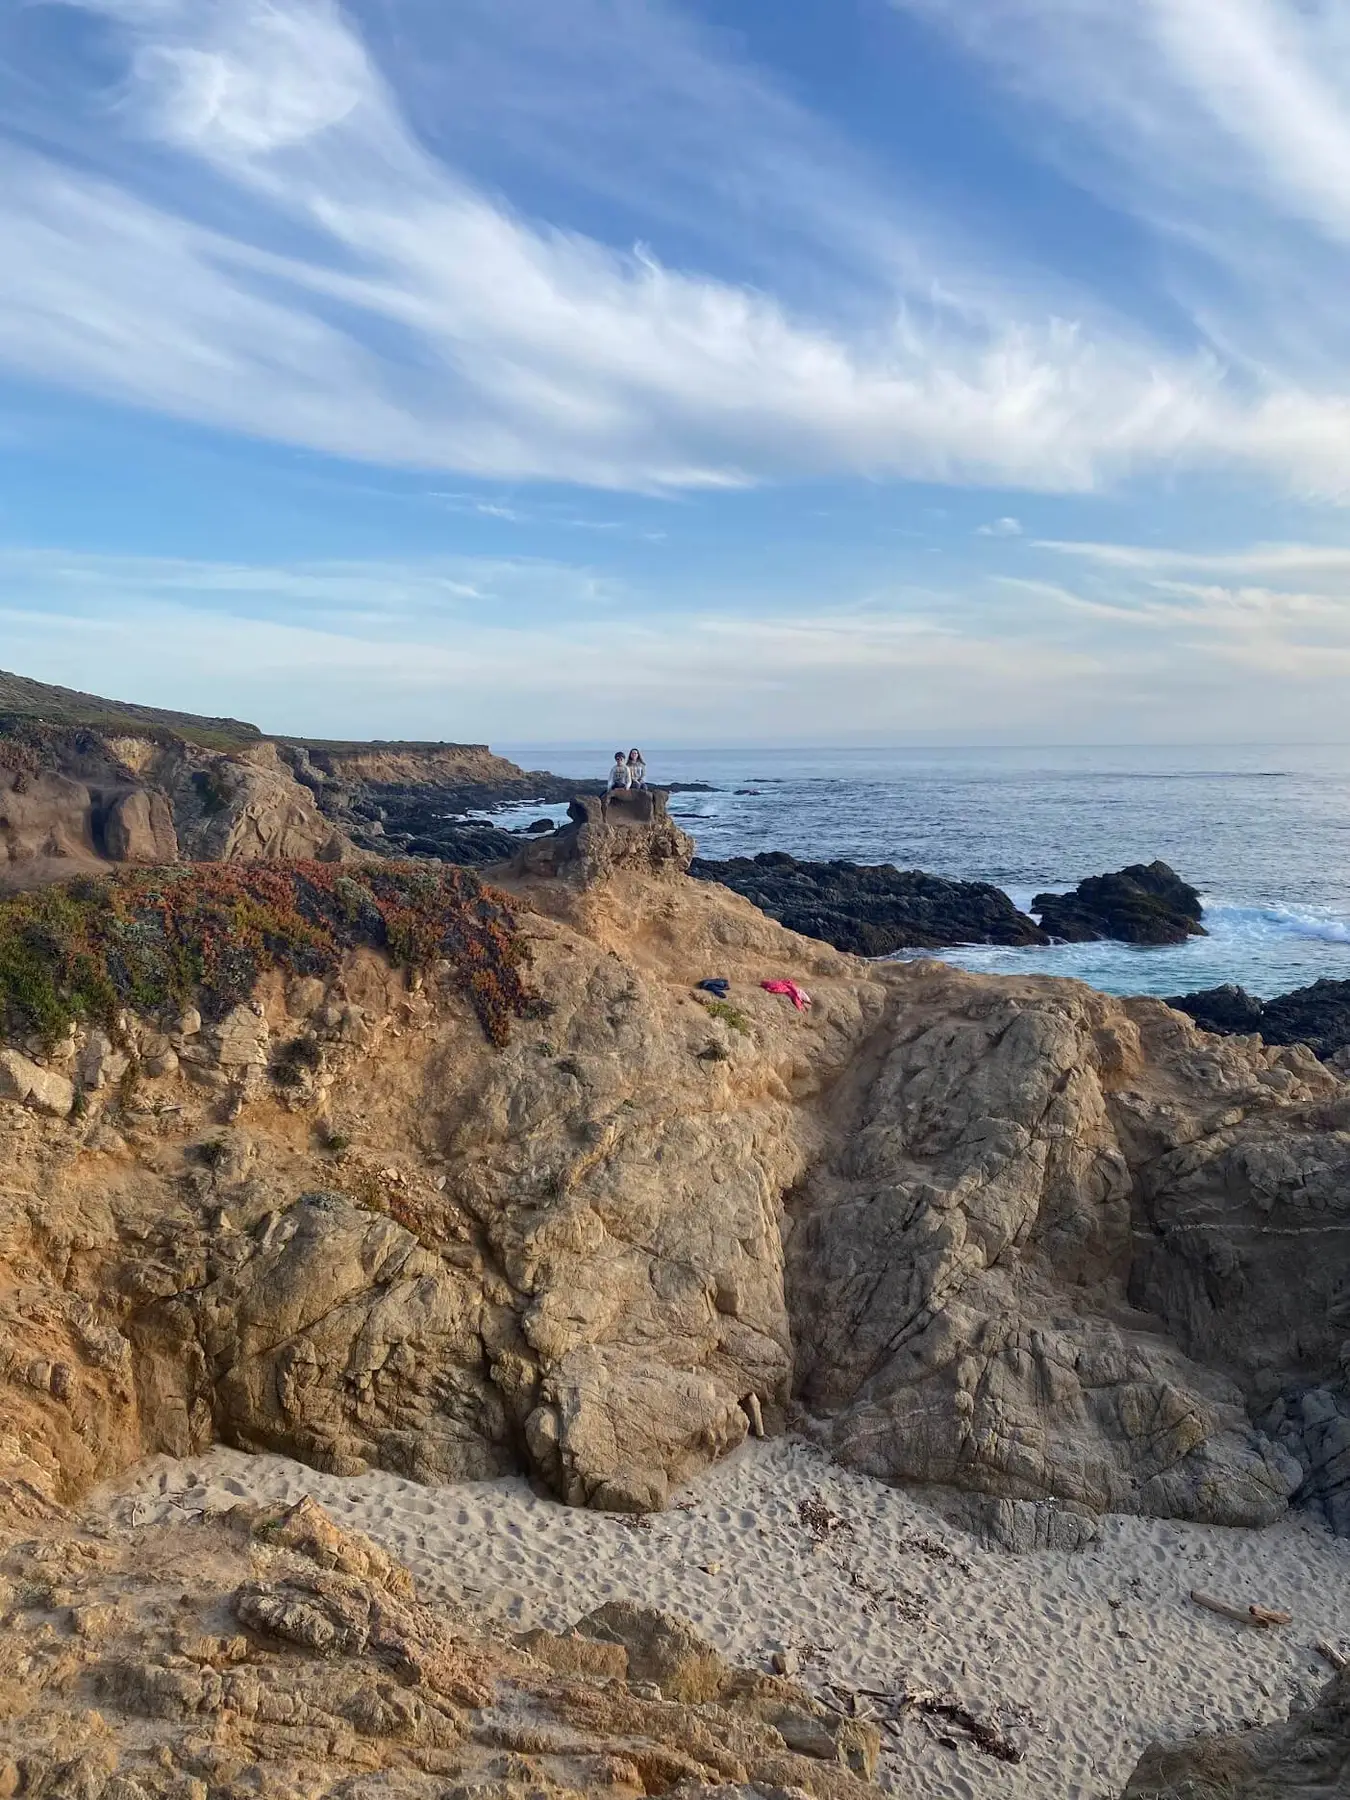
There are lots of great trails in this park. Where you find a parking spot may dictate which trail you take. If you’re here in the Spring, I suggest parking in one of the more southern parking lots so you can walk to China Cove, this is an area that frequently has baby seals! All the trails will give you great views of the beautiful coastline, stunning coves and cliffs, and little beaches with rocks for kids to climb on and tide pools to explore. View a trail map >
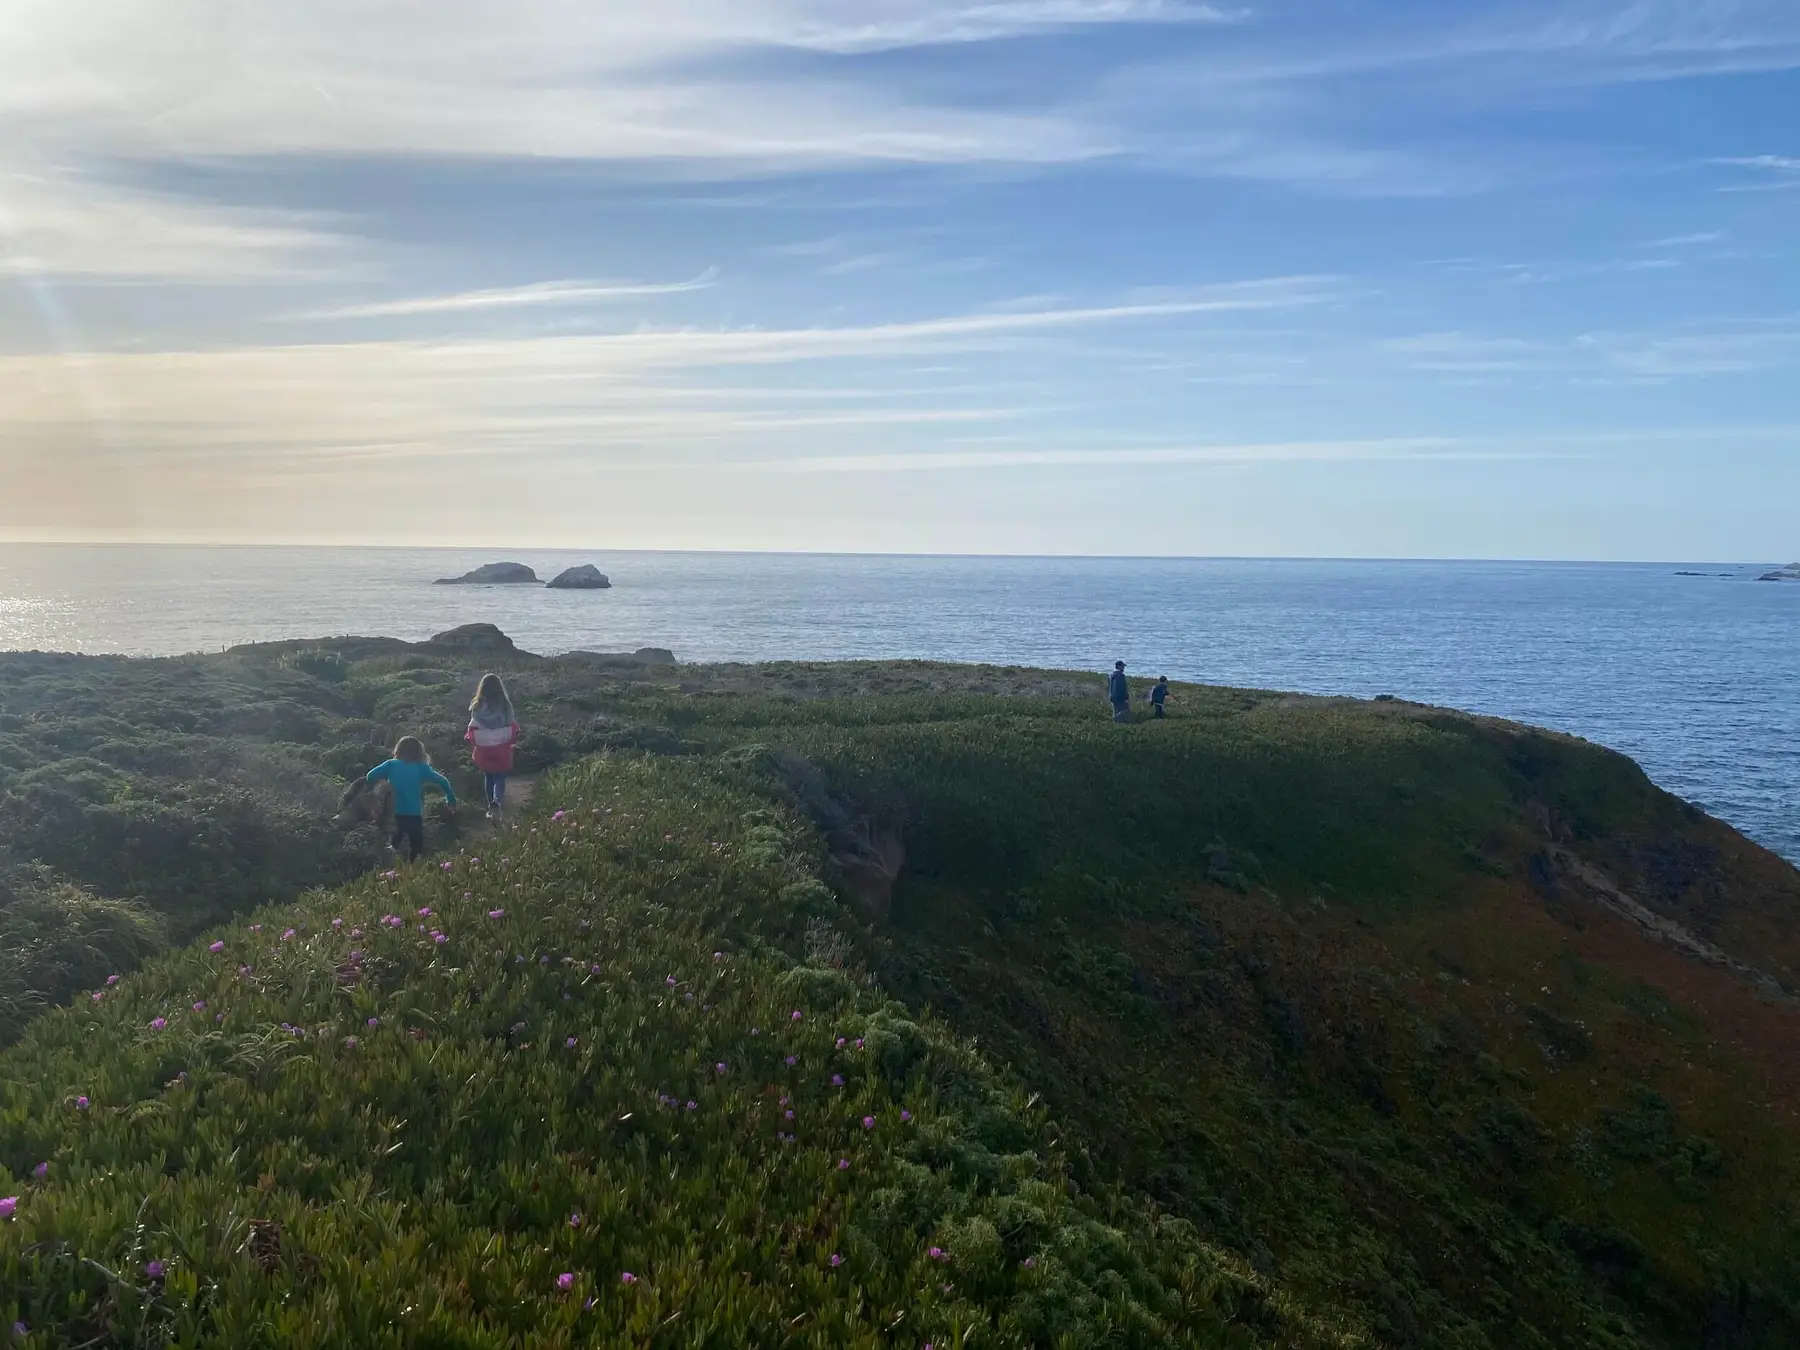
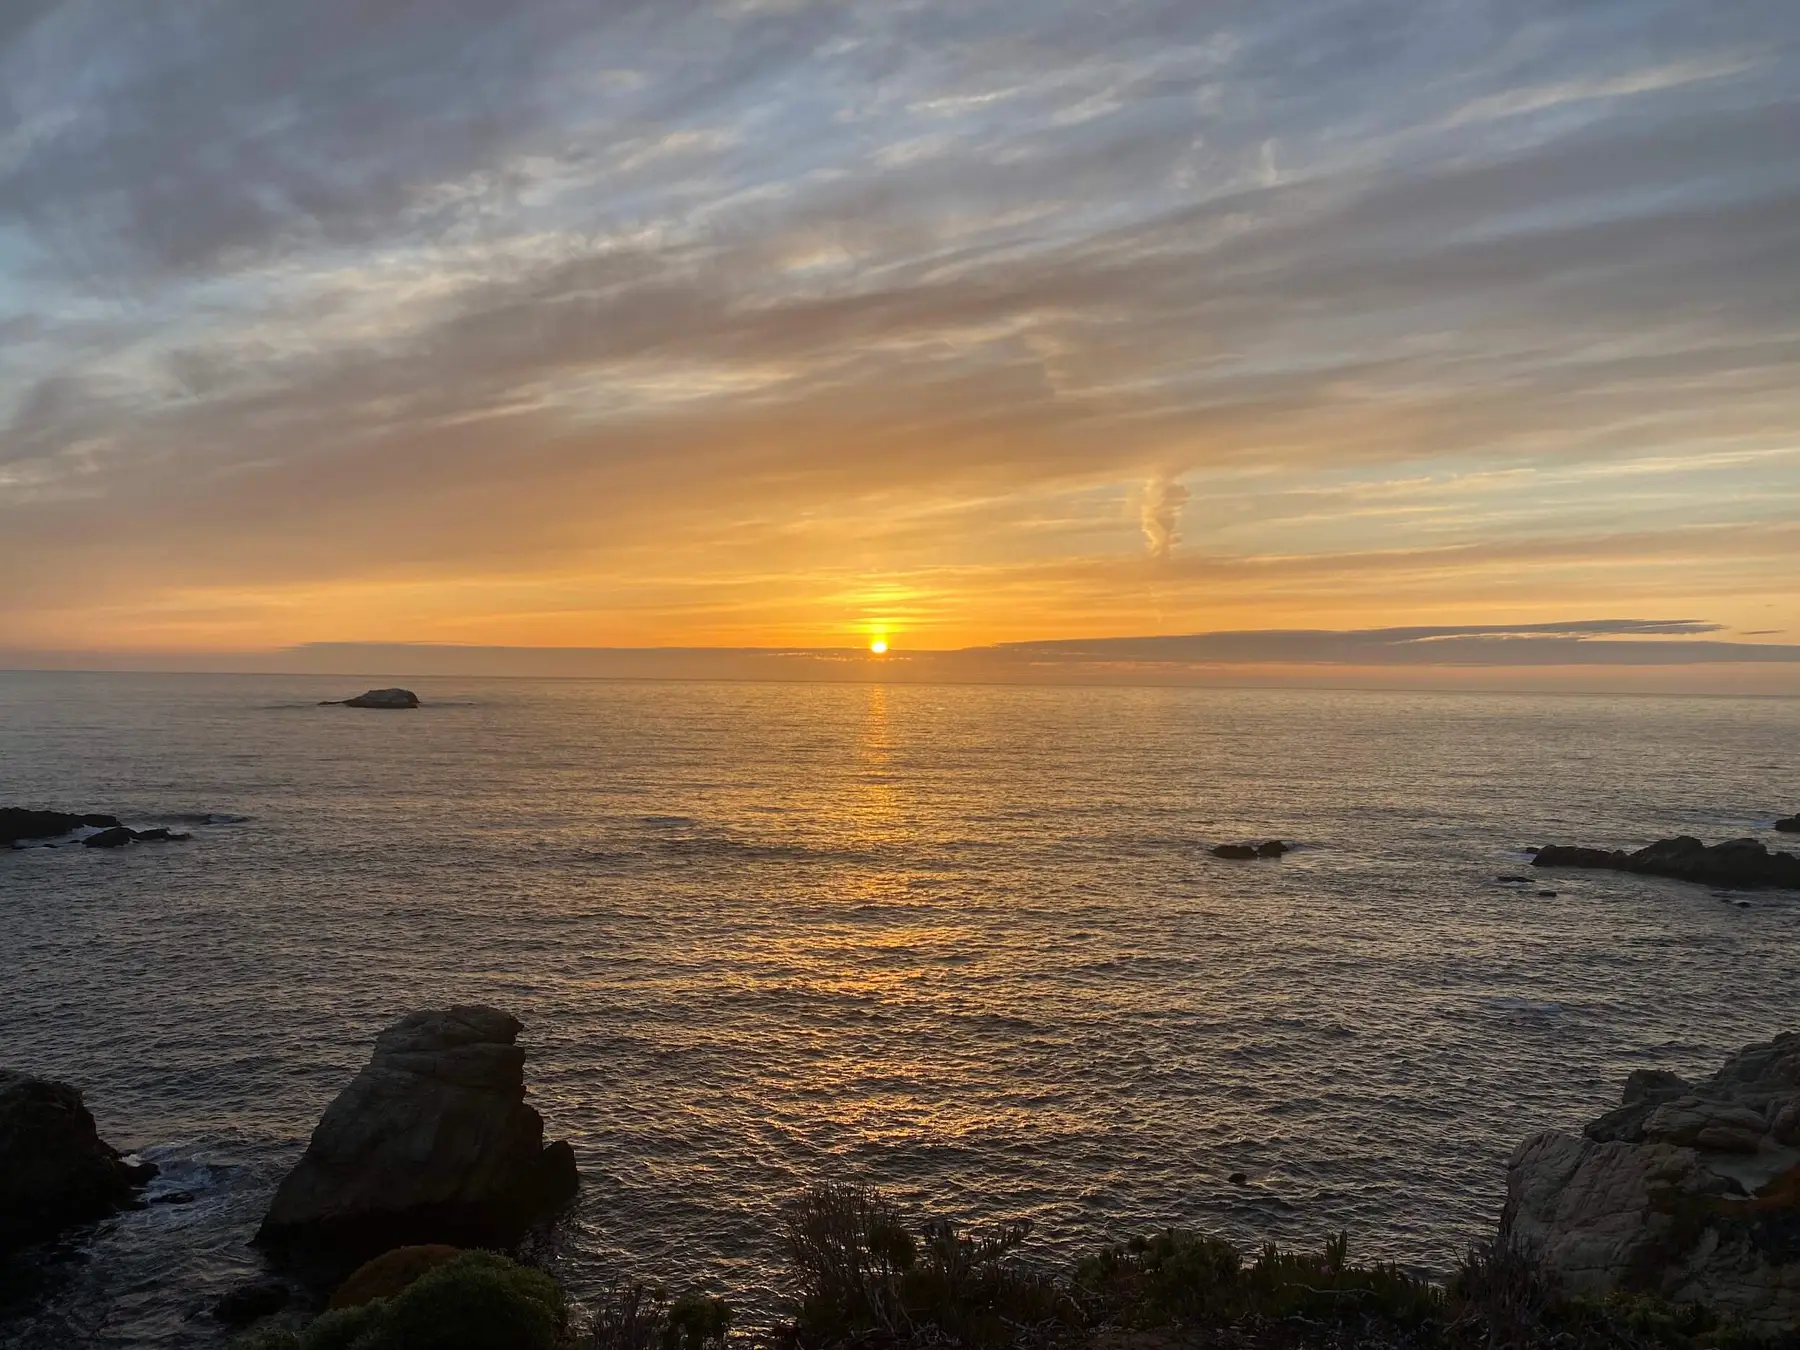
If you’re not too tired and there’s daylight left, then it’s time to head to a great sunset spot! Drive 5 minutes south on Highway 1 and you’ll come to parking for the Garrapatta Bluff Trail right off the side of the Highway. There is a trail along the coastal bluffs that leads through meadows of flowers with the beautiful rocky coast below. It’s a beautiful trail to explore, or just find a spot and enjoy the sunset!

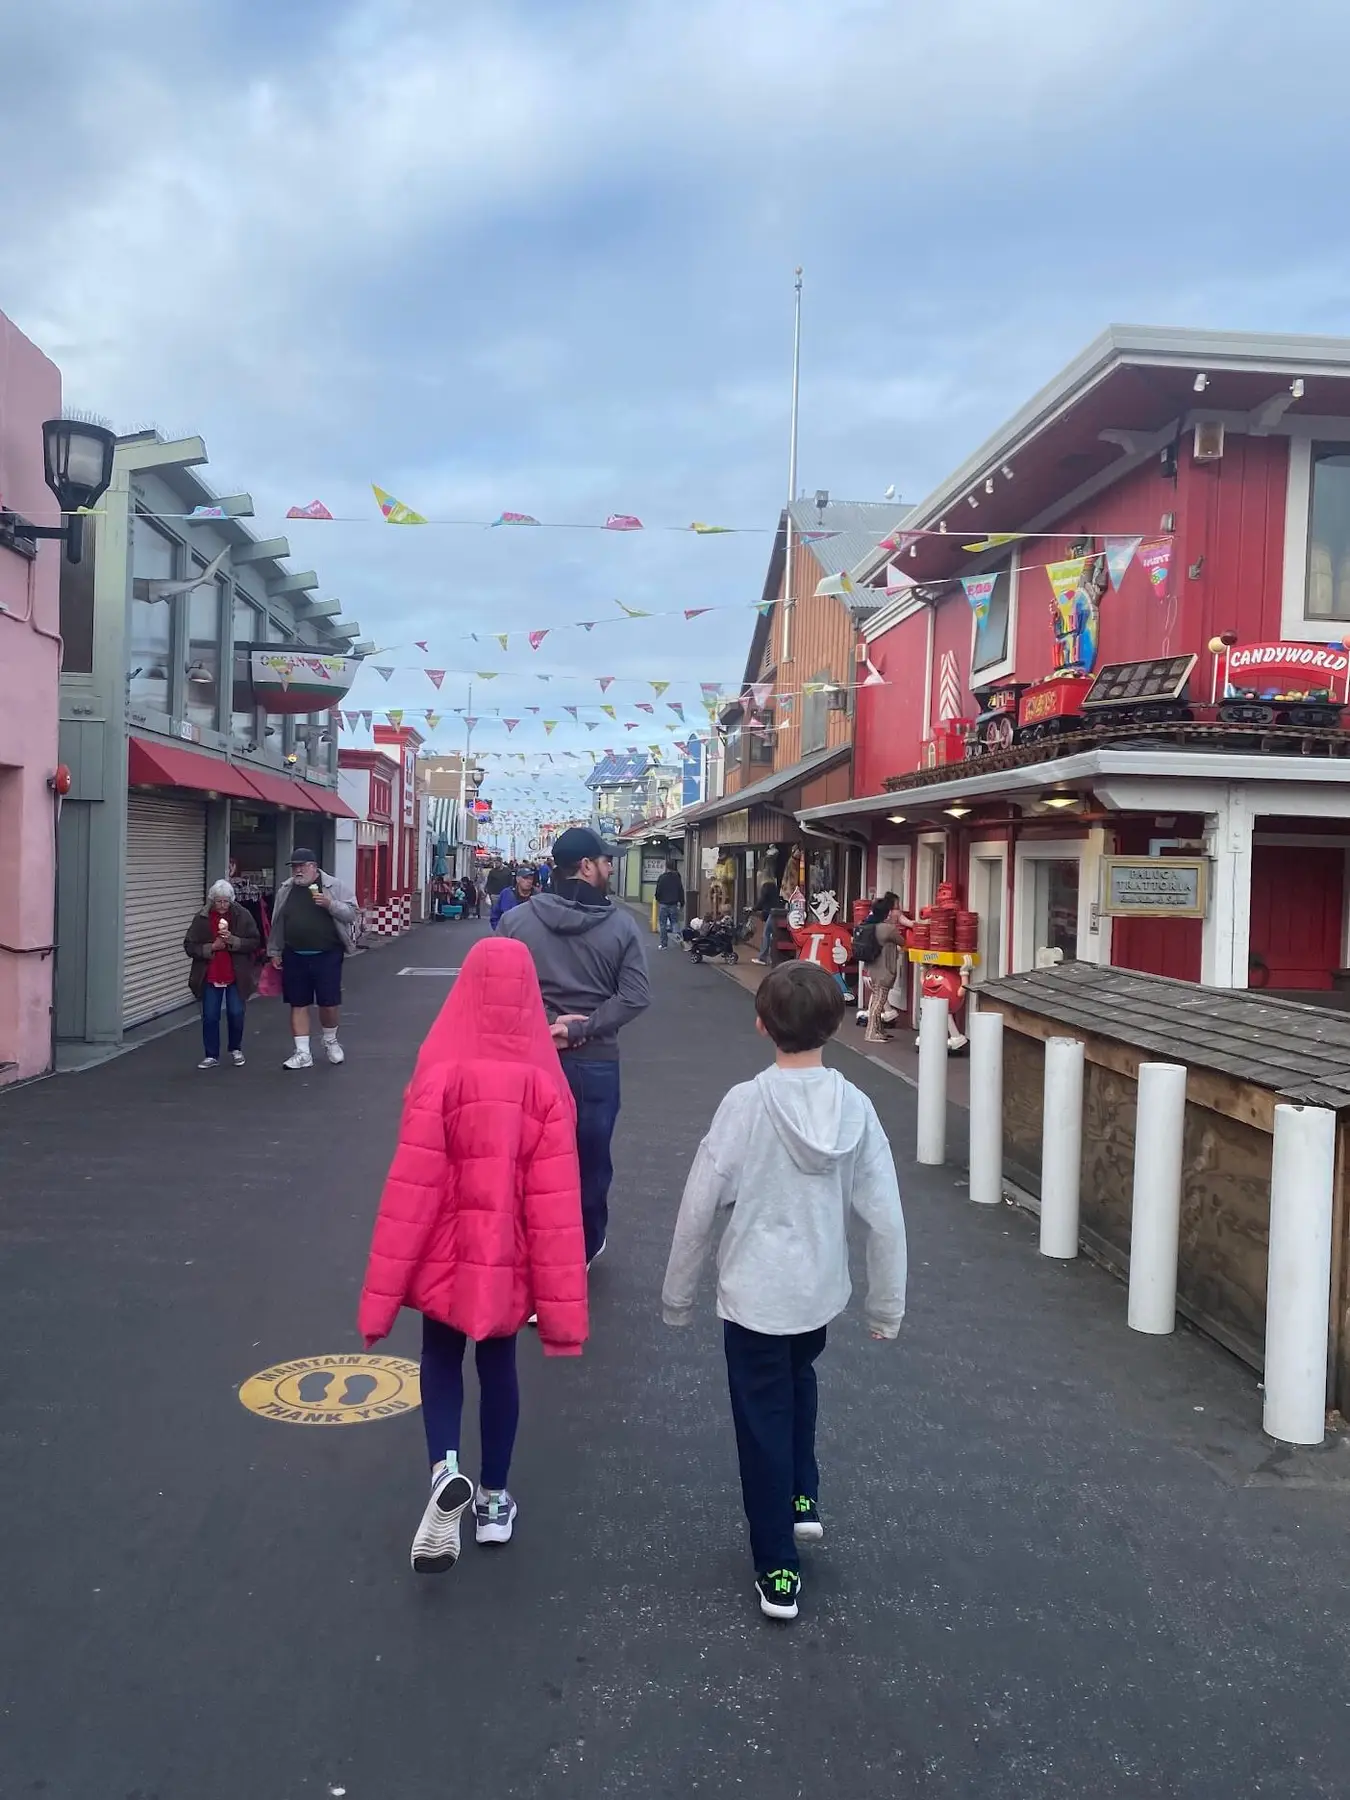
Stop for dinner in Carmel-by-the-Sea and head back to your hotel.
Day 11
Big Sur, Drive to LA
Check out of your hotel and start making your way south to start your tour of Highway 1. I recommend leaving by 9am at the latest.
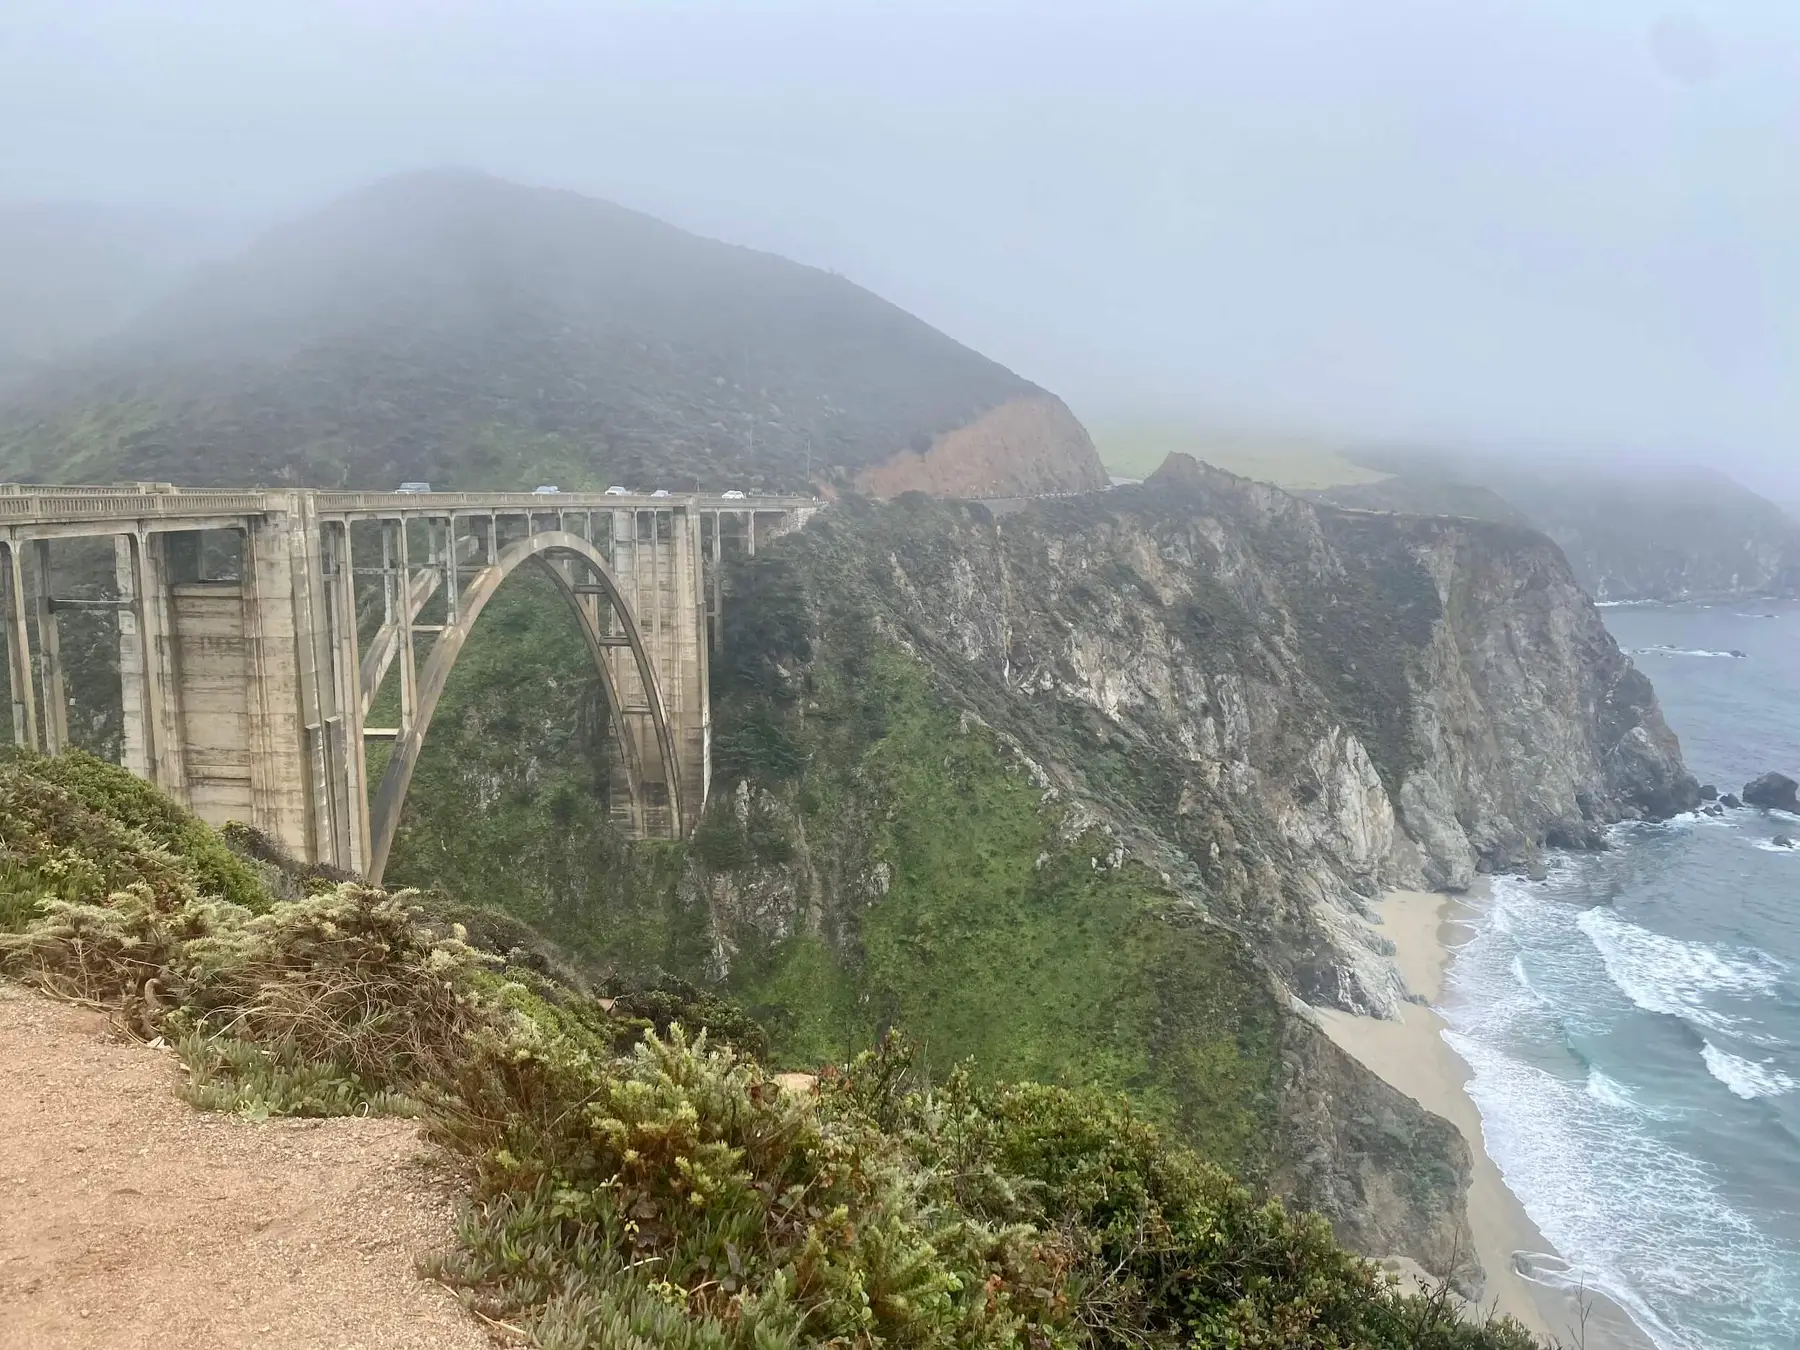
Drive south down Highway 1 past the spots you saw the day before. Pull over when you reach the Castle Rock Viewpoint (about 20 minutes past Point Lobos). This spot offers a great viewpoint of the iconic Bixby Bridge.
There are actually 3 vista points just a few minutes south of Bixby Bridge that all offer stunning, but similar views. If one parking lot is full, try the next one! The three vistas are Hurricane Point Vista, Sea Otter Refuge View Point, and Great Sur Vista Point.
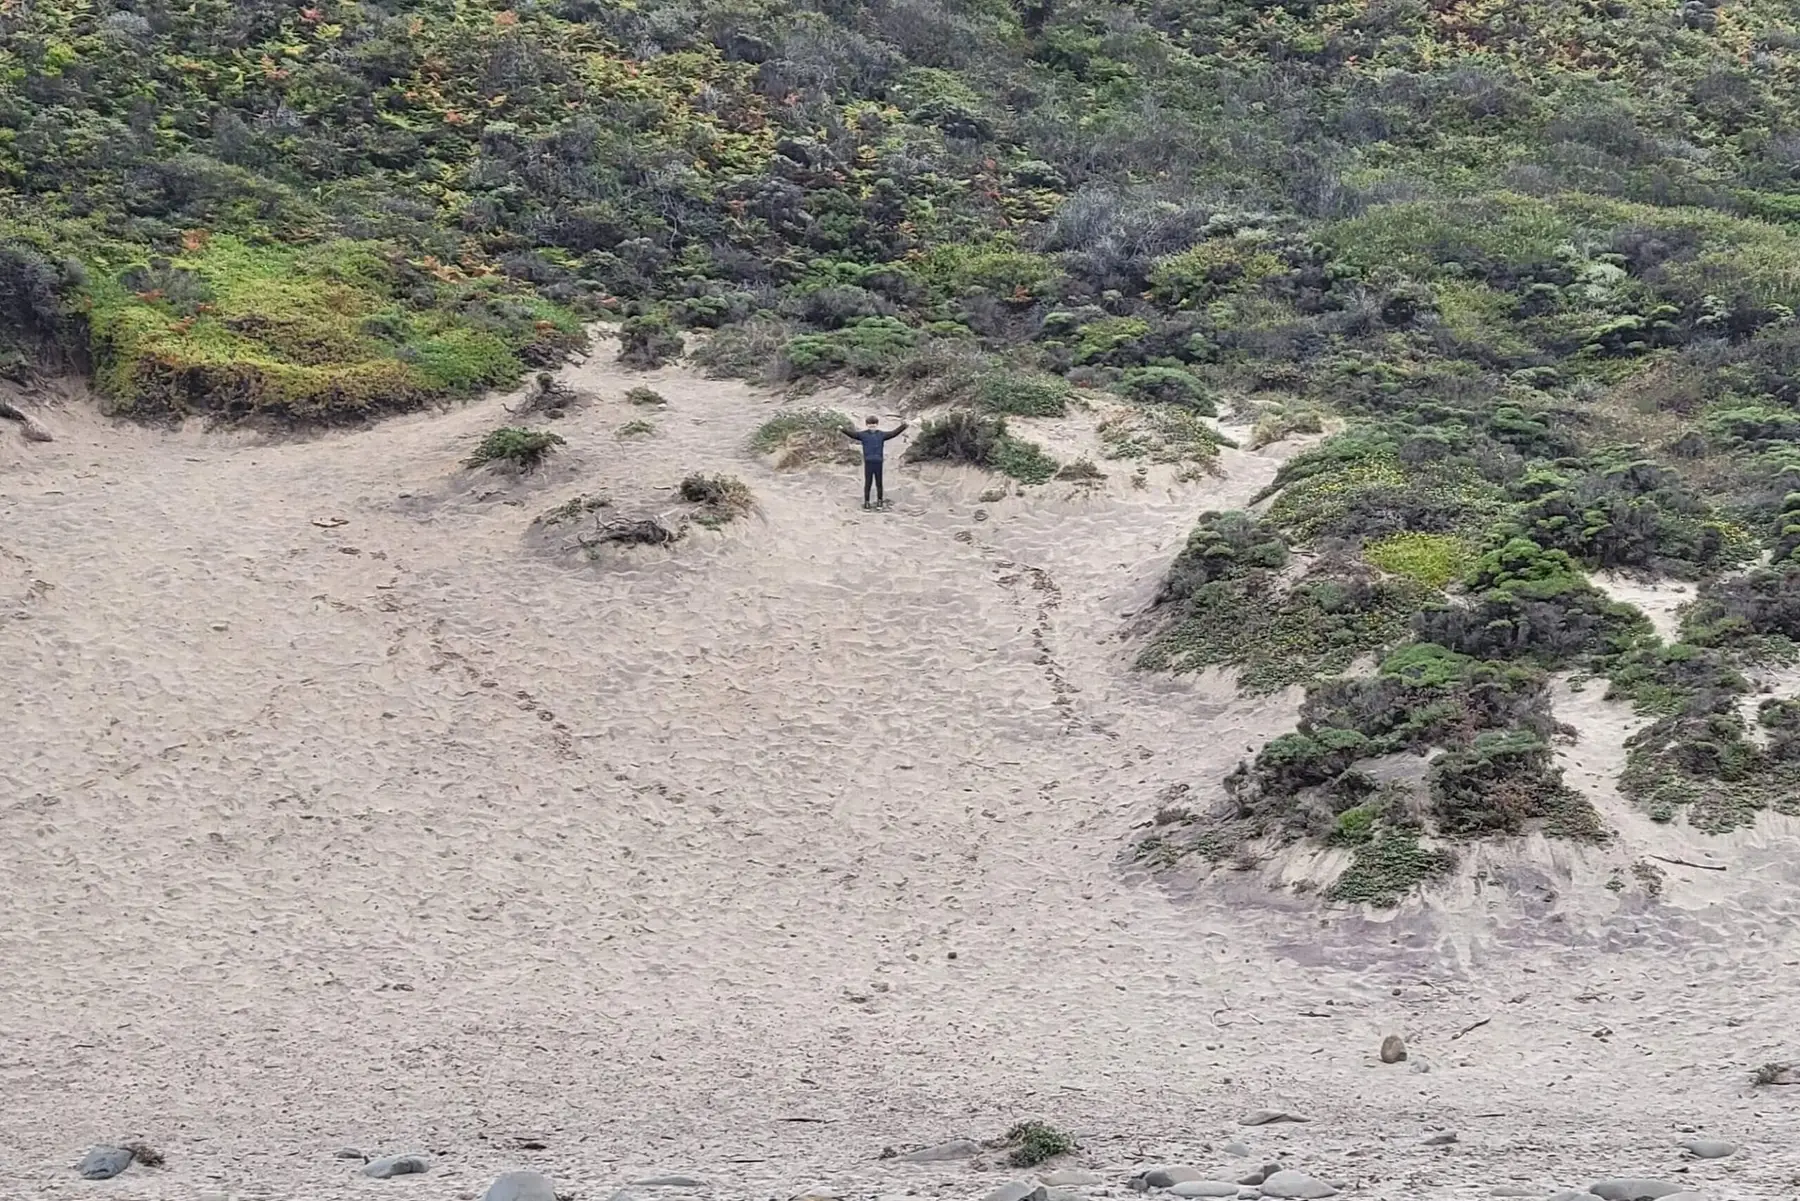
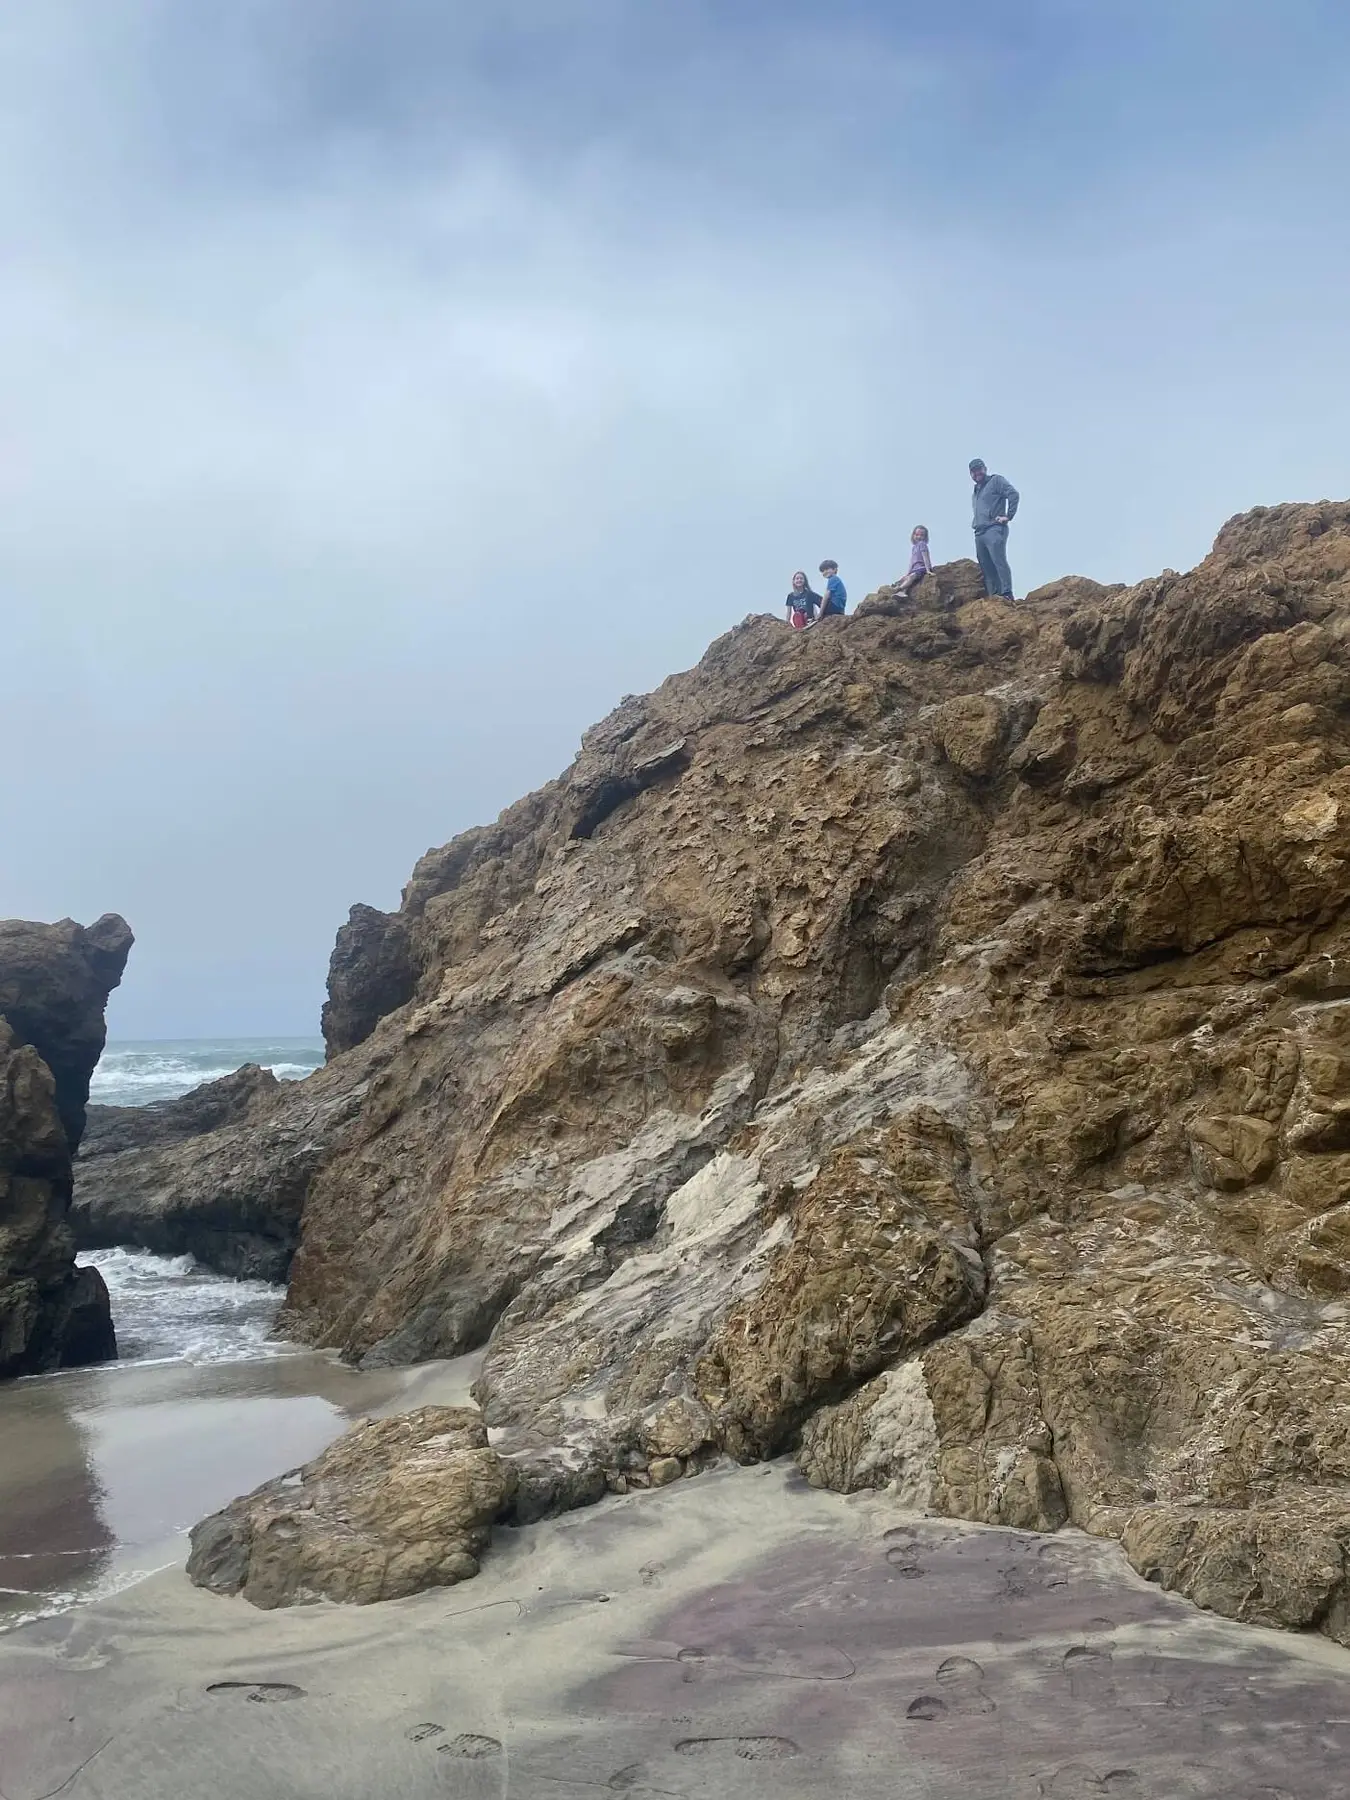
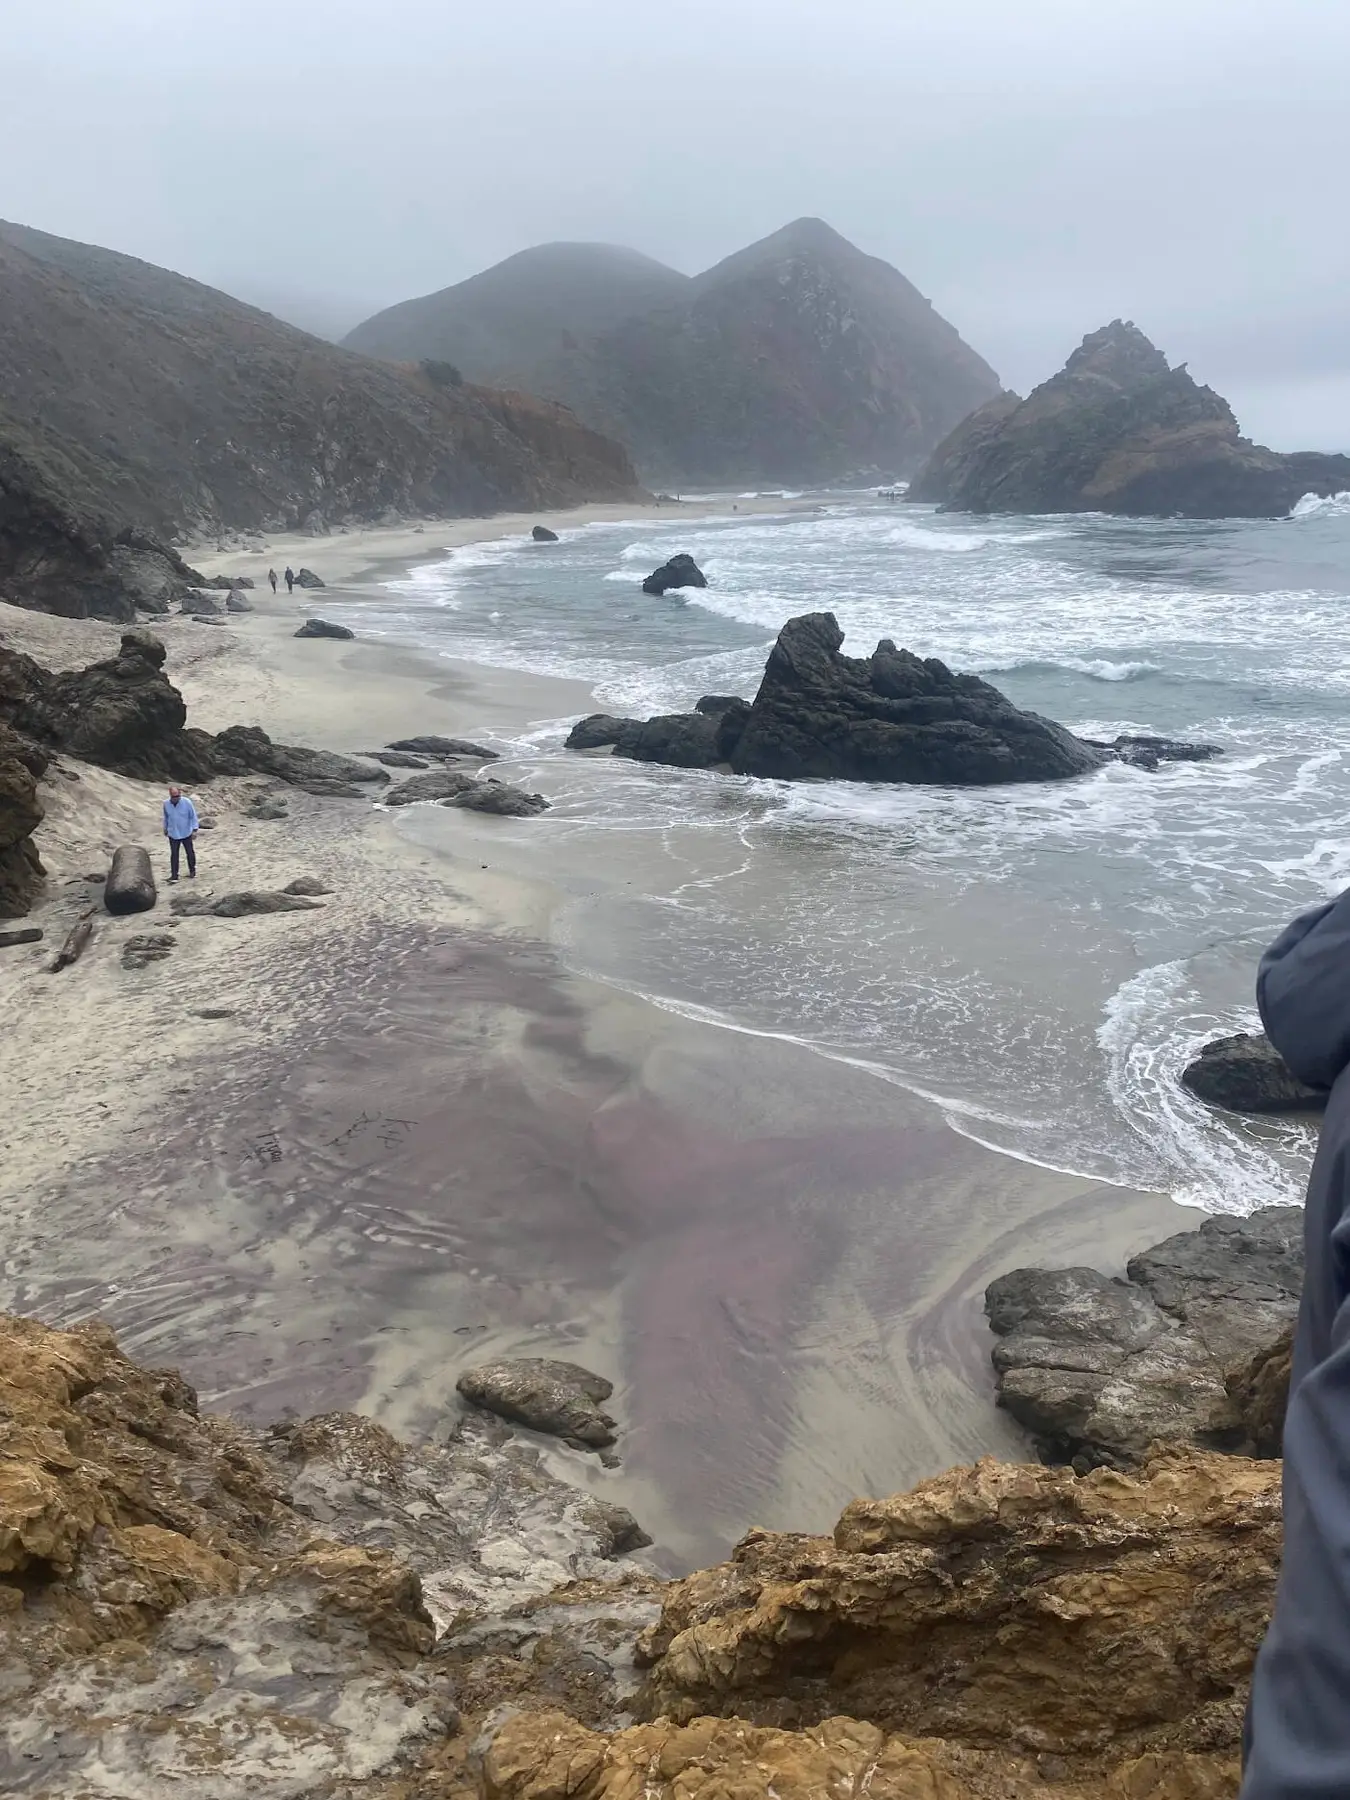
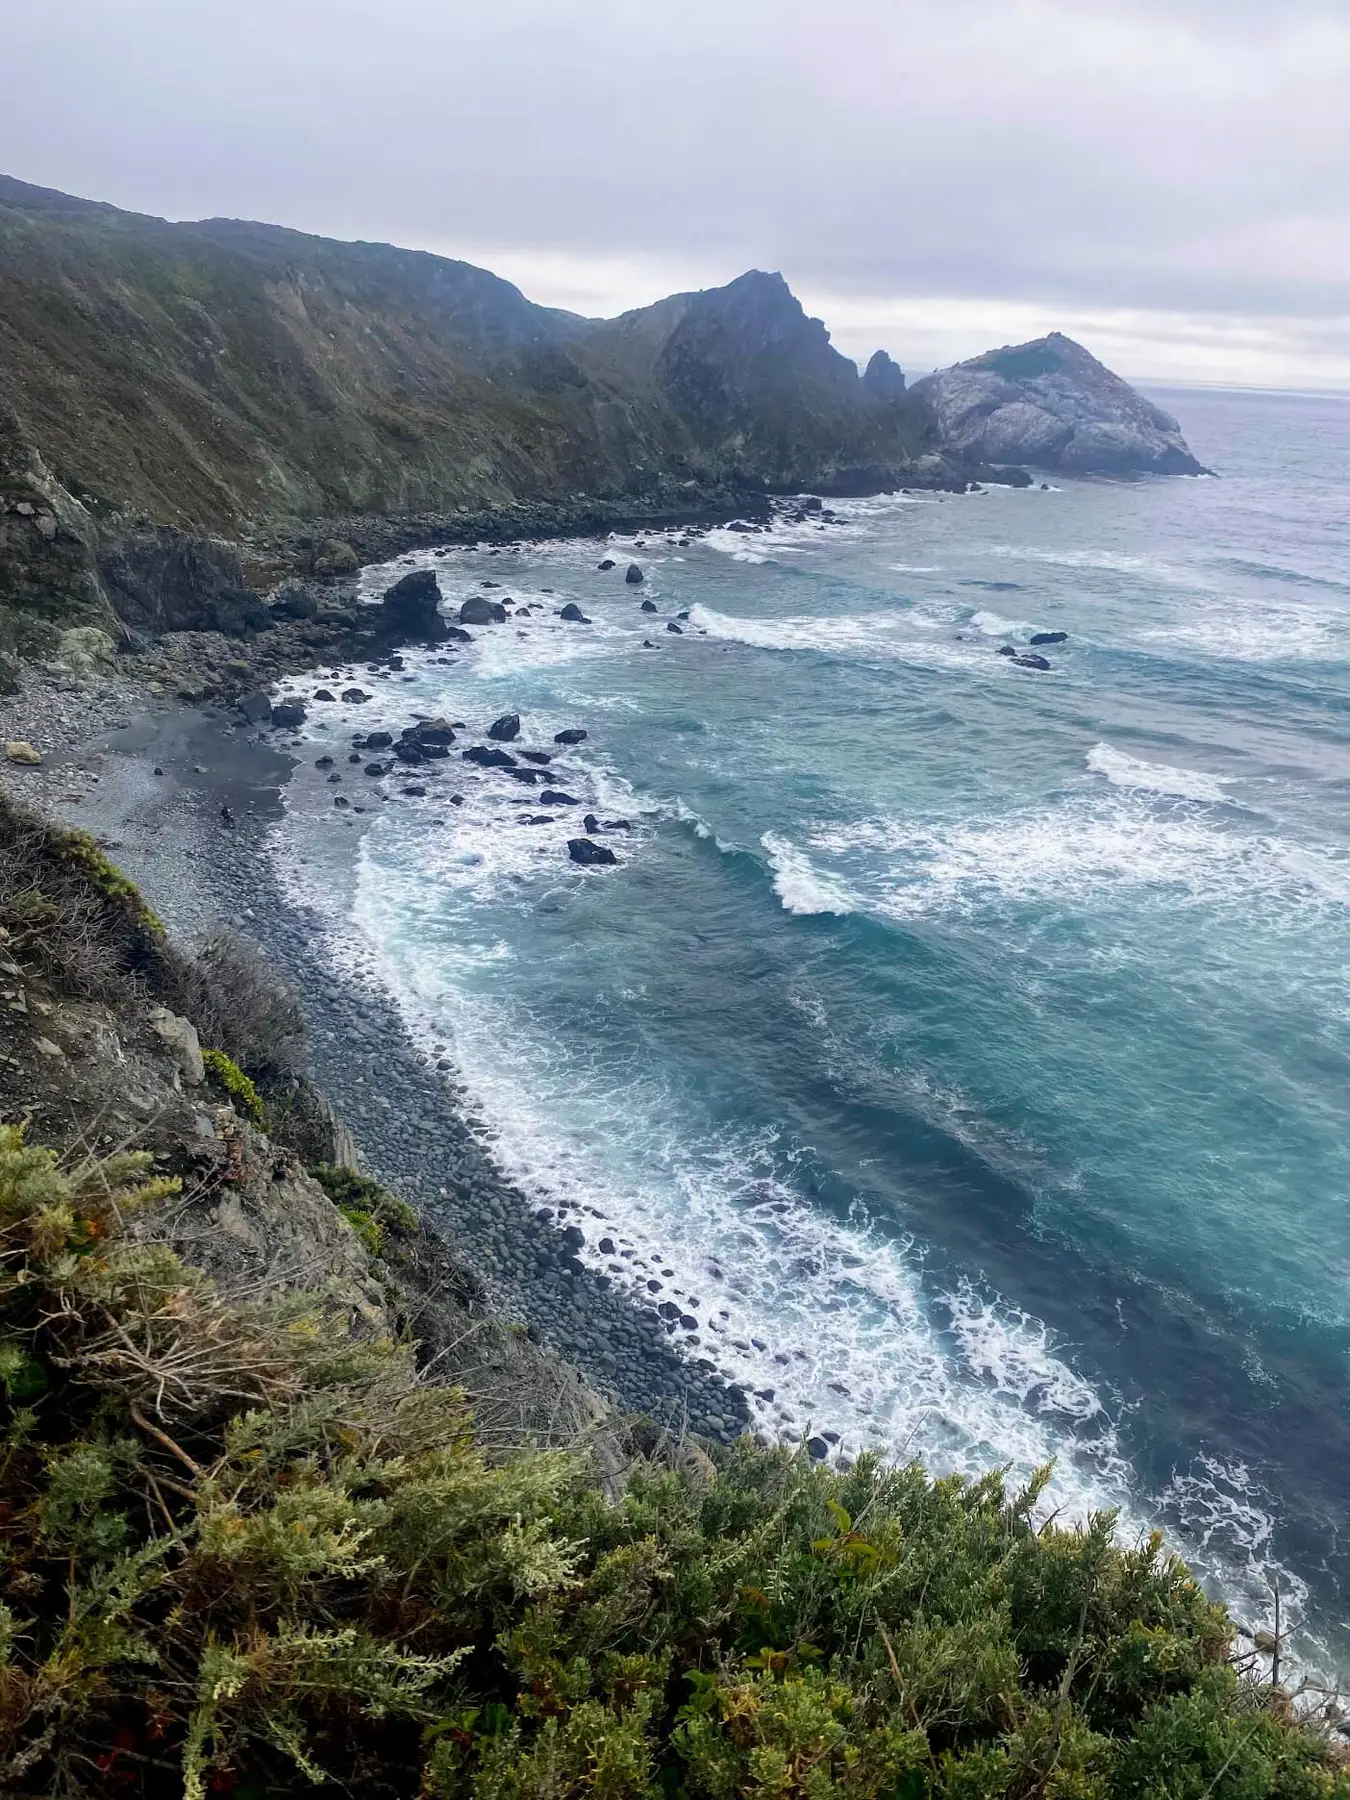
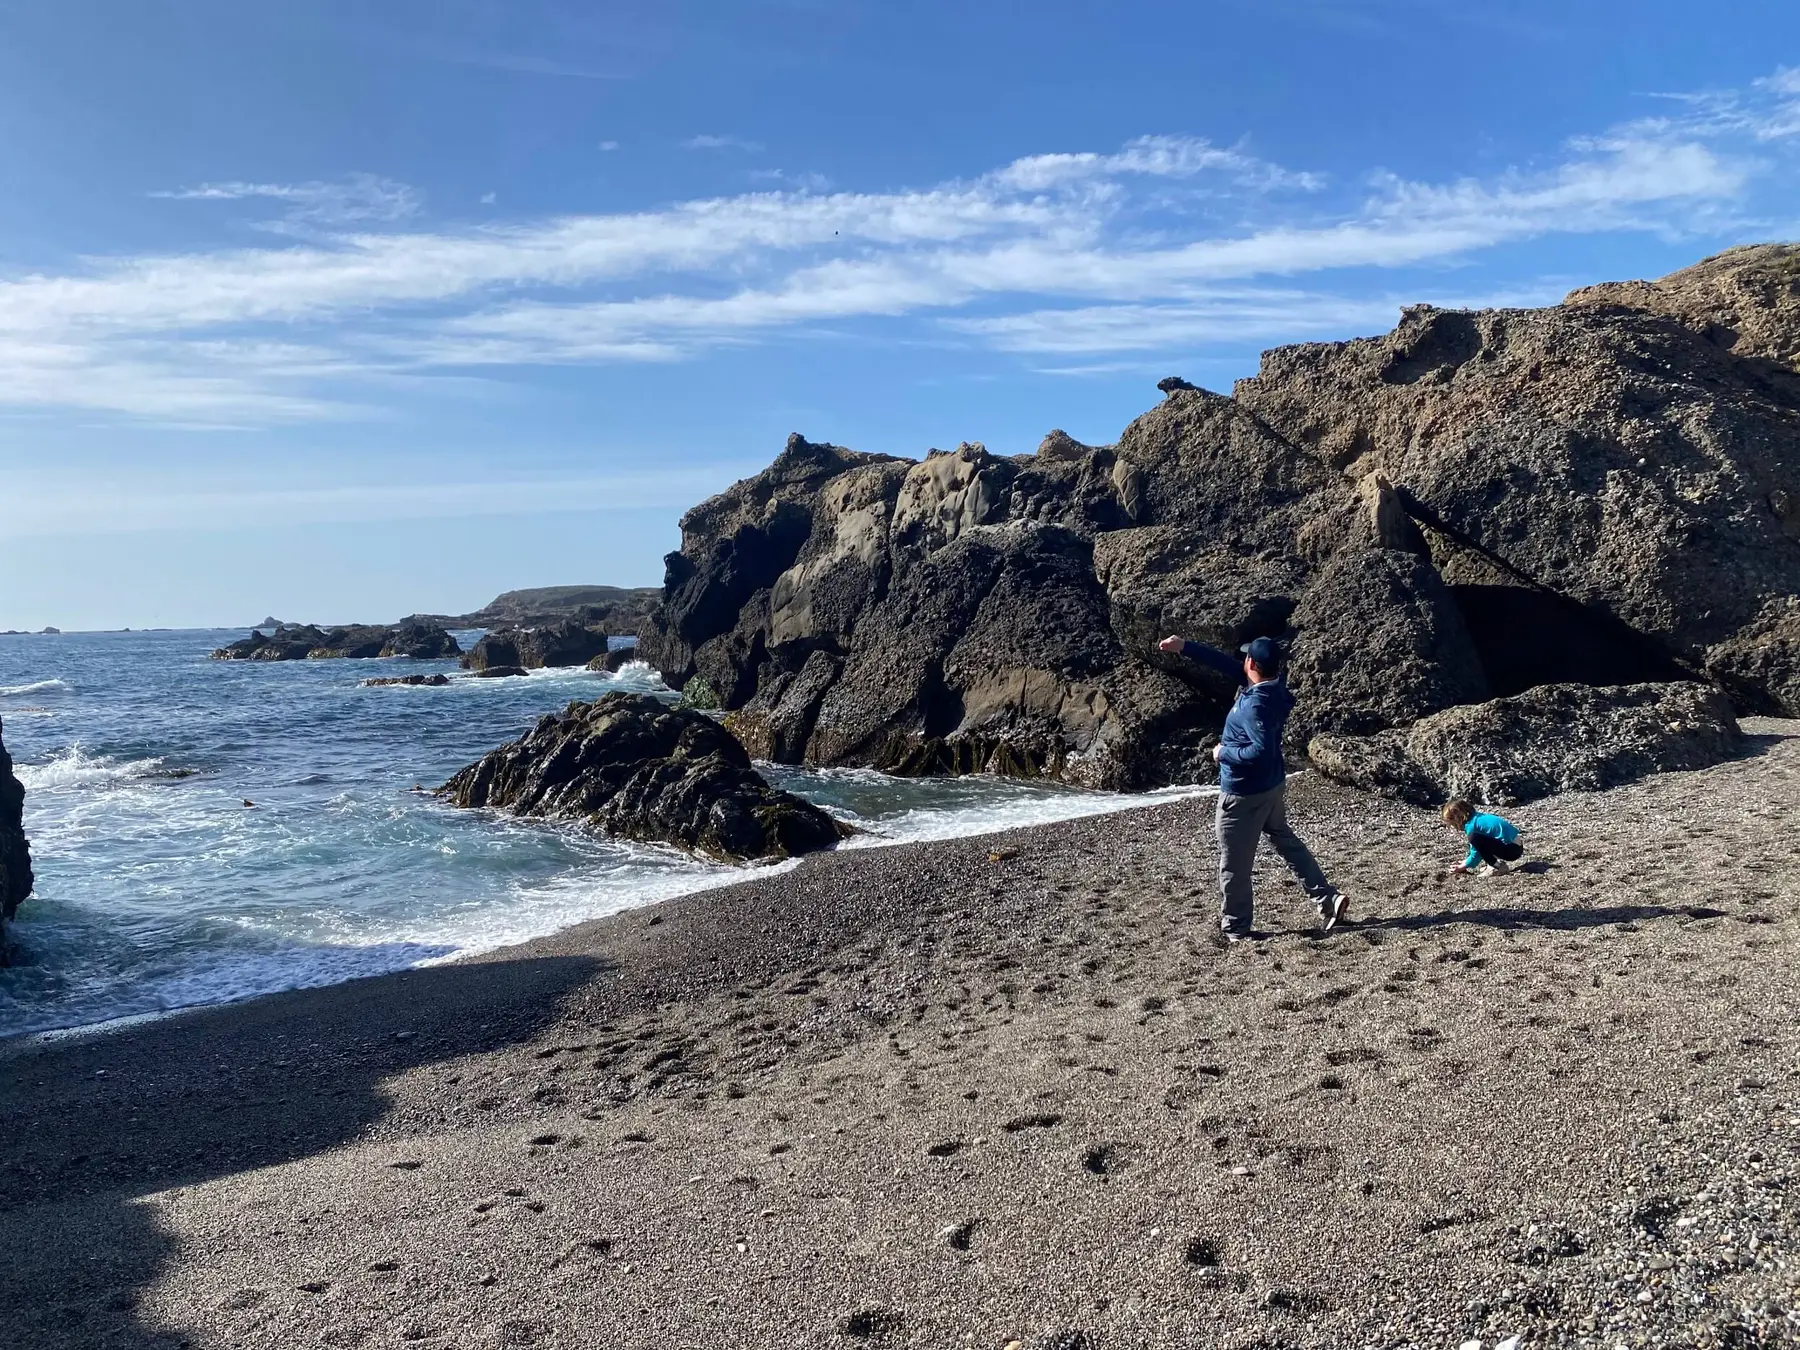
Drive about 12 miles further south on Highway 1, then turn right on Sycamore Canyon Road to reach Pheiffer Beach. There is limited parking so you may have to drive around and wait for someone to leave. The last two stops have only been vistas, so this is a great place to get out and let the kids run around on the beach! There are beautiful rock formations around and a place where the water crashes through a carved hole in the rock.
Continue South on Highway 1 and there are a few lunch options if you’re getting hungry:
Big Sur Deli – grab a delicous sandwich, grocery items, and craft beers to go! This is what we did on this particular trip to save cost and time. We took our sandwiches to our next stop and ate with a view.
Nepenthe – delicious sandwiches and salads, a kids menu, indoor and outdoor seating with gorgeous views. Prices are a bit high for lunch sandwiches so you’re definitely paying for the view. This place is popular so you may have to wait for a parking spot on busy days.
Big Sur Bakery & Restaurant – brunch/lunch menu with cozy, rustic indoor seating.
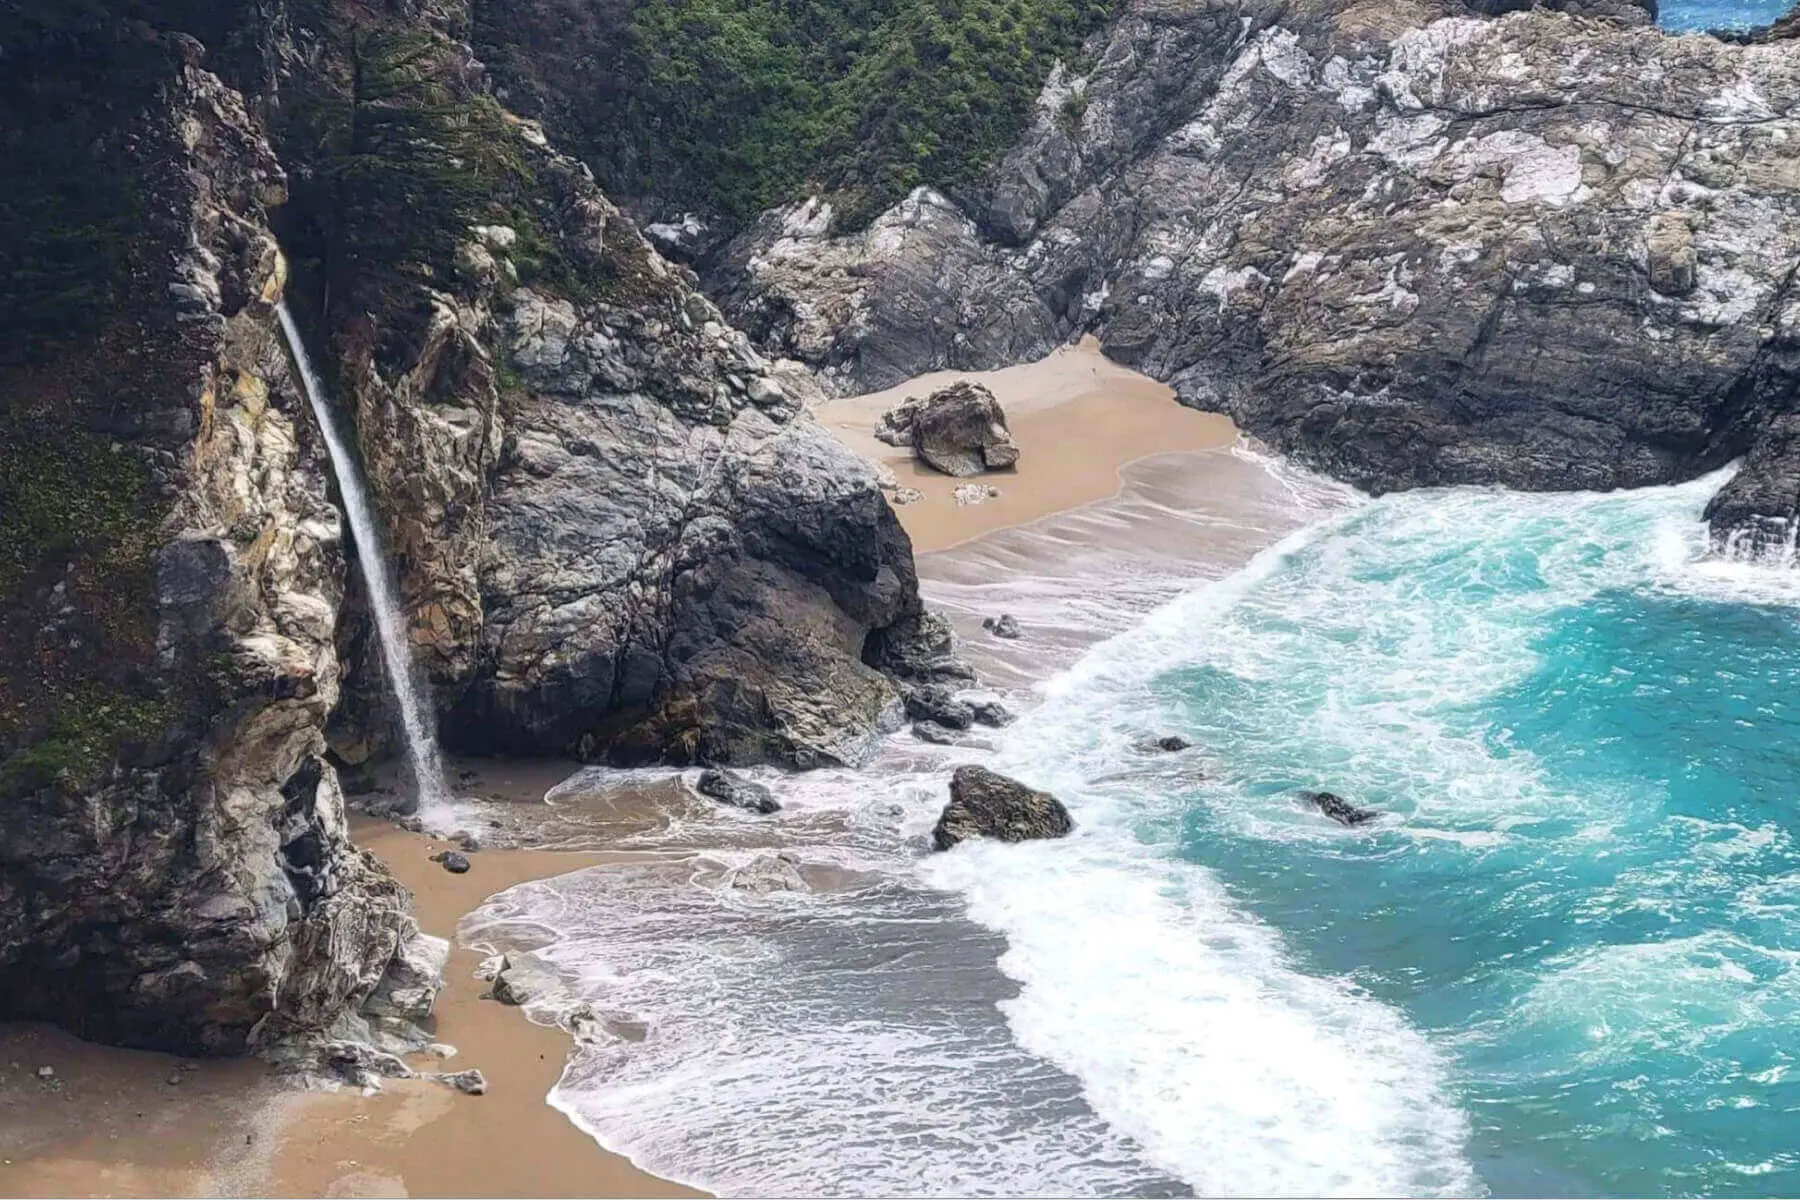
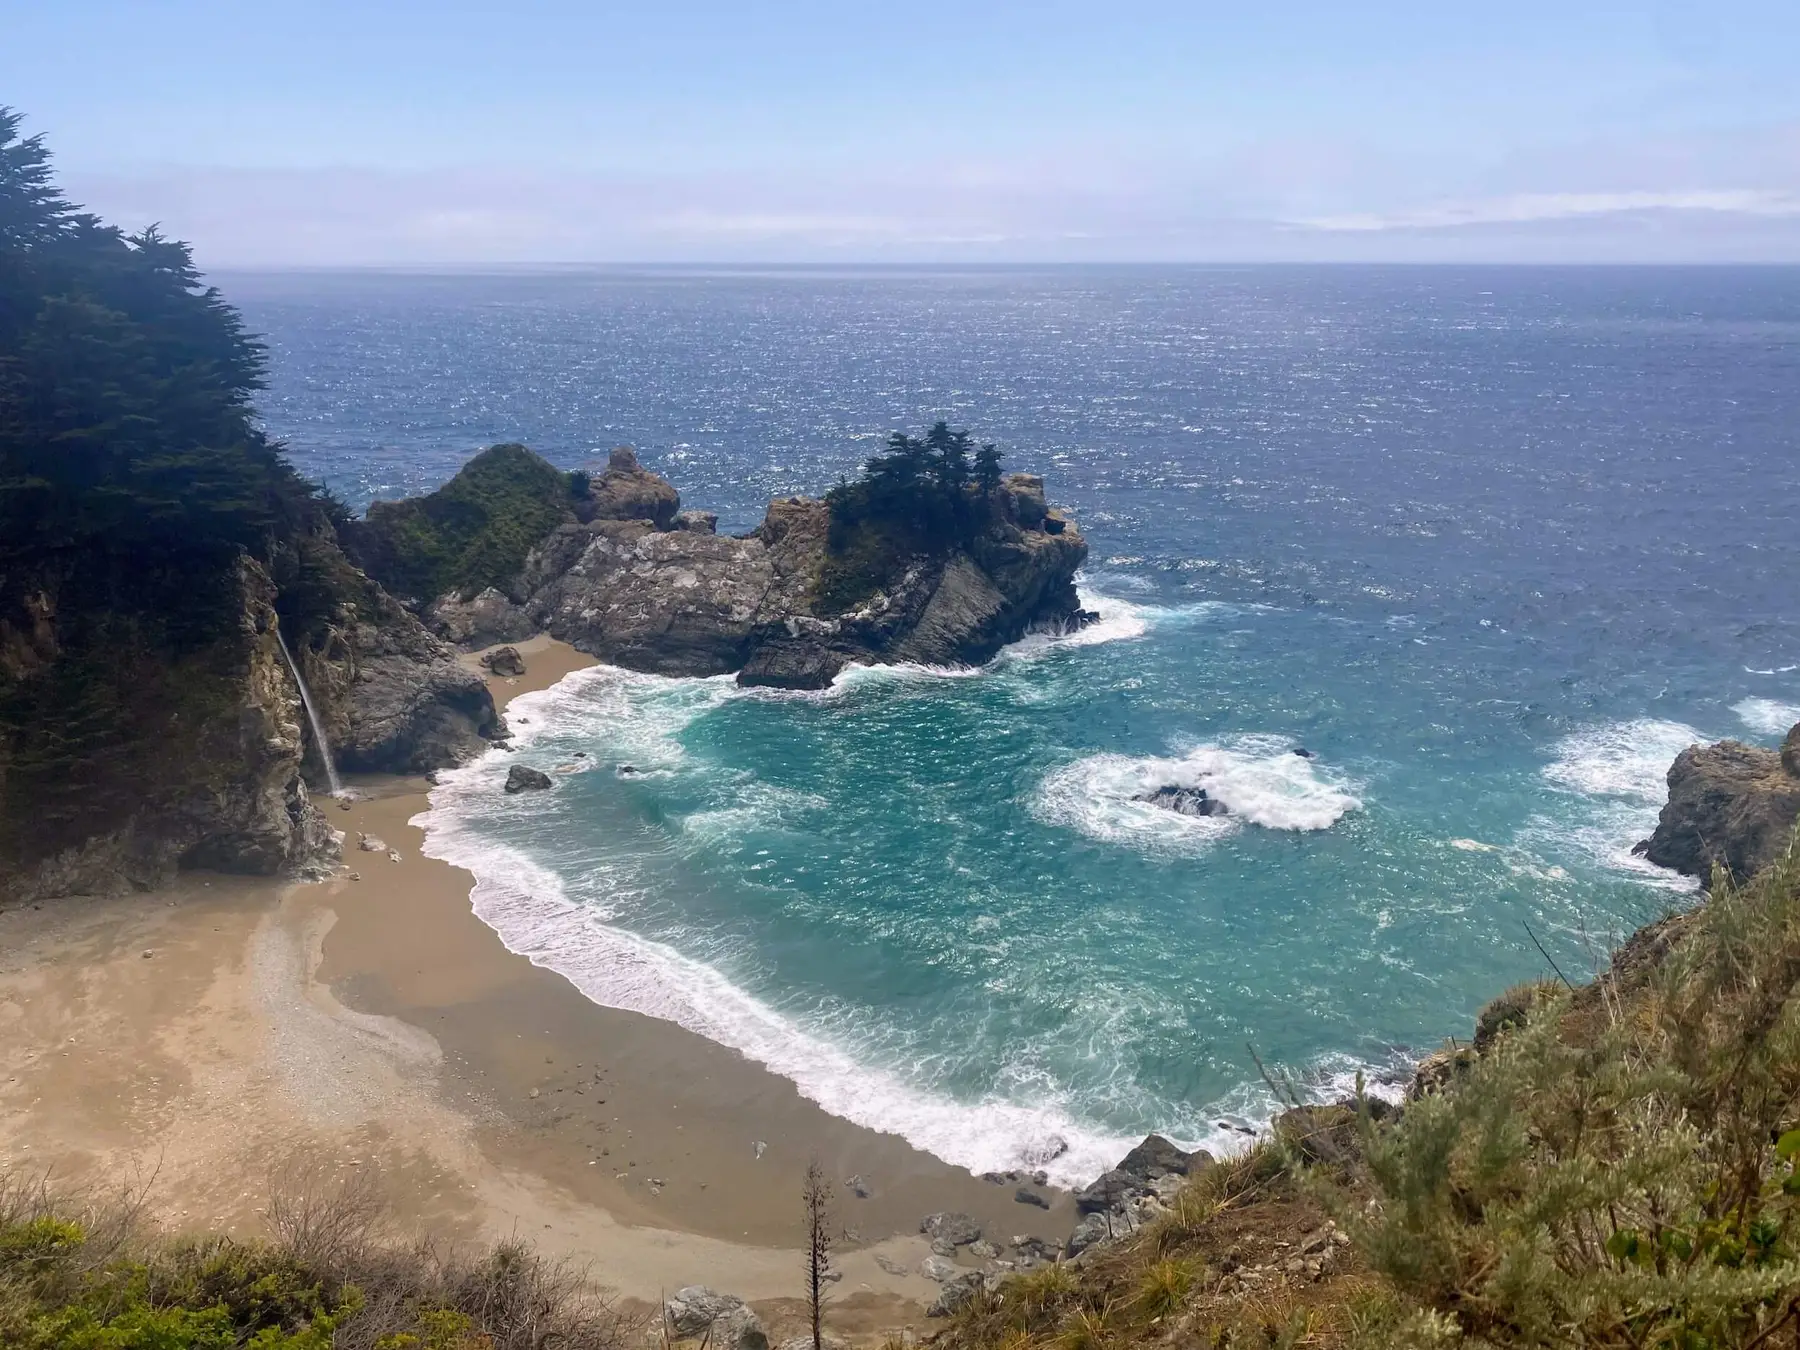
About 10 more miles down Highway 1/Pacific Coast Highway you will see a turn off for McWay Falls parking on the left side of the road (sometimes the road to the lot is closed, but you can park along the Highway also). From the parking lot, there is a trail head that leads you under the Highway then up to a view point to look back at McWay Falls. This is the famous waterfall you’ve probably seen in photos of a waterfall falling into a gorgeous cove. You cannot hike close to the waterfall or down into the cove – just enjoy the views from the top.
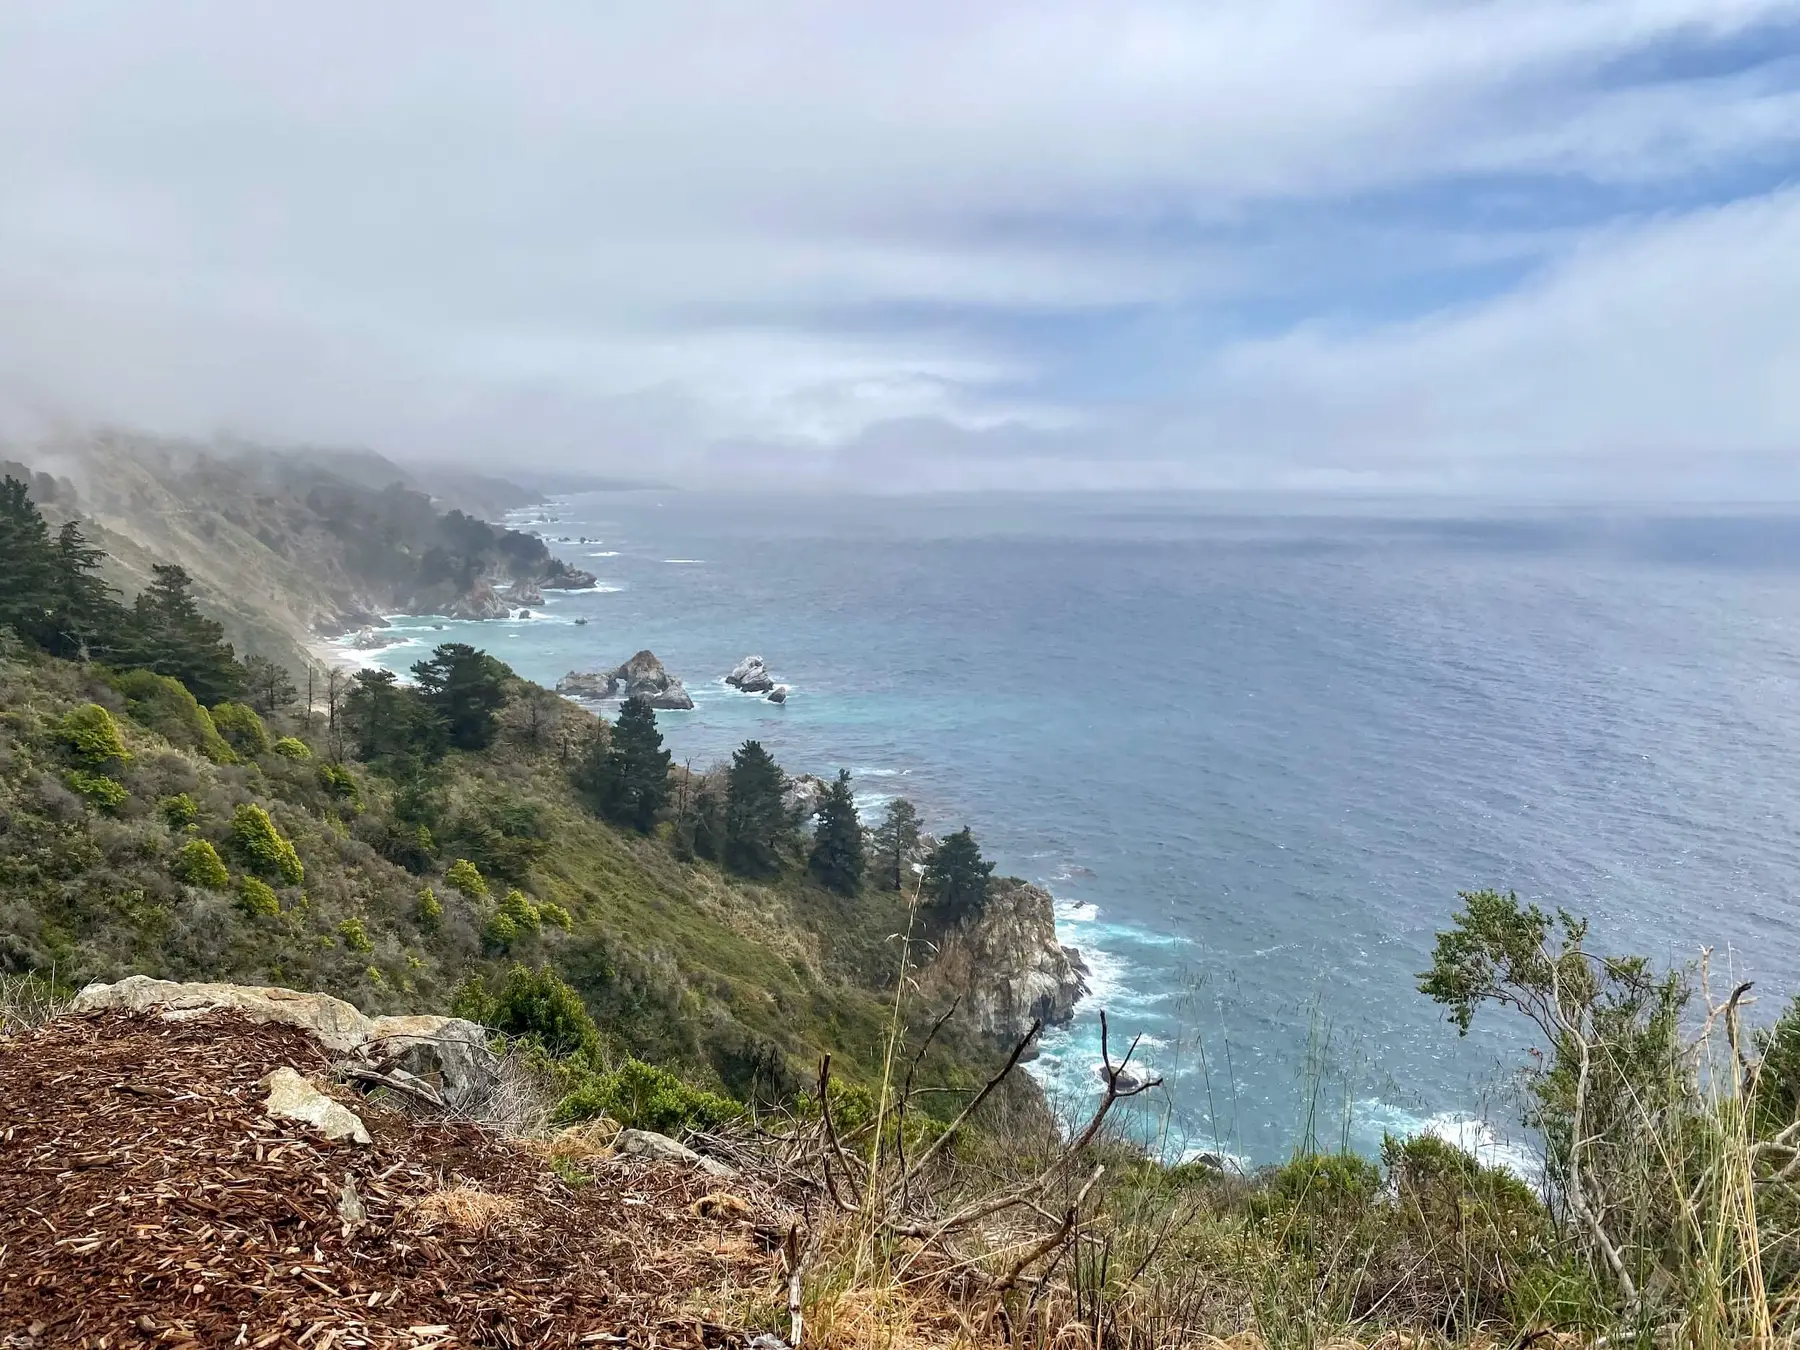
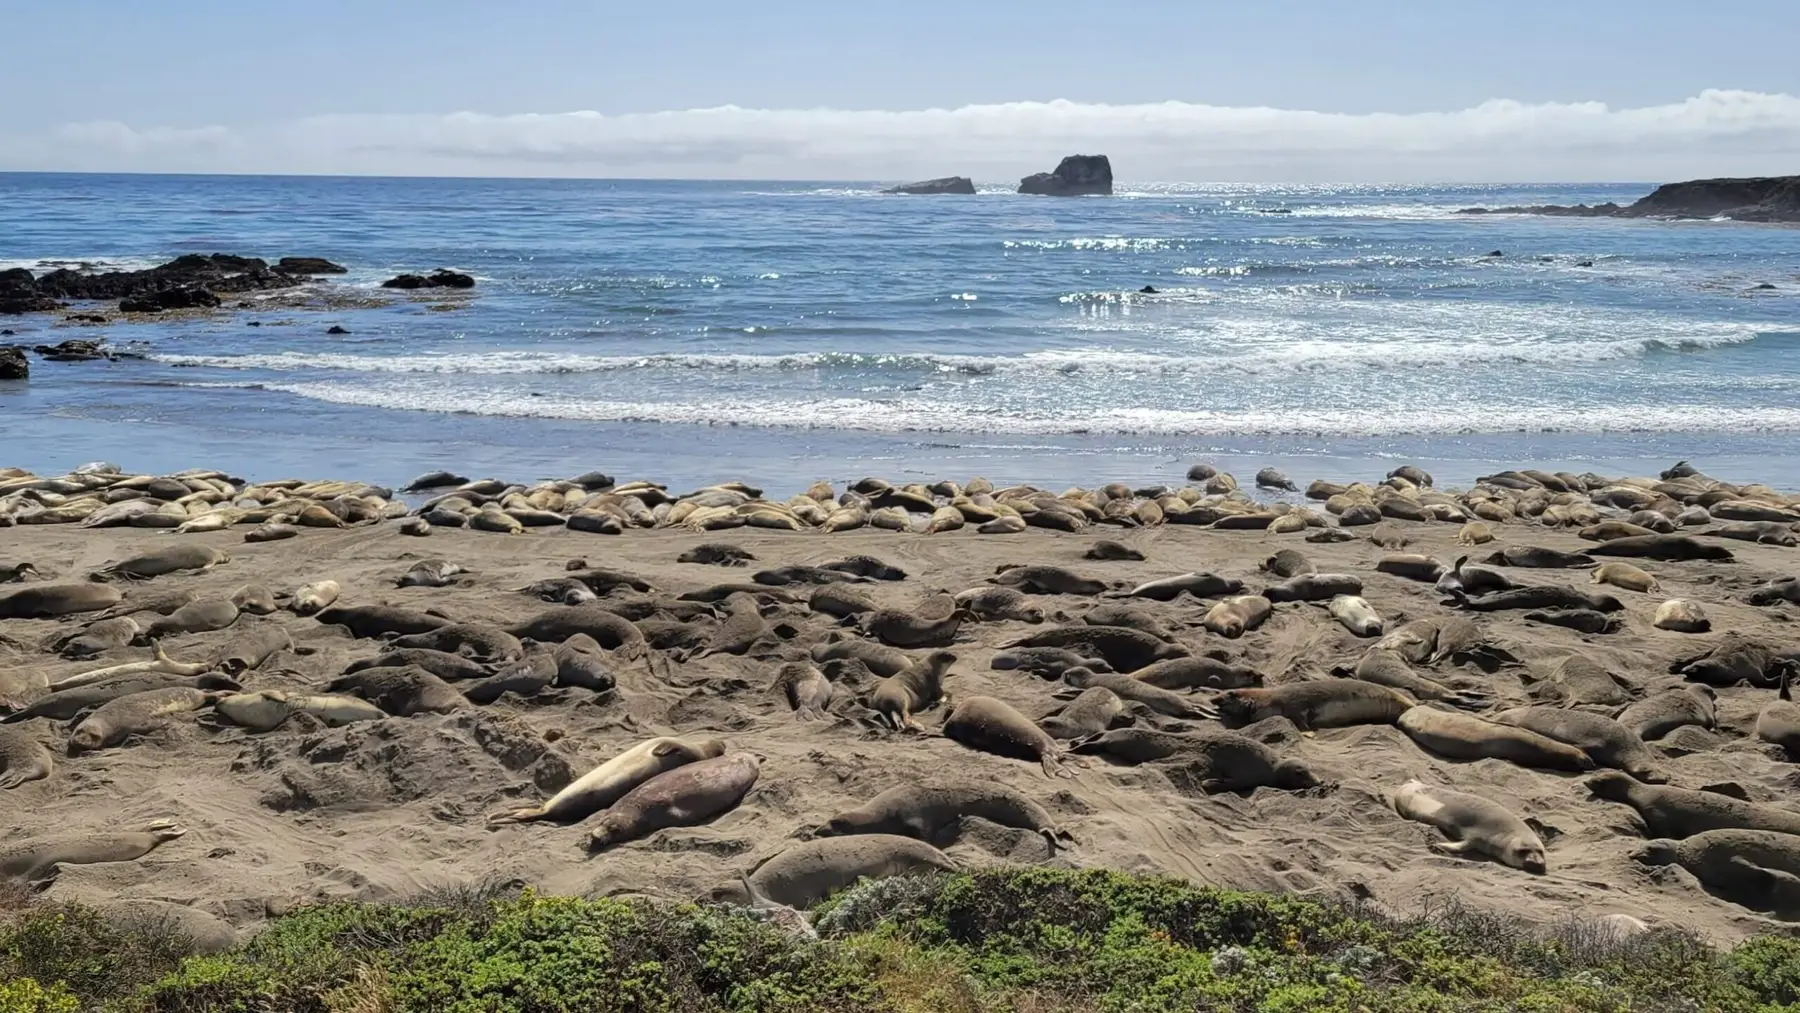
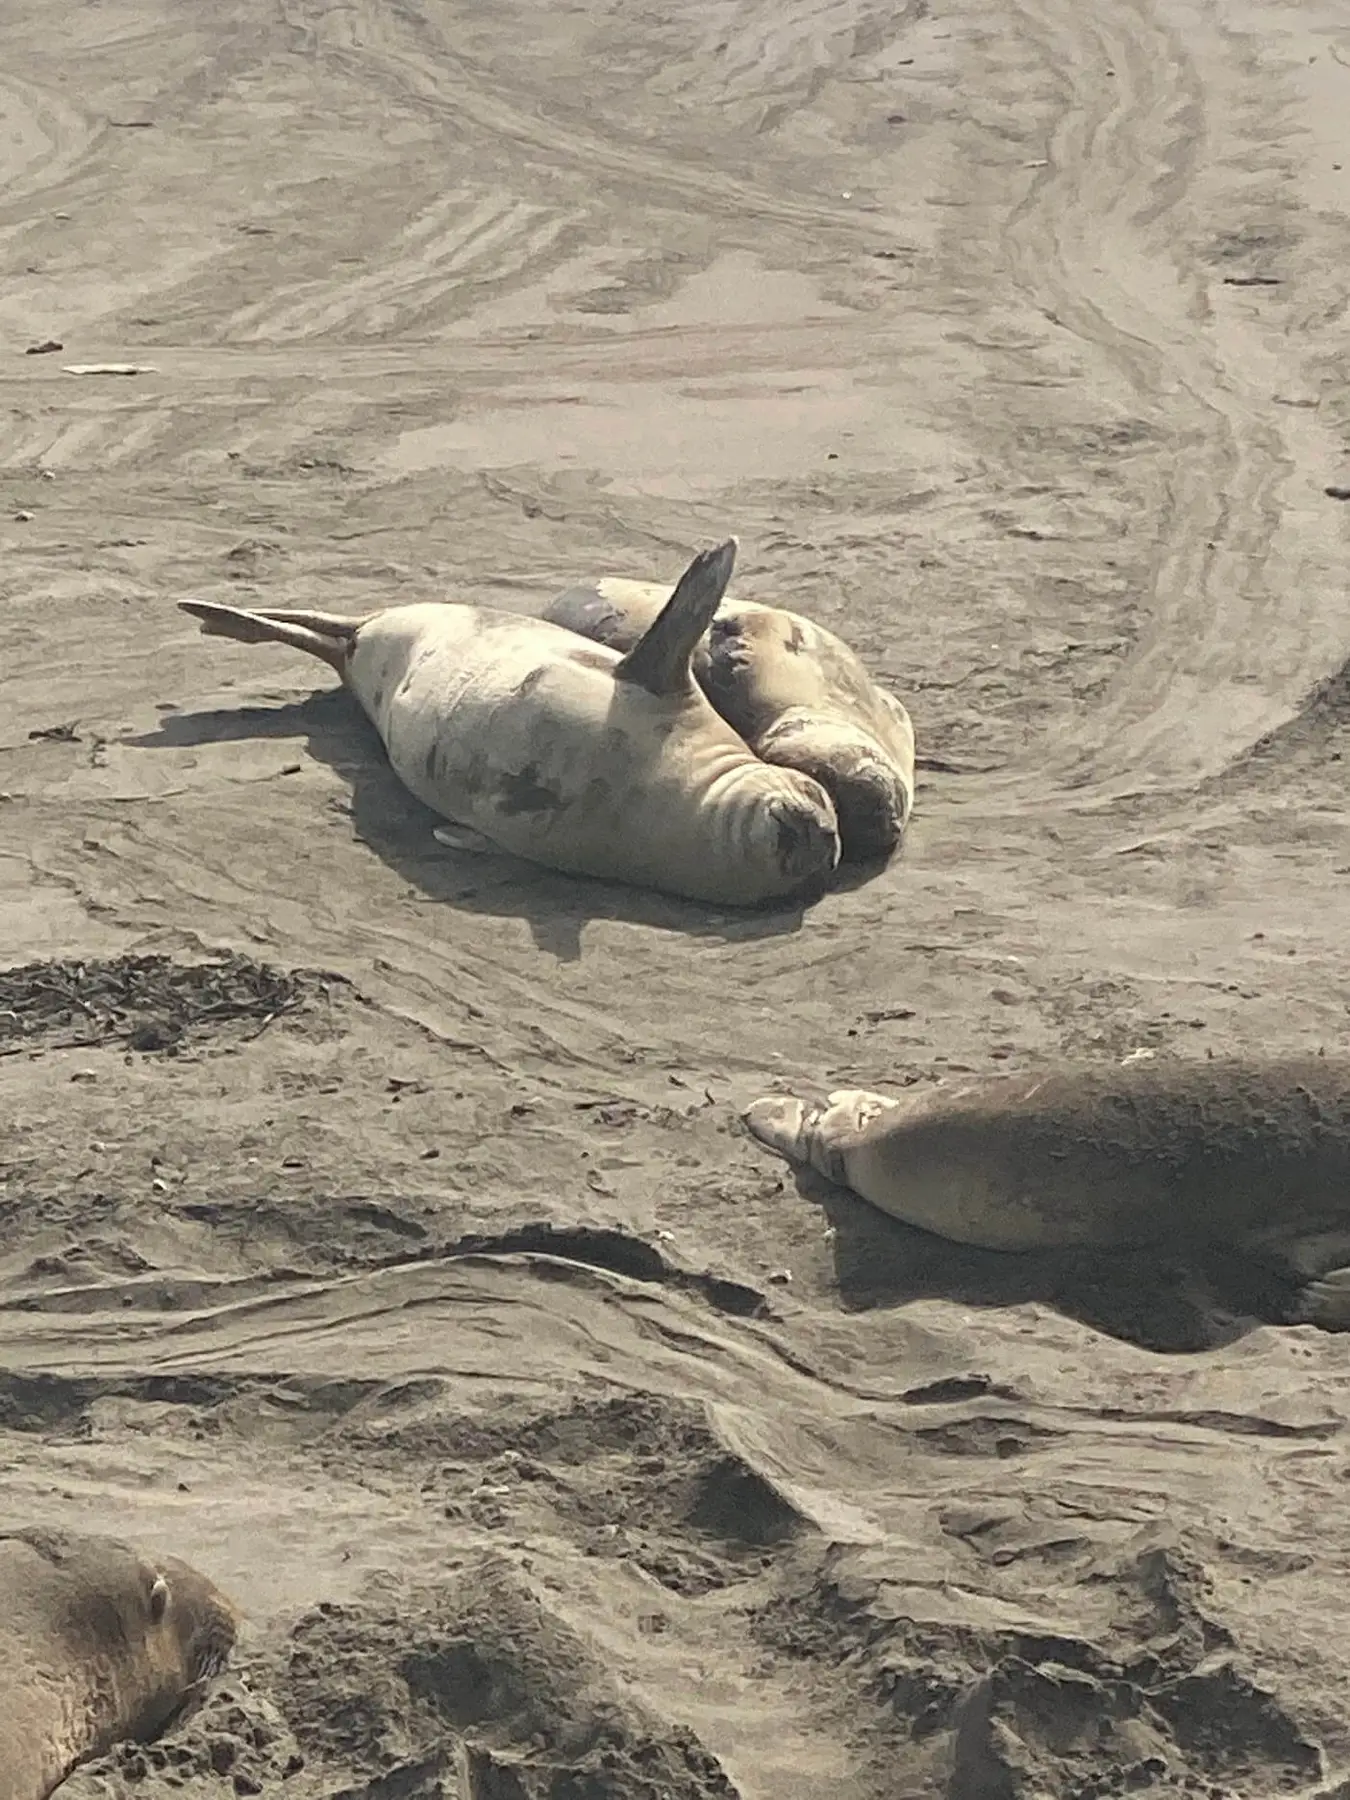
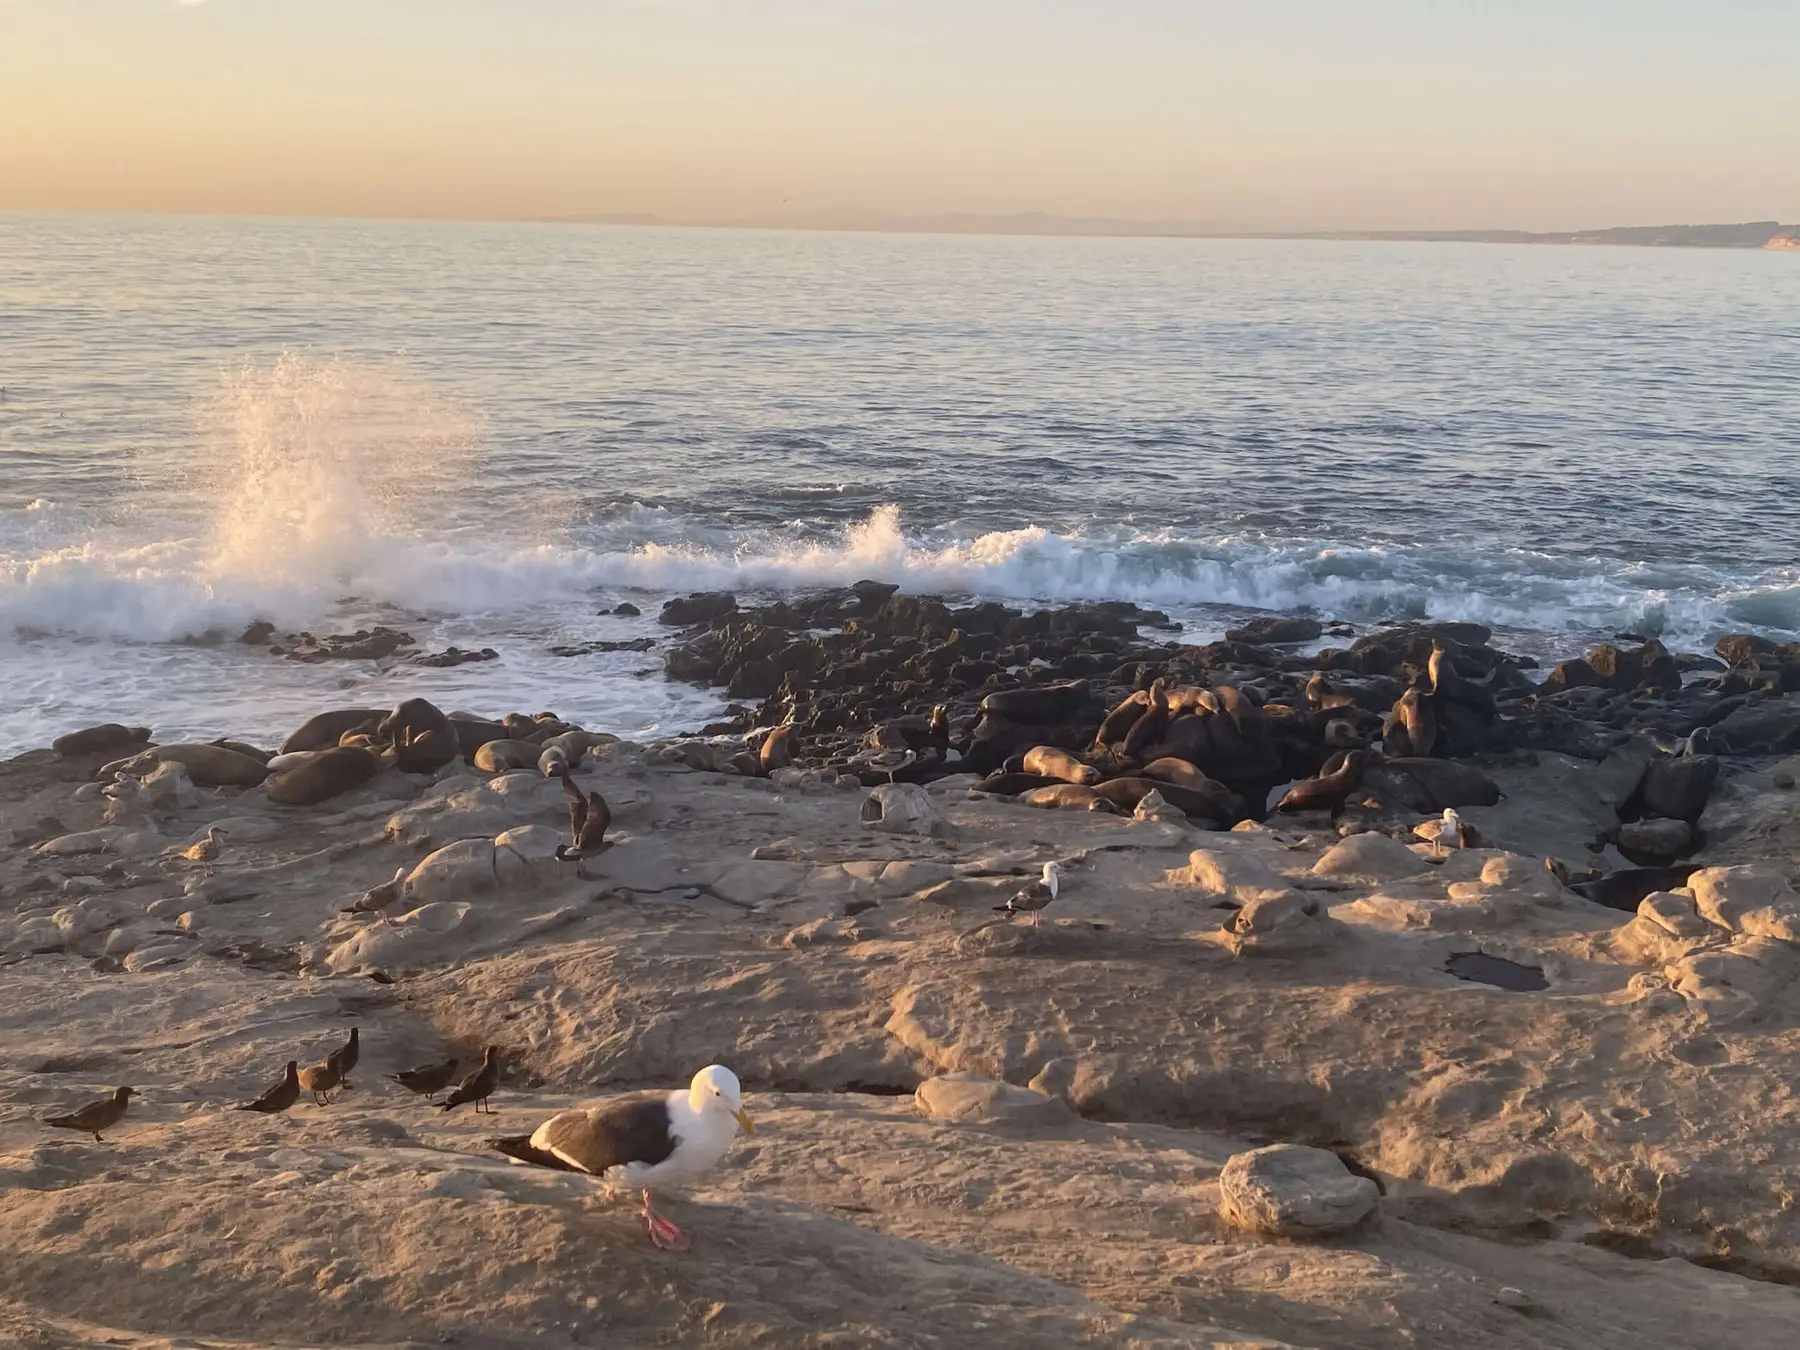
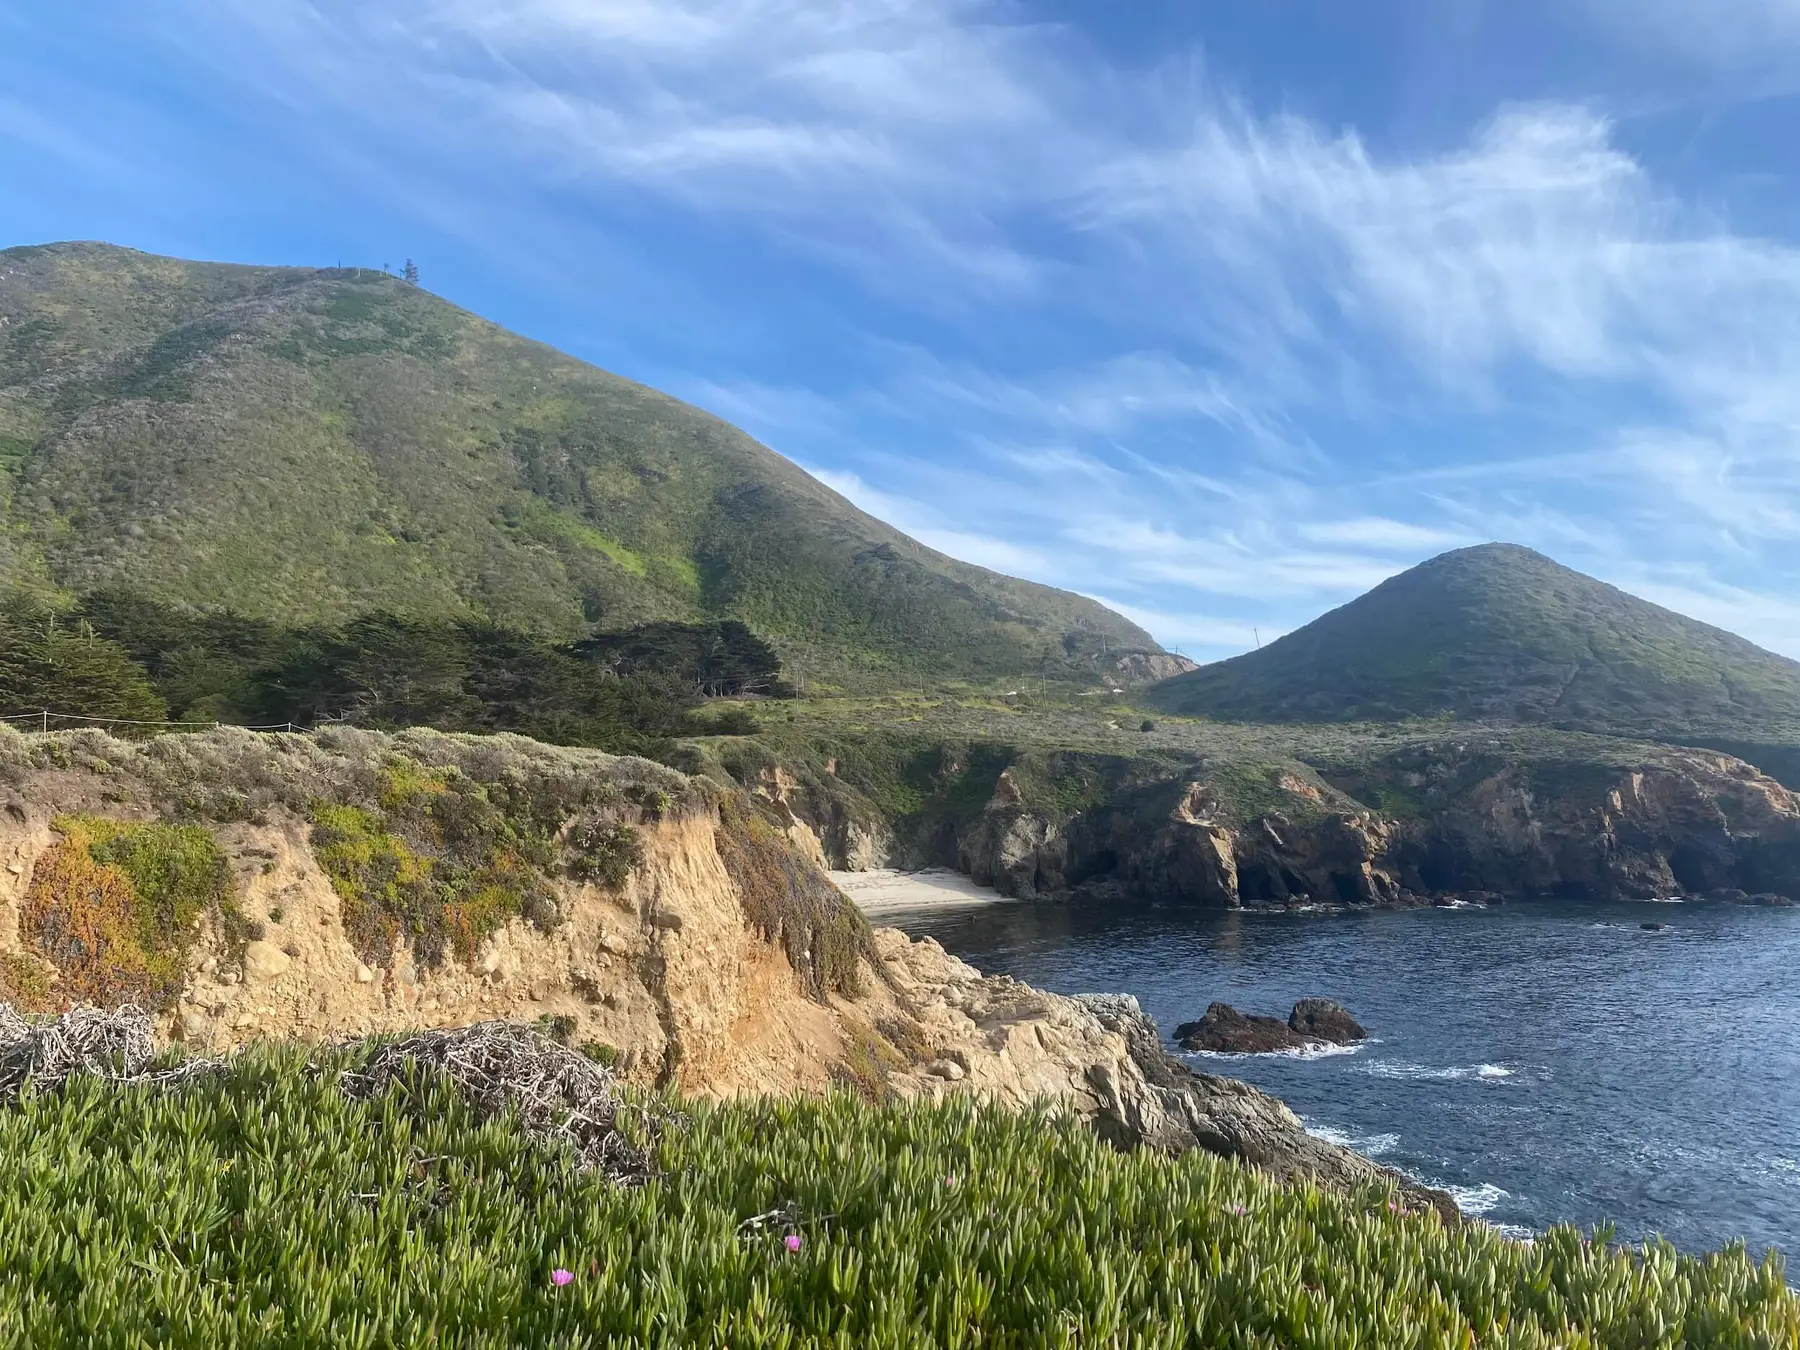
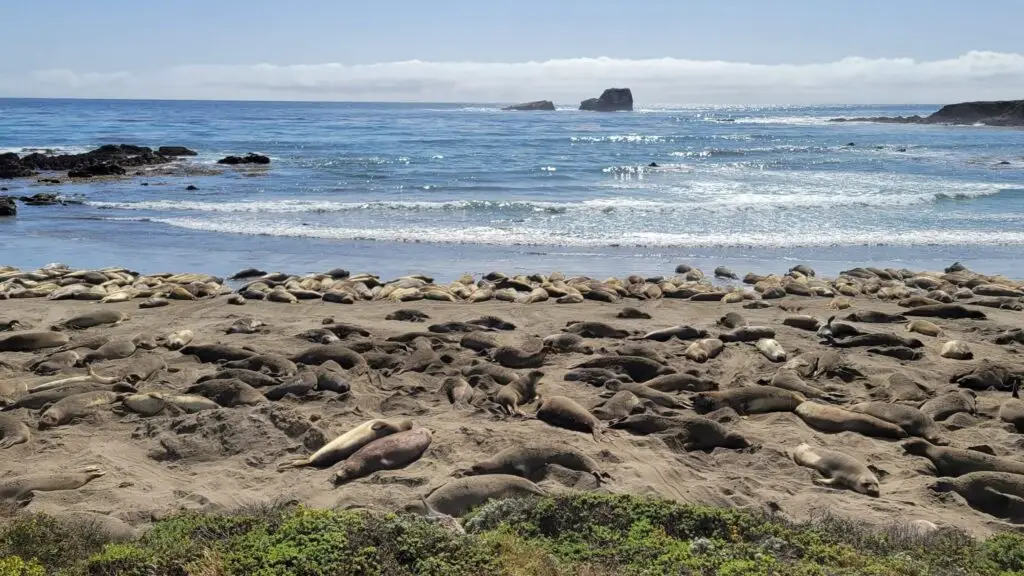
If your kids need a nap, the drive between the falls and your next stop may be a good time. But I recommend staying awake and enjoying the gorgeous drive. There are several other vistas you can stop at if you’d like. Elephant Seal Vista Point is at the southern end of Big Sur and has a large, long parking lot that is hard to miss. There are often hundreds of seals on this stretch of beach! It’s truly awesome and you’ll probably spend about 30 minutes enjoying looking at these awesome animals.
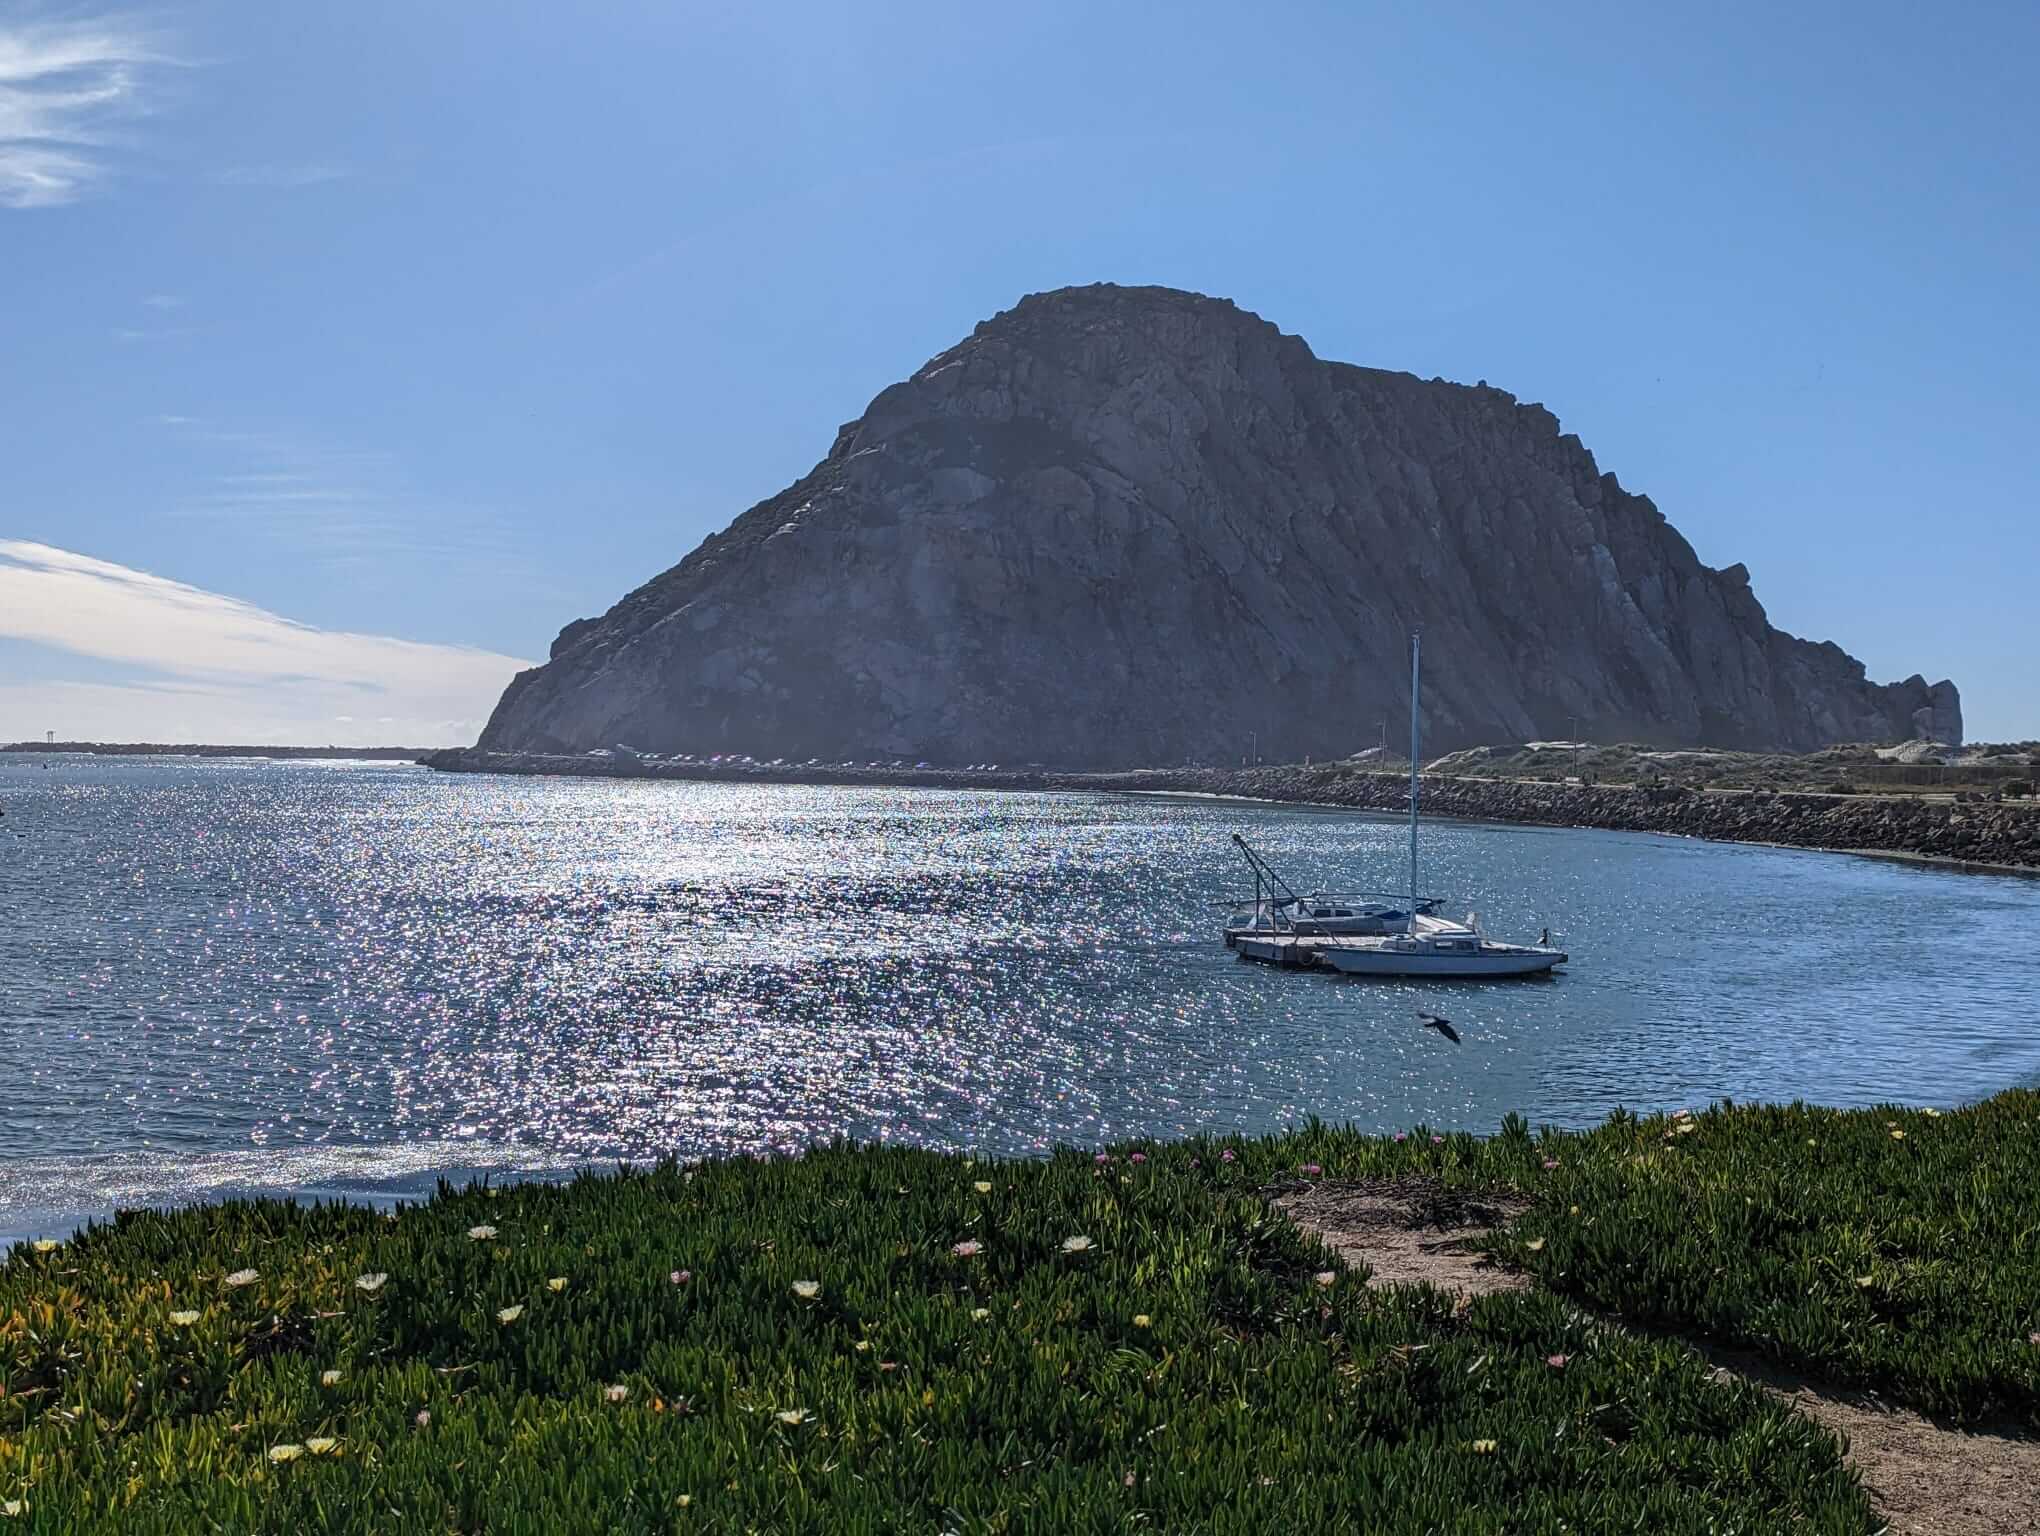
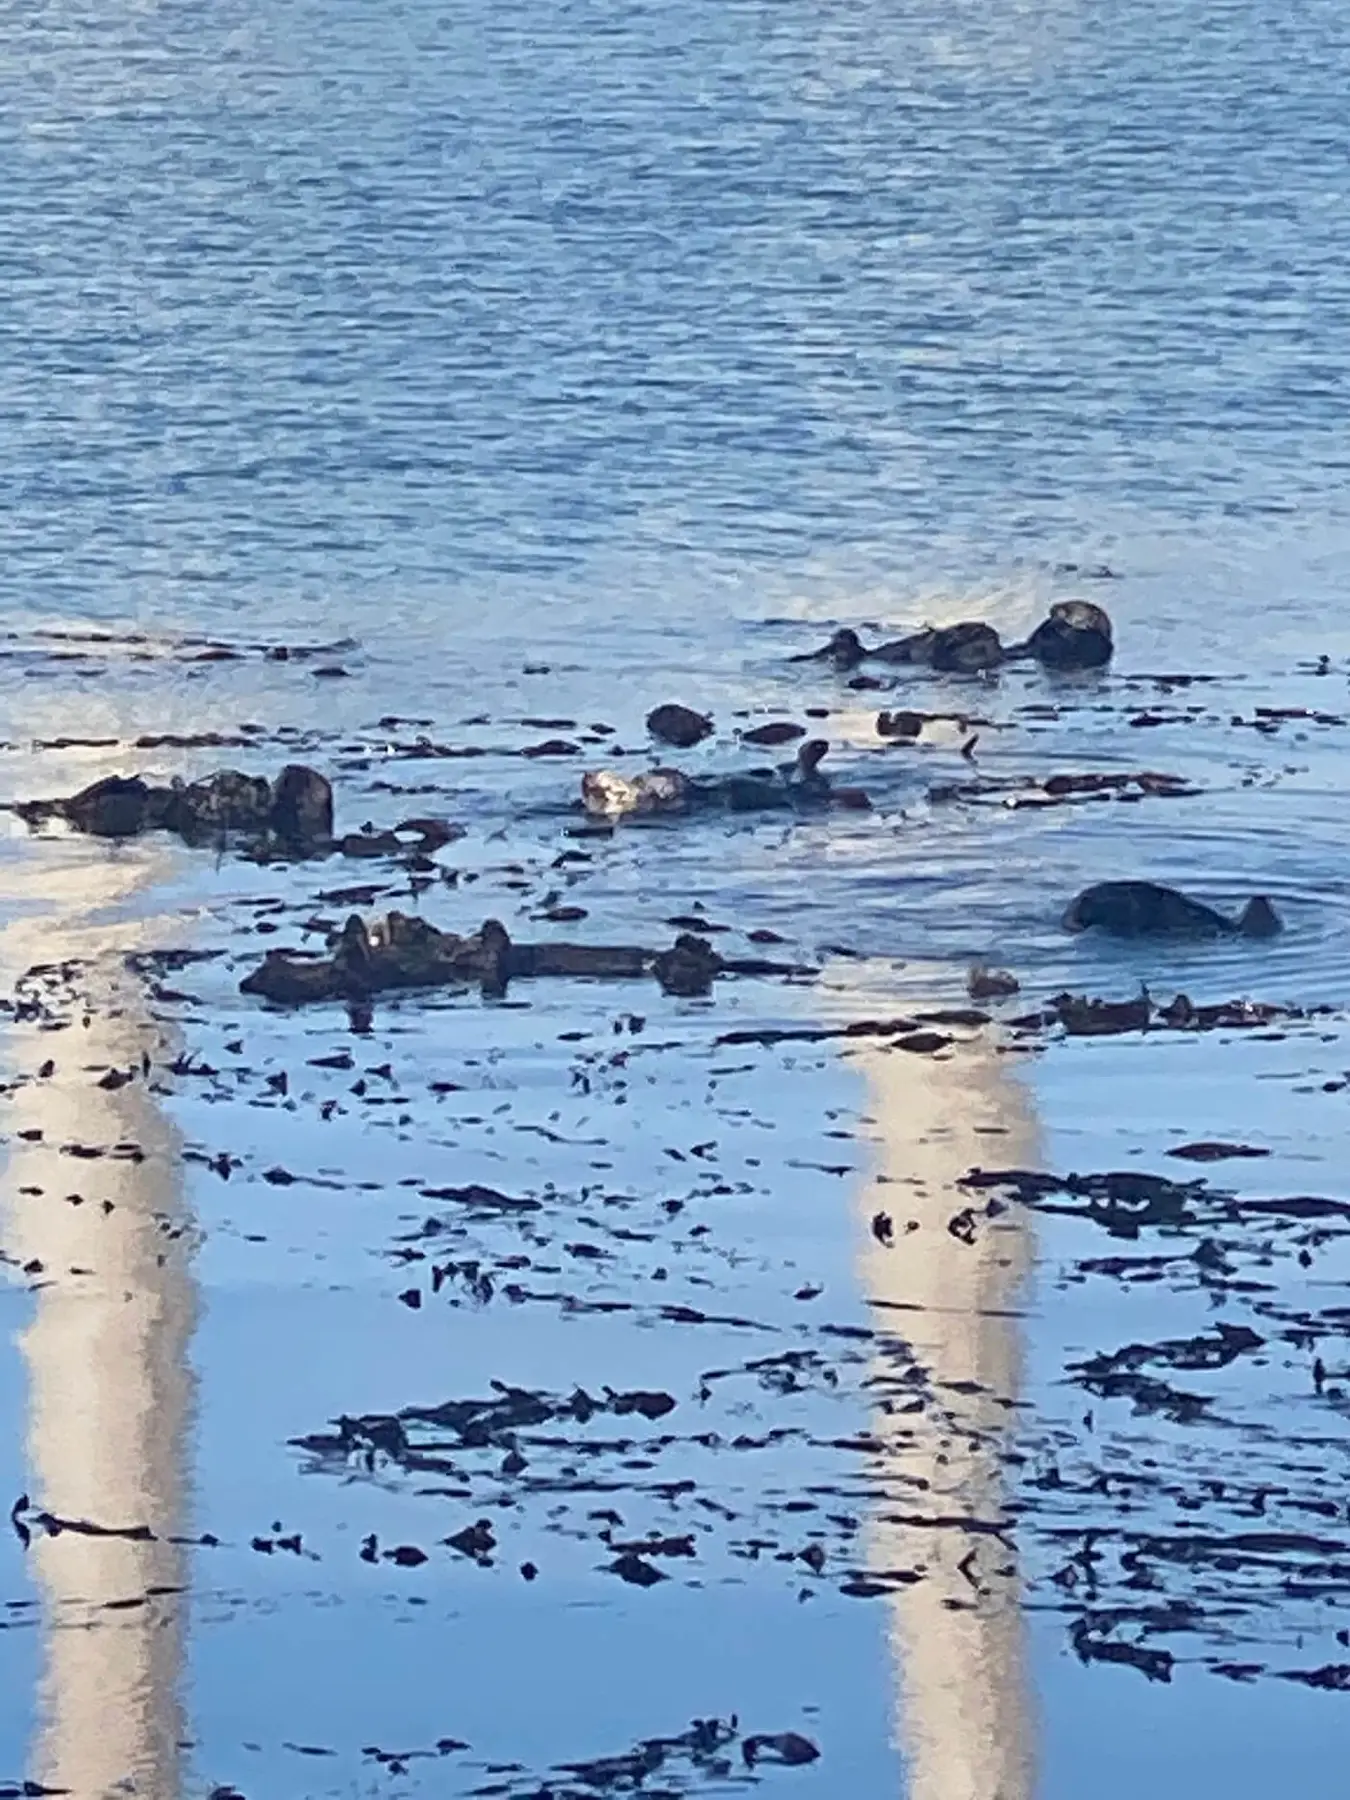
Continue on Highway 1 for about 40 more minutes and you will start to see a very large rock on the horizon. Drive down to Morrow Rock Beach to get a close up view of the huge 581 foot volcanic rock, run around on the beach, watch the surfers, and look for otters.

At this point, you’re still about 3.5 hours to LA so you’ll want to plug it into your map to find the fastest route (likely leaving Highway 1 and getting on the 101). You can stop for dinner somewhere along the way.
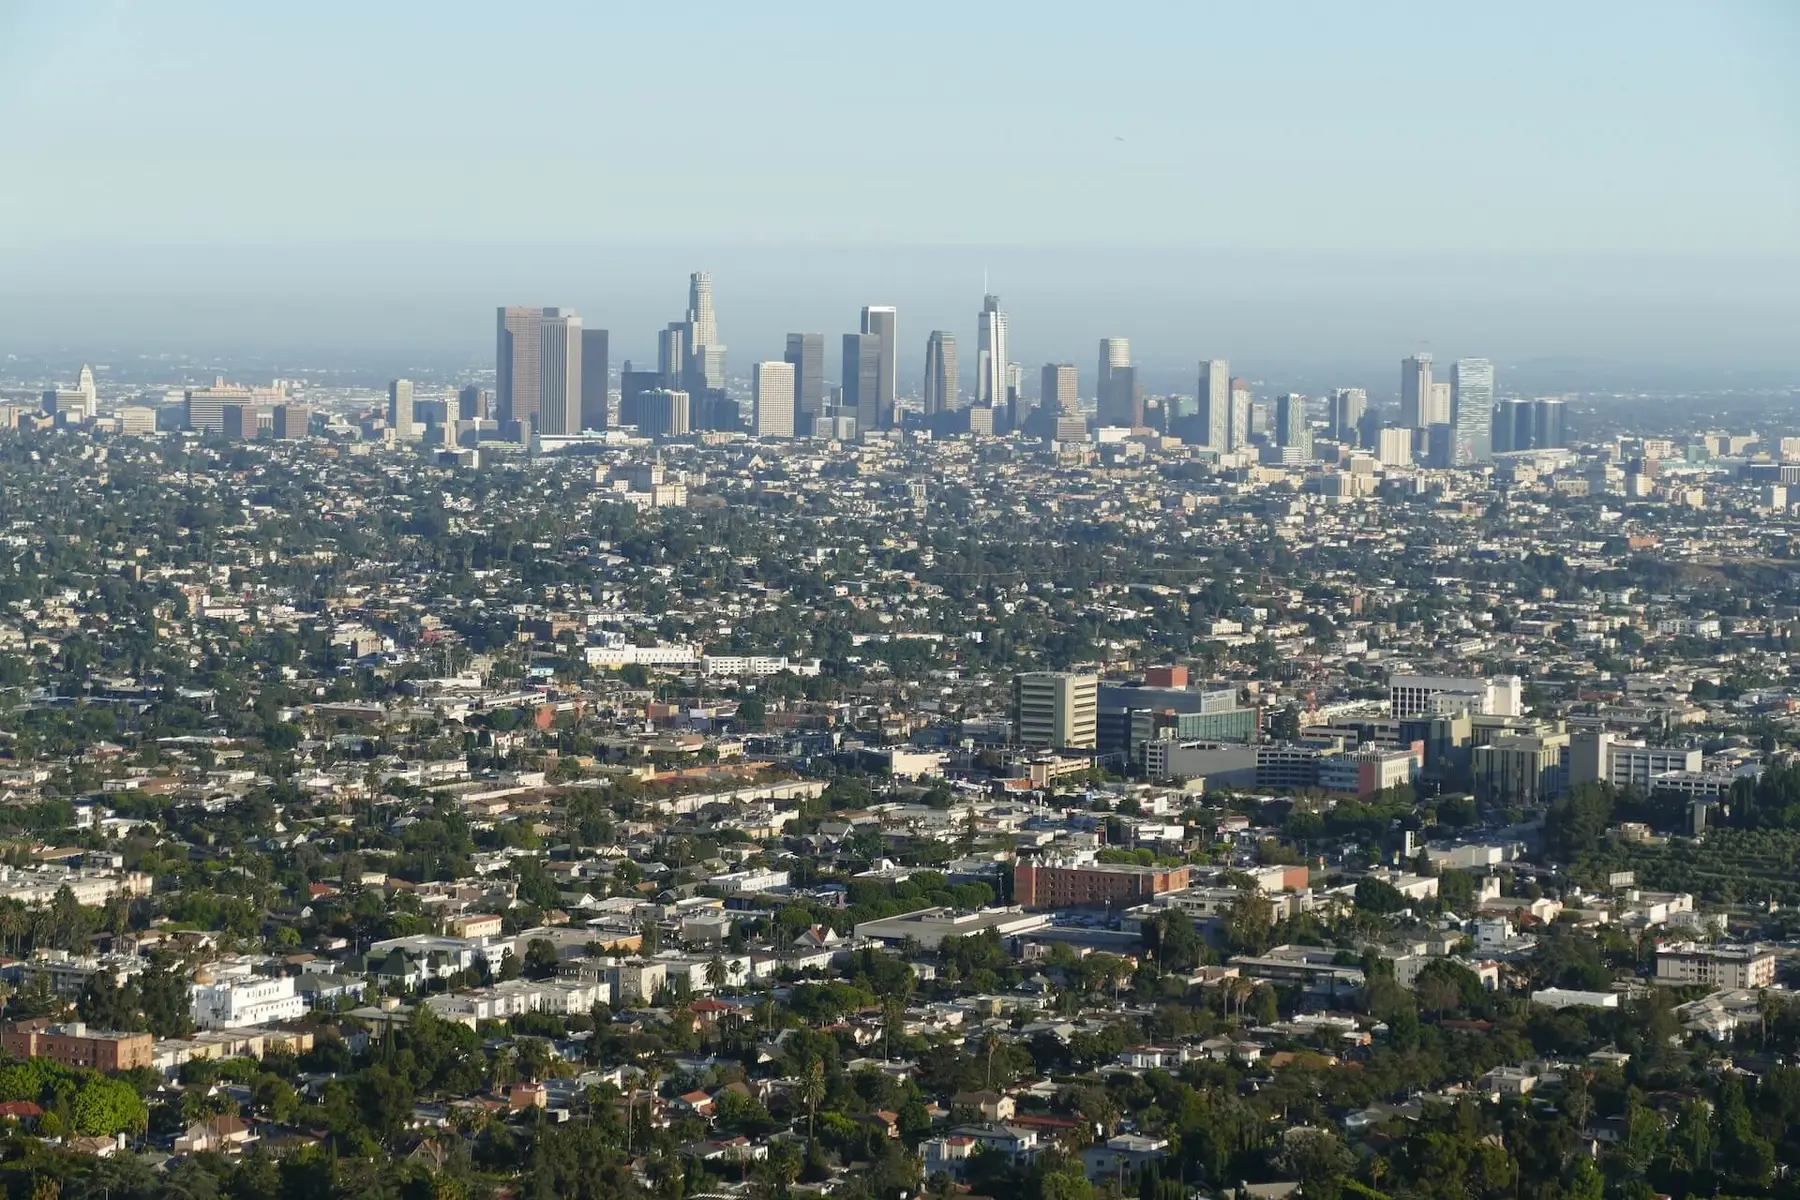
Where to stay in the LA area:
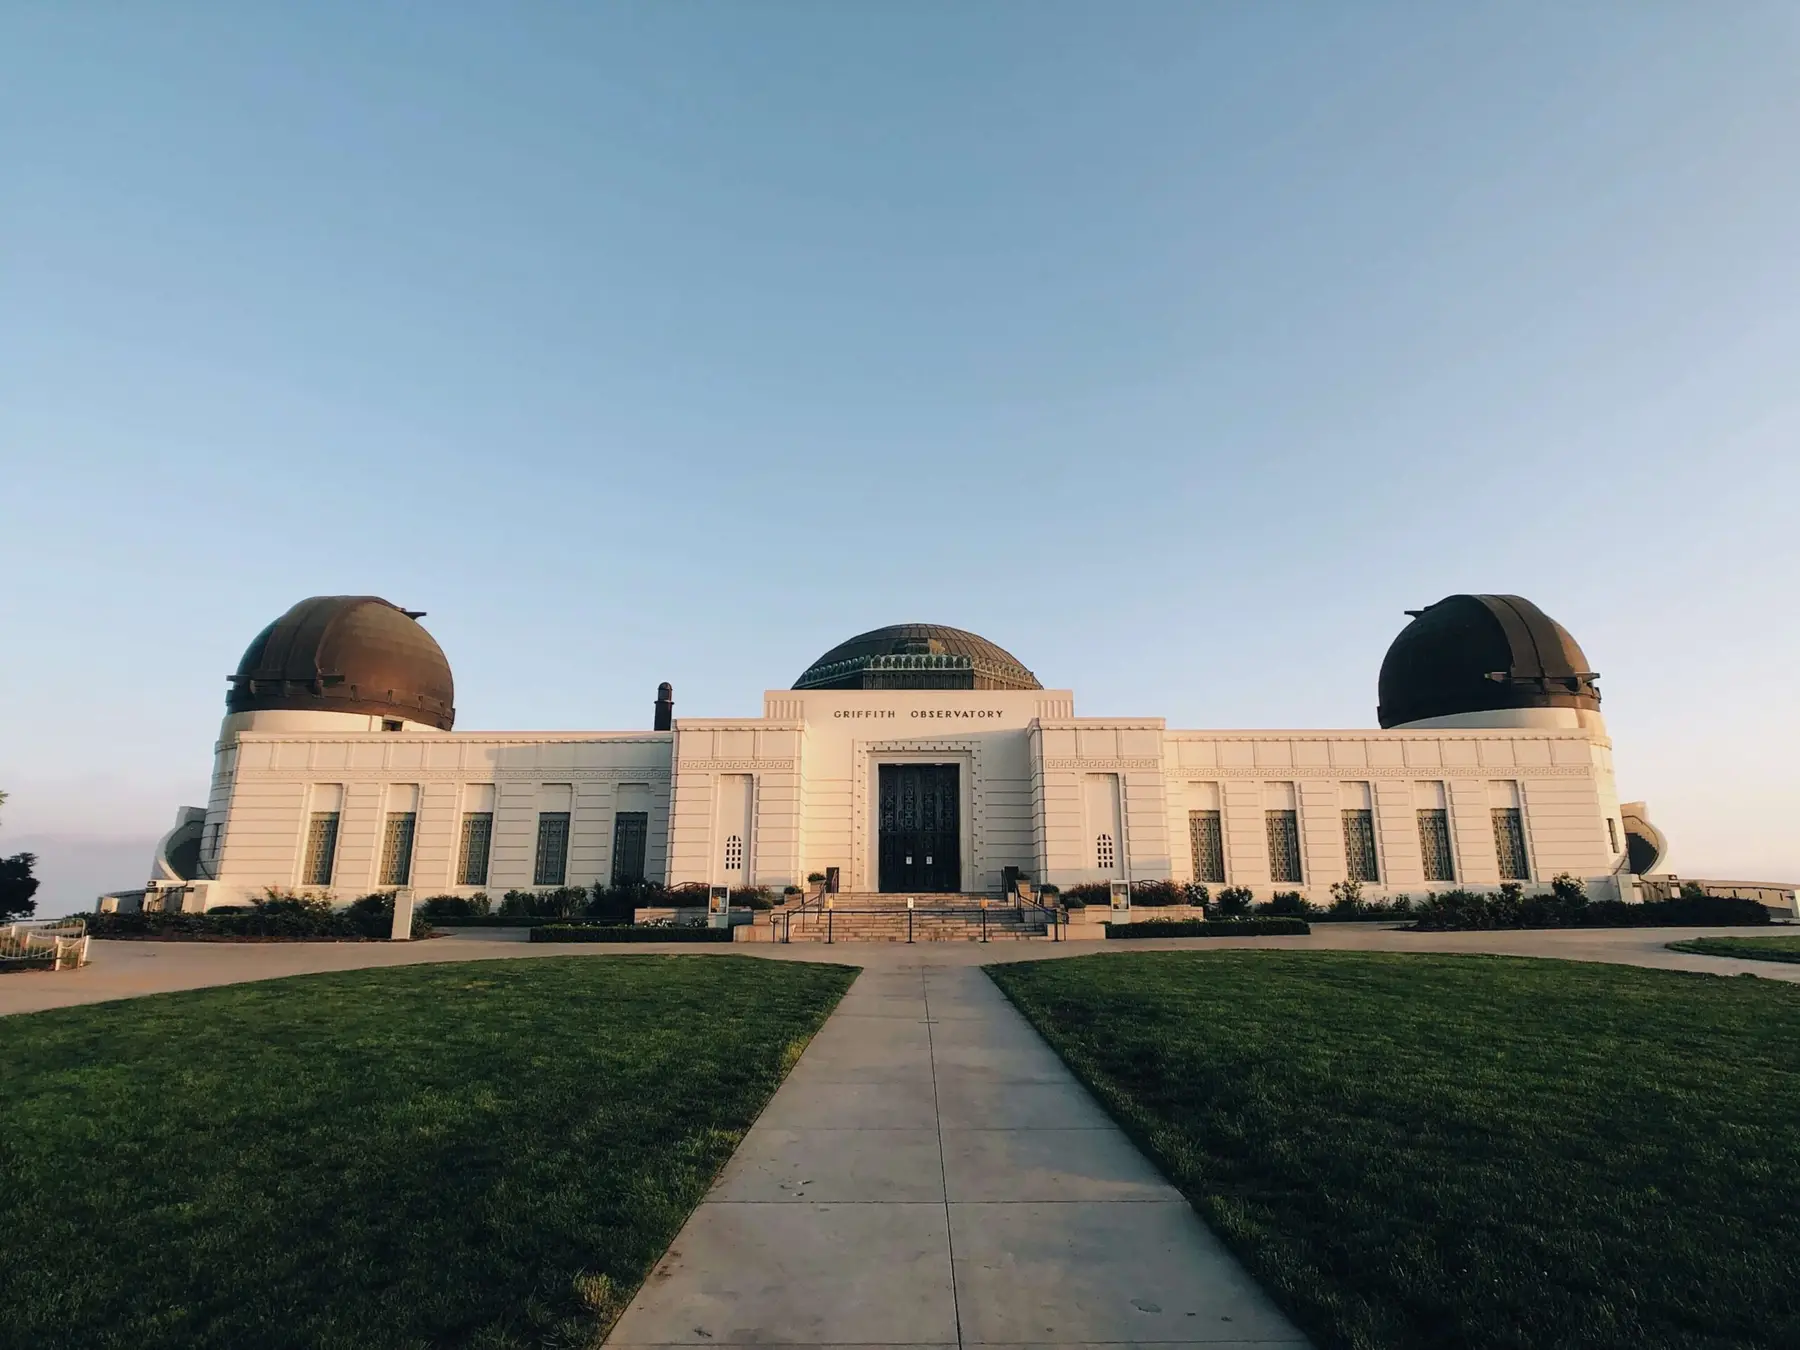
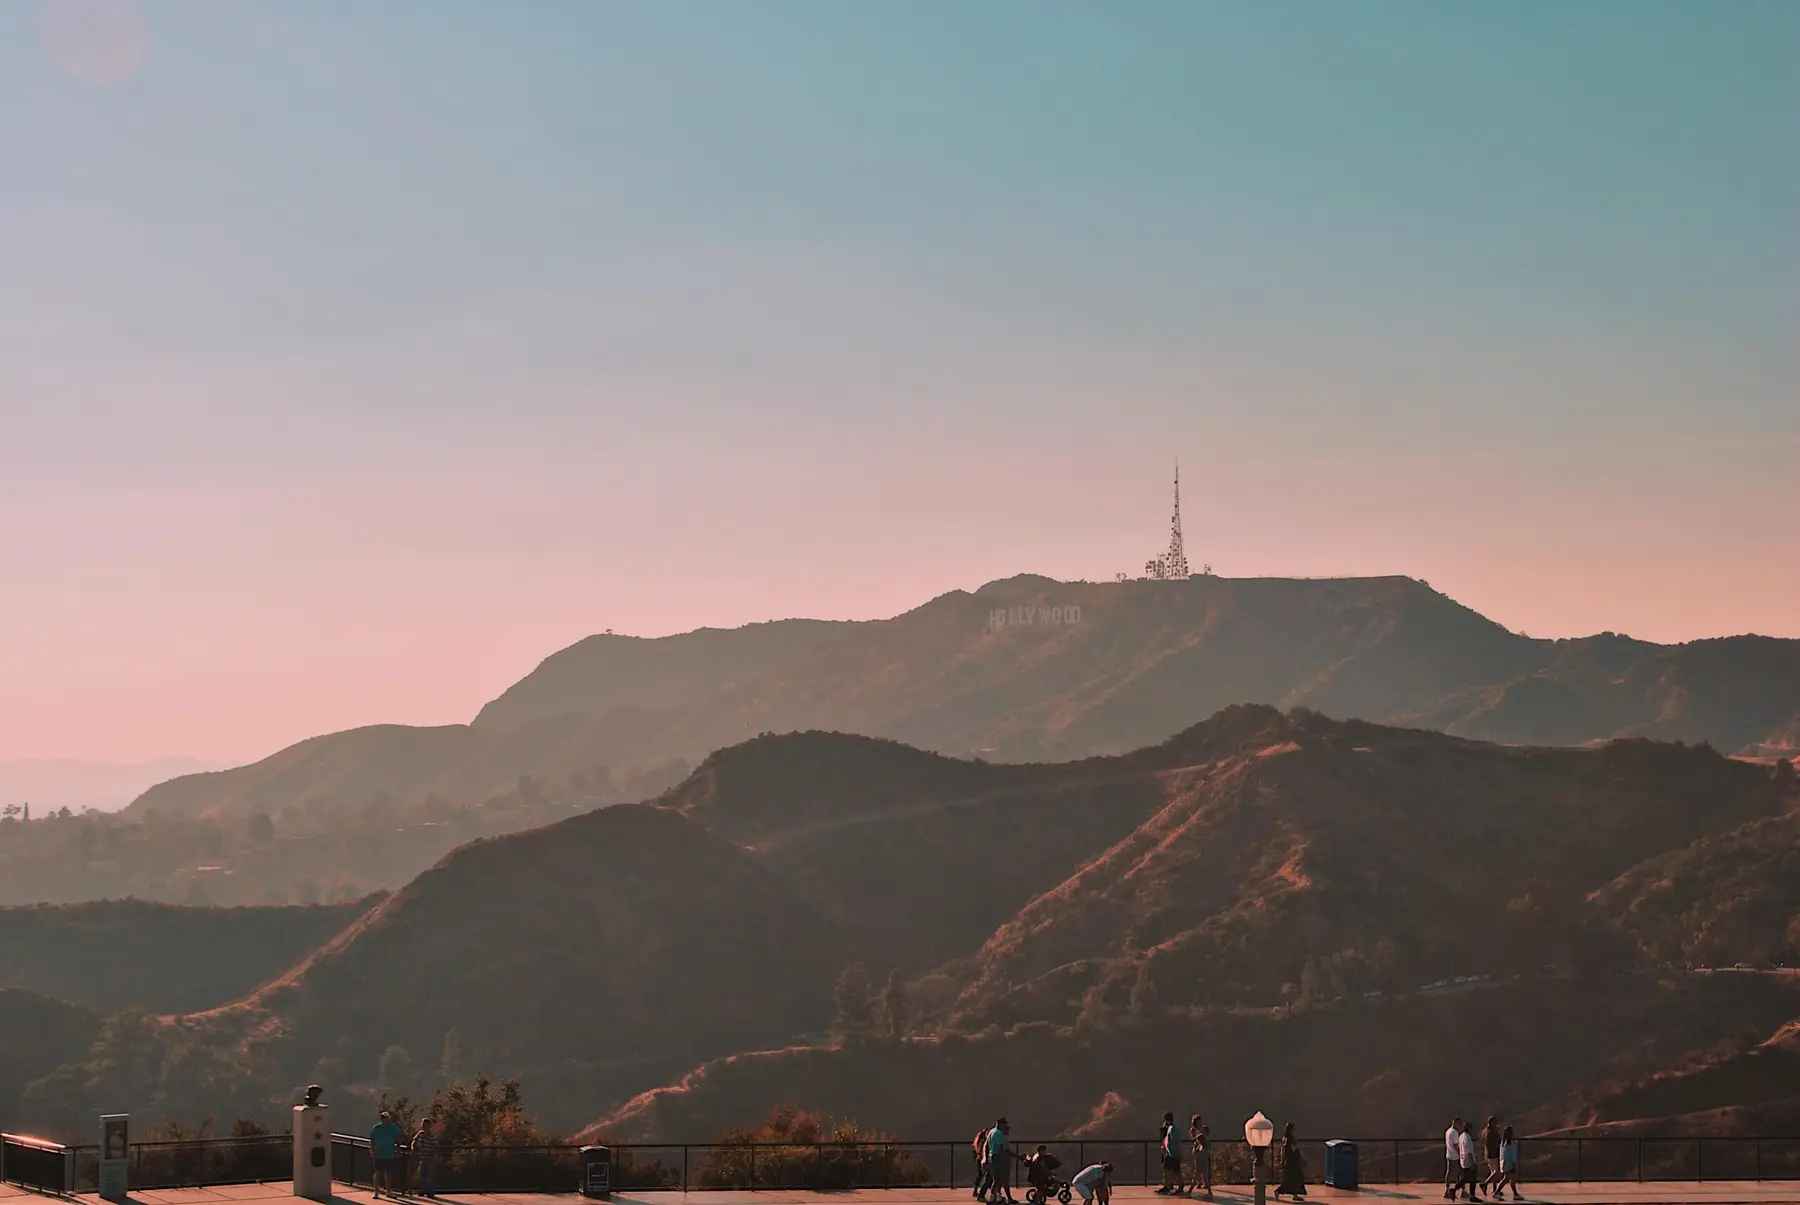
We have family in the area so we stay with them in Culver City, but there are of course plenty of options for hotels and rentals in the area. The real question is what part of the area you want to stay in. Most of the things on this itinerary are in the Hollywood/Hollywood Hills/Studio City area, so you may want to stay close to that area so you’re not having to drive as much in LA traffic.
Day 12
Los Angeles
It’s touristy, but it’s an LA classic! The area can get crowded, so I recommend doing this in the morning. There are several parking garages around the Chinese theater. Walk along Hollywood Blvd. for a bit to see some of the stars in the sidewalk, then explore the area in front of the Chinese theater to see the handprints of celebrities. There is a tour that takes you inside the theater, but I personally don’t think it’s worth doing with kids.
10-15 minute drive to Warner Bros. Studios. Map >
Learn about how shows and movies are made! There are several studio tours in the area, but this one is best for kids, although they have to be over the age of 5. (If you have kids under age 5, look at the list of alternative activities below.) The standard tour has a 1-hour guided tour, then you can go through self-guided exhibits, which will probably take about 2 hours. There is also a “plus” version of the tour that is longer and includes lunch and snacks. You can also get lunch on your own at the Central Perk Cafe. Check out their website to get a preview of what there is to see during the tour.
20-25 minute drive to Griffith Observatory. Map >
It is free to enter but you may have to pay for parking. Parking can get tough on busy days. Drive to the top of the hill to look for parking and see if you can find something there. If not, you may have to park further down the hill and hike up.
The Griffith Observatory gives you great views of LA and the Hollywood Sign. Inside the observatory, there are several exhibits, free telescopes, and a planetarium. Planetarium tickets can be purchased at the observatory. Planetarium shows are $10 for ages 13+ and $6 for ages 5-12. Shows are not recommended for children under age 5.
If it’s a nice day, there are many trails in the park that you can explore. They are rugged trails though so they are not stroller-friendly but good for kids with extra energy to burn!
If you get hungry, you can eat dinner at the Cafe on the bottom level of the Observatory.
Depending on the time of year and how your kids are doing, plan to stay for sunset and until the starts come out. The sunset views from the top are fantastic!
Alternative Ideas
There is not shortage of things to do in LA! If the 3 activities above don’t interest you, no problem! Consider any of these:
Knots Berry Farm – classic amusement park with some great roller coasters (owned by Cedar Fair). This would take the full day.
Los Angeles Zoo – an excellent zoo with lots of animals. The only reason it’s not included is because the much larger San Diego Zoo was already part of this itinerary. This could be done in half a day.
Natural History Museum of Los Angeles – dinosaur bones, stuffed animals, gems – all the natural history museum classics!
Aquarium of the Pacific – learn all about Pacific ocean wildlife at this great aquarium in the long beach area
Day 13
Universal Studios or a Beach Day
Be sure to buy your tickets in advance at https://store.universalstudioshollywood.com/
You can also buy tickets through some discount places but make sure they are legitimate. There really aren’t discounts on one day tickets so if it seems too good to be true, it is.
Consider buying the Express pass on really busy days. The busiest days are usually summer weekends. The express pass allows you to skip the line and gets you entrance into Super Nintendo World without joining a virtual line. It will definitely help you get everything done in the park in one day on busier days, but it’s expensive. We have yet to justify the extra cost with 5 people, but we’ve also never been on a super crowded day.
Another option currently offered is a ticket add-on that gets you early entry into Nintendo World. If Nintendo World is your main priority, this may be worth doing. The cost starts around $20/person.
- Breakfast. Eat breakfast at your hotel to save time.
- Park. Plan to reach the parking entrance about an hour before the park opens. This gives you enough time to park, walk through City Walk to the park entrance, go through security, and get a good spot in line. They occasionally open the gates early so you can start heading toward the lower lot before the park actually opens.
- Check for virtual lines. As you wait to enter the park, pull up the app and see if there are any virtual lines needed that day. Sometimes Nintendo World requires a virtual line to enter, and occasionally others.
- Enter the park. When the park opens, don’t just do the first attraction you see, head to the lower lot (you will be entering on the upper lot).
- Head to Super Nintendo World. If there is no virtual line needed, if you have an express pass or an Nintendo early entry pass, head straight to Super Nintendo World. Find a kiosk selling Power Up bands or go into the store and purchase Power Up bands. I do think these enhance the experience, but at $40, you may not want to buy one for everyone. Parents can buy them for their kids and enjoy watching their kids rack up points and do experiences without having to have a band for yourself.
- Mario Kart Ride. Get in line for Mario Kart: Bowser’s Challenge. While in line, make sure you sync your Power Up bands to the app by scanning the QR code on the back of the bands. Explore the app while in line and start earning points! The ride itself is awesome and everyone should try it! There is a 40″ heigh requirement but rider swap is offered.
- Nintendo Games. When you’re done with Mario Kart start playing games in the land and collecting keys. If you collect 3 keys you get to do the finale in Bowser’s Castle. Parents can accompany their kids in the finale even if they don’t have a Power Up band.
- Food. Get some food at the Toadstool Cafe! You may have to scan a QR code to join a wait list but there is plenty to do in this land while you wait.
- Transformers: The Ride. When you are done with Super Nintendo land, move on to the other big attractions in the lower lot. First up – Transformers: The Ride. This ride has a 40″ height requirement but may be a bit scary for smaller children. It combines physical sets and 3D simulation.
- Jurassic World: The Ride. Animatronic dinosaurs are out to get you as you ride through a river and splash down a 84′ drop. You will get splashed on this ride so plan accordingly. There is a 42″ height requirement.
- DinoPlay. If you have any kids under 12 with you, they will enjoy this dino-themed play area! It’s also a great spot for smaller kids to play while older kids and adults ride the next ride, Revenge of the Mummy.
- Revenge of the Mummy. The Mummy is an indoor roller coaster thrill ride with a 48″ height requirement. It is dark and pretty scary but older kids, teens and adults will love it!
- Head back up to the Upper Lot.
- The Simpsons Ride. 3D simulator ride with a 40″ height requirement. If you get motion sick this ride might bother you. If it does, close your eyes!
- Studio Tour. This is a highlight of the park and is not to be missed! This tram tour takes you backstage to the working Universal lot to learn about how movies are made, plus takes you through the King Kong 3D experience and a finale with Fast & Furious. There’s no height requirement. The experience takes about 45 minutes so plan accordingly.
- Water World Show. Check the times for when this show is offered. You’ll need to arrive at least 15 minutes before the show. It’s a very exciting show that all ages should enjoy! The show is back toward the entrance so it’s a bit of backtracking, but the it’s good to do a show in the late afternoon when other lines are long.
- The Secret Life of Pets. A dark ride that takes you through physical sets and has a fun queue. This ride is a delight and only has a 34″ height requirement.
- Despicable Me Minion Mayhem. A fun 3D simulator ride that takes you on an adventure with the Minions, Gru, and the girls. 40″ height requirement.
- Silly Super Fun Land. A kids area themed after the amusement park from the Despicable Me movies. The area includes a splash area where kids can get soaked if they want, a small dry playground area, and the Silly Swirly ride (classic Dumbo-style ride). Personally, unless it’s really hot and you brought bathing suits with you, skip this area because your kids will be tempted to get very wet. I would also skip this area if you don’t have younger kids.
- Enter Harry Potter Land. Check out the shops and grab a butter beer at the Hogs Head.
- Flight of the Hippogriff. This small kids coaster is great if you have kids under 12. It only has a 39″ height requirement and is a great “first coaster” for many kids.
- Harry Potter and the Forbidden Journey. The main Harry Potter attraction that is inside Hogwarts Castle. The queue takes you through the castle and the ride itself is a unique dark thrill ride that is so much fun! There is a 48″ height requirement and rider swap is offered.
- Check to see if there are any nightime shows on the day you are there. If not, head back to your hotel. If you did everything in this list then you had a long day but awesome day and you deserve some rest!
If you have small children or just aren’t interested in doing Universal, I would recommend visiting one (or more) of the great beaches in the LA area. Options include (in order from furthest north):
Santa Monica State Beach – busy but iconic beach with lifeguards, a boardwalk, playgrounds, and you can walk to the Santa Monica Pier that has amusement park rides, shops, and restaurants.
Venice Beach – another famous beach just south of Santa Monica Beach with a bohemian vibe and a boardwalk full of shops and street performers.
Mother’s Beach at Marina Del Ray – this beach is in the marina so there are no big waves and has a shallow swimming area making it perfect for families with little kids!
Playa del Ray Beach – quieter then Santa Monica and Venice Beach but still has restrooms and lifeguards on duty.
There are a lot of indoor options in LA if needed:
Aquarium of the Pacific – learn all about Pacific ocean wildlife at this great aquarium in the long beach area
Natural History Museum of Los Angeles – dinosaur bones, stuffed animals, gems – all the natural history museum classics!
California Science Center – there are a lot of fun, hands-on exhibits at this free science museum plus an IMAX theater.
Getty Museum – this is a great art museum if you have kids that like (or will at least tolerate) looking at art.
Day 14
Travel Home
Make sure you calculate what time you need to wake up and what time to leave your hotel based on how long it takes your family to:
- get dressed and pack
- eat breakfast (about 20 minutes)
- load your car (about 10 minutes)
- get gas and throw away all the trash in your rental car that your kids stashed everywhere (about 10 minutes)
- drive to the rental car return (depends where you are staying so plug it in your map to get a time)
- unpack the rental car and do the return process (15 minutes)
- get a shuttle to the terminal (averages about 20 minutes)
- get through ticketing, bag check, and security (depends on date and time, could be anywhere from 30 min to 2 hours)
- take all kids to the bathroom, get some food or snacks if needed (15-20 minutes)
- get to your gate with a little time to spare before boarding (about 45 minutes before your scheduled departure time)
Try to balance erring on the side of caution but also not getting to your gate 3 hours early with bored kids!
Help Our Itinerary Database Grow
Do you have feedback about this itinerary? If something is out of date, or you have a suggestion, or you would like to share about your experience using this itinerary, please share!
If you have taken a trip and have a great itinerary to share, please share it with us so other families can benefit from your research and have a great vacation! If your itinerary is accepted you will get free membership to this site for a year!
You can also request an itinerary! Requests help us know which itineraries to focus on first. We have SO many in the works! But we thoroughly research and test them so it takes time.